CD1000 Pin Welder Instruction Manual
K.C.D. Studwelding, Cheltenham, Victoria. Tel: 03 9584 1588, Fax: 03 9584 1688
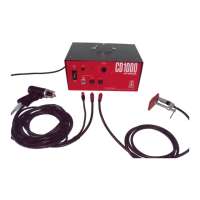
HOW TO USE YOUR CD1000 PIN WELDER
OPERATION
1. Uncoil the gun and earth cables. Attach the gun cables and earth cable to the stud
welding unit.
The earth cable with attached clamp is connected to the negative front panel
connector (marked negative). Make sure the plug is turned and locked into
position.
The gun weld cable is connected to the positive front panel connector (marked
positive). Make sure the plug is turned and locked into position.
The control cable is connected to the 4 pin front panel connector (marked control
cable). Make sure the plug is clicked correctly into position.
NOTE: This is a standard setting for welding onto galvanised sheet. If you have a
different application, refer to the recommended polarity on page 5.
2. Attach your earth cable to your material to be welded. Make sure the clamp is secured
tightly.
3. Plug your machine into a 240v outlet.
4. Turn the voltage control dial to zero. This control dial sets the capacitor voltage.
5. Turn your CD1000 on.
6. Turn the voltage control dial to setting 8. This is an average setting. We recommend
that you test fire some pins or studs to check that you are getting the required power.
Your CD1000 is now ready to use.
7. Insert the capacitor discharge (CD) pin into the gun. Push the pin in until it is flush
with the brass nozzle.