Do you have a question about the KANSAI SPECIAL WX Series and is the answer not in the manual?
| Brand | KANSAI SPECIAL |
|---|---|
| Model | WX Series |
| Category | Sewing Machine |
| Language | English |
Select the proper needle for the fabric and thread. Lists Schmetz and Organ needle types and sizes.
Instructions on how to replace the needle, emphasizing needle scarf orientation and safety precautions.
Guide on correctly threading the machine, warning of issues from incorrect threading.
Details on recommended machine speeds and pulley rotation direction for optimal machine life.
Information on the motor type, belt type, and selecting the correct motor pulley based on machine speed.
Specifies the use of genuine Kansai Special oil and provides its part number and volume.
Instructions for filling the machine with oil and checking the oil flow, including oil level indicators.
Procedure for replacing machine oil and filter element, emphasizing frequency for machine longevity.
Diagram and specifications for cutting the machine table, including specific areas for EMK type and presser foot lift.
Instructions and illustration for securely mounting the sewing machine onto the table using bolts and rubber cushions.
Guidance on setting the correct angle and height of the looper relative to the needle for optimal stitch formation.
Procedure for adjusting the looper's horizontal movement to ensure correct needle clearance and timing.
Details on setting the looper's distance from the needle bar, with a table for different needle spaces.
Instructions for adjusting the needle height relative to the looper, ensuring proper needle drop into the needle hole.
Procedure for setting the front-to-back clearance between the needle and looper for correct stitch formation.
Guidance on adjusting the looper's orbital path to prevent skip stitching and needle breakage.
Instructions for adjusting the front-to-back movement of the looper based on needle count to prevent rubbing and skip stitching.
Details on aligning the rear needle guard with the needle and looper for correct needle guidance and clearance.
Instructions for positioning the front needle guard to ensure proper clearance with the needle and looper during operation.
Guidance on setting the height and left-to-right position of the spreader relative to the needle plate and needle.
Instructions for adjusting the spreader thread guide to ensure correct thread path and tension.
Procedure for adjusting the timing of the spreader relative to the needle, with reference marks for advancing or delaying timing.
How to adjust the height and tilt of the feed dogs relative to the needle plate for proper fabric feeding.
Instructions on adjusting the stitch length using a push button and handwheel, with a table of stitch lengths and stitch counts.
Explanation and adjustment procedures for normal and reverse differential feed ratios for fabric gathering or stretching.
Guidance on setting presser foot pressure for optimal fabric feeding and stitch uniformity.
Instructions for positioning the presser foot correctly and setting the foot lift height based on machine configuration.
How to adjust the height of needle thread guides for proper thread path and tension control.
Procedure for positioning the thread guide on the needle thread take-up for optimal thread slack and tension.
Instructions for synchronizing the needle thread take-up timing with the needle bar movement for correct stitch formation.
How to adjust the needle thread guard's position relative to the needle and thread, with specific settings for cotton and woolly threads.
Guidance on threading the spreader thread take-up, with options for woolly, cotton, or spun threads.
Instructions for aligning looper thread guides for proper thread supply and tension, with specific notes for woolly threads.
How to position the looper thread take-up and its thread guide for correct looper thread path and slack.
Instructions on correctly inserting lace or elastic, including roller operation.
How to adjust the tape guide and upper knife guide on the presser foot for proper lace/elastic feeding.
Procedure for adjusting the front of the presser foot to improve fabric feeding for heavy weight elastic.
Guidance on installing the tape guide, ensuring smooth fabric feeding and proper clearance.
How to adjust the feeding amount of lace/elastic and increase the adjustable range.
Instructions for adjusting the pressure of the elastic feed small roller for different types of elastic.
Steps to check and troubleshoot the elastic feeder for uniform feeding and to prevent issues like needle breakage.
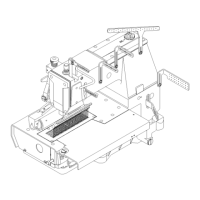
How to adjust the position of the lower knife holder and oiling points for the EMK front knife device.
Step-by-step guide for replacing the lower knife of the EMK front knife device.
Procedure for replacing the upper knife of the EMK front knife device.
How to adjust the overlap between the upper and lower knives for proper cutting action.
Instructions on sharpening the lower knife, and when to replace the upper knife if dull.
Explanation of the different timing belts for the X Series based on shaft distance.
Step-by-step instructions for removing the timing belt, including loosening set screws and the handwheel.
Procedure for installing the timing belt, ensuring correct alignment and tension.