This document is a Use & Care Guide for a Kenmore Canister Vacuum Cleaner, Model/Modelo: 125.10701610.
Function Description:
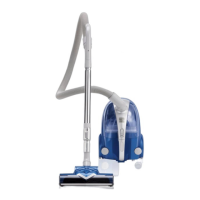
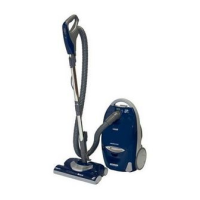
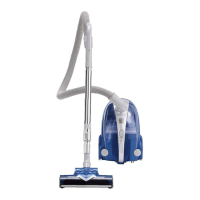
The Kenmore Canister Vacuum Cleaner is designed for household cleaning, offering effective dirt pick-up through its various components and attachments. It functions by creating suction to collect dust and debris into a dust bin, which can then be emptied and cleaned. The vacuum cleaner is equipped with a thermal protector to prevent overheating and a cord rewind feature for convenient storage.
Important Technical Specifications:
- Model Number: 125.10701610
- Power Source: 120 Volt outlet (polarized plug)
- Filters:
- Exhaust Filter (HEPA Media Filter inside): Part No. KC38KDRDZ000. Requires replacement annually or more frequently with heavy use.
- Secondary Filter: Part No. KC37KDRDZ000.
- Dust Bin Filter: Part No. KC30KDRDZ000.
- Safety Features:
- Thermal Protector: Automatically trips to protect the motor from overheating if airflow is restricted.
- Polarized Plug: Designed to fit into a polarized outlet only one way to reduce the risk of electric shock.
- Warranty: Kenmore Limited Warranty for ONE YEAR from the date of sale for defects in material or workmanship. WITH PROOF OF SALE, a defective appliance will receive free repair or replacement. This warranty covers ONLY defects in material and workmanship and does not apply to:
- Expendable items like filters, bags, or screw-in base light bulbs.
- Service to clean or maintain the appliance, or to instruct the user.
- Service calls for problems with house fuses, circuit breakers, house wiring, or gas supply systems.
- Damage from installation not performed by Sears authorized service agents, including installation not in accord with electrical, gas, or plumbing codes.
- Damage from appliance alteration, abuse, misuse, or use for other than its intended purpose.
- Damage from use of detergents, cleaners, chemicals, or utensils other than those recommended.
- Damage from unauthorized modifications.
- Service to an appliance if the model and serial plate is missing, altered, or cannot easily be determined.
- Disclaimer of implied warranties: limitation of remedies. Customer's sole and exclusive remedy under this limited warranty shall be product repair or replacement as provided. Implied warranties, including warranties of merchantability or fitness for a particular purpose, are limited to one year. Some states and provinces do not allow the exclusion or limitation of incidental or consequential damages, so these limitations may not apply. This warranty gives specific legal rights, and other rights may vary from state to state.
Usage Features:
- Assembly:
- Hose: Insert the hose stopper into the air inlet. To remove, press buttons on the hose stopper and pull the hose upward.
- Wand (Telescoping): Insert the wand into the handle and press together tightly.
- Turbine Unit: Insert the turbine unit into the wand and press together tightly.
- Floor Brush: Insert the floor brush into the wand and press together tightly.
- Wand Length Adjustment: Adjust by pushing the slider wand adjust button. Ensure a "click" sound is heard. If the wand doesn't extend/retract easily, pull/push the wand while pressing the slider.
- Combination Tool: Stores on the wand when not in use. Includes a crevice tool for edges and gaps, and a dusting brush for fragile or easily scratched items.
- Power On/Off: Push the ON/OFF switch on the canister.
- Cord Rewind: Turn off and unplug the vacuum cleaner, hold the plug, and push the cord rewind button.
- Vacuuming Tips:
- Sweeping Pattern: Push the floor brush straight away and pull straight back. Change nozzle direction into the next section. Use slow, gliding motions.
- Hose Swivel: Allows the hose to turn without moving the canister, useful for small areas. Check for twisting before pulling the canister.
- Stairs: Use care when placing the canister on stairs. Do not pull on the hose to move the canister from one stair to the next; use the handle grip.
- Attachments: The manual provides an "ATTACHMENT USE TABLE" indicating which attachments (Turbine Unit, Floor Brush, Combination Tool with Crevice Tool/Dusting Brush) are suitable for different cleaning areas (Furniture, Between Cushions, Drapes, Stairs, Bare Floors, Carpeted Floors/Rugs, Walls). Always clean attachments before using on fabrics.
- Suction Control: The turbine unit has a suction control to adjust the force required to push/pull the floor brush. Opening the control decreases suction; closing it increases suction.
- Hose Stand: The vacuum cleaner can be stored with the floor nozzle, wand, and hose connected. The wand must be collapsed to its shortest length. To store, stand the cleaner up, align arrows on the wand and turbine unit, insert the wand holder into the slot on the canister, and wind the hose around the wand.
Maintenance Features:
- Removing Clogs:
- Hose: Pull out the handle by turning the removal ring. Remove clogs from the handle and shake the hose. Reinsert the handle.
- Turbine Unit: Press latches inward, lift off the clean-out port cover, remove debris, and reinstall the cover (ensure a "click").
- Check dust filter cover, secondary filter, and exhaust filter for clogs.
- Cleaning Exterior and Attachments: Turn off and unplug. Wipe outer surfaces with a clean, soft cloth dipped in mild liquid detergent and water, then wrung dry. Wipe dry. Do not use wet attachments or attachments used in dirty areas on other surfaces without washing.
- Emptying Dust Bin:
- Turn off and unplug.
- Push the dust bin release button and lift off the dust bin.
- Empty the dust bin into a trash container.
- Close the filter door and reattach the dust bin.
- CAUTION: Do not use the vacuum cleaner without the filter, as it may damage the motor.
- Cleaning Dust Bin Filter:
- Turn off and unplug.
- Remove the dust bin.
- Slide the lever to remove embedded dust.
- Push the filter door release button to open the dust bin.
- Use the included cleaning brush to clean loose dirt from the filter folds.
- Close the filter door and reattach the dust bin.
- Washing Dust Bin:
- Turn off and unplug.
- Remove loose dust (as per emptying instructions).
- Push the dust filter cover release latch to pull out the dust filter cover.
- Wash all parts of the dust bin, including the filter. DO NOT wash in the dishwasher.
- Allow the filter to air dry for 24 hours. DO NOT install damp. DO NOT attempt to dry with a hair dryer or clothes dryer.
- Install the dust filter cover along the locating strip (ensure a "click"). DO NOT operate without the filter installed.
- Close the filter door and reattach the dust bin.
- NOTES: Replace the filter if torn or perforated. Replace the filter when cleaning no longer restores full suction power.
- Replacing Exhaust Filter (HEPA Media Filter):
- WARNING: Always unplug the power cord.
- Open the filter cover by pressing the release latch and lifting out.
- Remove the HEPA media exhaust filter.
- Install a new HEPA media exhaust filter by inserting tabs on the bottom into the slots and pressing into place. Ensure the seal faces the canister.
- Reinstall the filter cover by inserting tabs on the top into the slots and pressing into place until the release latch snaps.
- Replacement is recommended annually, or more often if vacuuming fine dust reduces airflow.
Troubleshooting:
The manual provides a table for common problems, possible causes, and solutions:
- Vacuum cleaner won't start: Unplugged at wall outlet (plug in firmly, push ON/OFF switch), tripped circuit breaker/blown fuse (reset breaker or replace fuse).
- Poor job of dirt pick-up: Full or clogged dust bin (empty dust bin), clogged airflow passages (clear passages), dirty filters (clean/change filters), hole in hose (replace hose), dust bin open (close dust bin).
- Vacuum cleaner starts but shuts off: Tripped thermal protector in canister (see "Thermal Protector" section).
- Cord won't rewind: Dirty power cord (clean power cord), cord jammed (pull out cord and rewind).
For further assistance, contact the Vacuum Cleaner Help Line at 1-877-531-7321. Model and serial numbers are required. Replacement parts can be ordered by calling 1-844-553-6667 or visiting www.searspartsdirect.com.