Do you have a question about the Kenmore 146.23681310 and is the answer not in the manual?
Steps to take if you detect a gas leak, including shutting off the appliance and contacting the gas supplier.
Read manual before use, wear protective gloves, use only with supplied LP gas and regulator, comply with local codes.
Explanation of DANGER, WARNING, and CAUTION symbols and their meanings for hazard identification.
Section to fill out product record information like model number, serial number, and date purchased.
Details of the one-year limited warranty for the Kenmore grill, including exclusions and limitations.
Information on purchasing a repair protection agreement for expert service, parts, and labor coverage.
Warning about combustion by-products and product chemicals known to cause cancer or reproductive harm.
Coverage for defects in material/workmanship within one year; burner rust-through replacement for ten years.
List of items not covered, including expendable items, service calls for instruction, misuse, and unauthorized modifications.
Limits remedies to repair, limits implied warranties, and disclaims liability for incidental or consequential damages.
DANGER and WARNING notices regarding LP cylinder storage, handling, and potential hazards like leaks.
Specifications for LP cylinders, including size, construction, and valve type (Type 1 with OPD).
Information on LP gas properties and guidelines for safe cylinder filling, including using licensed dealers.
Information on using exchange services for LP tanks and ensuring they are safe and properly equipped.
Procedure for performing a leak test on the LP tank and connections using a soap and water solution.
Step-by-step instructions for safely connecting the regulator to the LP tank valve.
Detailed steps for leak testing the grill's gas system, including using soapy water and checking for bubbles.
DANGER and WARNINGs regarding inserting tools into valves, leaks, and outdoor appliance installation.
Important warnings for safe grill use, including keeping area clear, using in ventilated space, and avoiding balconies.
Tips for safe operation, such as checking coupling nut, turning off valves, using long-handled utensils, and cleaning grease tray.
Instructions for lighting the grill using the push-and-turn electronic ignition system.
Instructions for lighting the grill using a match, including main burners and side burner.
Procedures for checking burner flame, ignitor, valves, and hoses for proper function.
Guidelines for cleaning different grill surfaces like porcelain, painted, and stainless steel.
Warning about spiders in venturi tubes and instructions for cleaning burner assembly.
Detailed procedures and methods for cleaning the burner tubes and checking for damage.
Guidance on cleaning and storing the grill properly, including LP cylinder disconnection.
Explanation and instructions for cooking with indirect heat using one or two burners.
Four basic steps for food safety: Clean, Separate, Cook, and Chill.
Recommended safe minimum internal temperatures for various meats and poultry when grilling.
A detailed list of all grill parts with corresponding keys, descriptions, quantities, and part numbers.
Continuation of the parts list, including unpictured hardware and manual, with contact information.
Contact information for obtaining replacement parts or assistance with missing or damaged components.
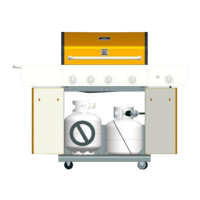
A visual representation of the grill with all parts numbered for identification.
Guide on how to correctly unpack the grill parts from the shipping box and identify initial components.
Instructions for removing additional panels, doors, shelves, and support bars from the packaging.
Procedure to remove remaining panels and turn the grill head on its side to remove top Styrofoam.
Guide to lifting the grill head from Styrofoam, opening the lid, and removing internal boxes and packing.
List of required tools and provided hardware with quantities for the assembly process.
Instructions for connecting the two bottom shelves using M6x13 screws and M6 Nuts.
Guide to inserting and securing bottom shelf support bars using M6x40 screws and M6 flat washers.
Instructions for attaching casters to the bottom shelf using M6x13 screws and main cabinet door magnets.
Procedure for inserting the tank holder into the bottom shelf and securing it with cotter pins.
Instructions for attaching main cabinet side panels and back panel to the bottom shelf using screws.
Guide to attaching the tank baffle bar and cart support angle bars to the cabinet structure.
Instructions for attaching back panel, outer panel, and shelf for the left cabinet.
Instructions for attaching back panel, outer panel, and tank baffle for the right cabinet.
Guide to installing door brackets for both left and right cabinet doors, ensuring proper alignment.
Instructions for attaching magnets to the main cabinet side panels for the left and right cabinet doors.
Guide to attaching ignition module boxes and wire clips to the main cabinet panels.
Instructions for attaching heat insulation panels and brackets to the cabinet structure.
Procedure for lifting and securing the grill head onto the assembled cart using screws and washers.
Guide to placing and securing the left side shelf to the grill head and left cabinet.
Instructions for attaching slide bars to the drawer and mounting the drawer to the front panel.
Guidance on removing, adjusting vertical alignment, and adjusting horizontal alignment of the drawer.
Instructions for attaching the push bar to the left side panel using M6x17 screws.
Guide to attaching the right side shelf fascia and the shelf itself to the grill and right cabinet.
Instructions for attaching the right side shelf to the right cabinet and the fascia to the control panel.
Guide to attaching the folding side shelf support brackets and the shelf itself to the right cabinet.
Instructions for installing the side burner, including wire connections and securing the burner.
Guide to connecting wires to the right ignition module and installing the battery.
Instructions for connecting wires to the left ignition module and installing the battery.
Guide to attaching door handles and installing the main cabinet doors onto the cart.
Instructions for attaching handles to cabinet doors, installing the tool hook, and hanging doors.
Guide to sliding in the grease tray, placing heat diffusers, cooking grates, and warming rack.
Instructions for attaching the grease cup to its clip and the match holder to the grill.
Guide to feeding the regulator hose and placing the LP tank securely in the bottom shelf, then locking casters.
Actions to take if a gas leak cannot be stopped or if a fire occurs due to gas leakage.
Troubleshooting steps for burners not lighting with the igniter, covering gas issues and electrode problems.
Solutions for burners not lighting with a match or having sudden drop in gas flow or flame blowouts.
Addressing issues like flare-ups, persistent grease fires, and flashbacks in burner tubes.
Diagnosing issues when no sparks or ignition noise is heard, checking battery and module.
Troubleshooting no sparks but audible noise, focusing on output lead connections.
Addressing sparks present but not at all electrodes or at full strength, checking connections and battery.
| Brand | Kenmore |
|---|---|
| Model Number | 146.23681310 |
| Fuel Type | Liquid Propane |
| Number of Main Burners | 4 |
| Ignition System | Electronic |
| Ignition Type | Electronic |
| Material | Stainless Steel |