EasyManua.ls Logo

Kenmore 365.1664194 User Manual

Kenmore 365.1664194
21 pages
To Next Page IconTo Next Page
Page #1 background imageLoading...
Page #1 background image
q0L++LL 3.'J. lbb41'_ )
L_;4"-'IIP[OV[_L_I'K %FWI_P,H_C|IIr_[
!_. I.E .o.t.So_.,'=2_=_t._
I. LOCA'IE AND IDEt;TIFY Tile PARTS .................................. I
2. TItRFA:);."',':. THE L',IACll+=_I£
TtlREADING THE FL_CRINE....................................... 2
THREADING TIlE LOWER LOOFLR ................................. 3
THRFADING Tile UP! ER LOOPER................................. 6 /
TIIREADI[_G THF NEEDLE O.'; TIll" RIGHT .......................... 8"'J
TItFF.ADING THE h'EEDLF O:; TItF. LF_rI ......................... lO- 11
THRI'ADING TIlE HACItINE ( 3 TIIR_'AD:;) ,, ;:IDI/i';AI_RO_: ++'TI1CII ....... 17
3. WIIAT TO DO WIIEN ............................................... ]
4. RLHOVING AND ATTACHIt,IG TIIE PARIS
FACE PLATE IN,IT AND BELT COVER .............................. 14
MACIIINE BASE................................................ 15
SIDE COVER.................................................. 16
LOOPER COVERtRIIT ........................................... 17
FRONT PANEL UIqIT............................................ 18
ADJUSTMENT
GAUGE FOR SERVICING ........................................ 19
NEEDLE BAR HEIGHT ......................................... 20
PP,EFSER EAR HEIGHT ......................................... 21
FEED DOG HEIGHT ............................................ 22
FEED TIMING ................................................ 23
UPPER KNIFE TIHING ......................................... 2A
LOWER LOOPER POSITION .............
CLEARANCE BETREEN NEEDLE AND LOWER LOOPeR/NEEDLE GUARDS..26=2?
LOWER LOOPER 3IMING ......................................... 28
UPPER LOOPER POSITION ....................................... 29
UPPER & LOWER LOOPERS TIMING ................................ 30
CLRAI_NC£ BE_EEN LOOPERS ................................... 31
CLEARANCE BEll_EEN NEEDLE AND UPPER LOOPER ................... 32
POSITION OF FJtIVES .......................................... 33
POSITION OF LOOPER TItREAD GUIDES ........................... 34
DIFFERENTIAL FEED RATIO ..................................... 35
CLEARANCE BLI"WEEN l_IN & SUB FEED DOGS...................... 36
STITCH LENGTH ............................................... 37
6. OILING ........................................................ 38
LOCATE AND IDENTIFY THE pARTS.
pressure adJustLnK
screw
Face plate
Needle thread
tension dial
Right needle
thread guI
Side cover
tarrying handle
Thread guide bar
Thread guide
Thread guide
plate
Spool pin
Spool holder
Spool stand
Stitch length
dial
Differential
feed dial
thread
Power switch
wheel
Question and Answer IconNeed help?

Do you have a question about the Kenmore 365.1664194 and is the answer not in the manual?

Kenmore 365.1664194 Specifications

General IconGeneral
BrandKenmore
Model365.1664194
TypeMechanical
Buttonhole Styles4-Step
Automatic Needle ThreaderNo
Drop FeedYes
Free ArmYes
Stitch SelectionDial
MechanicalYes

Summary

Identify Overlock Machine Parts

Machine Component Identification

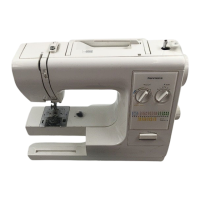
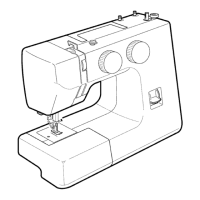
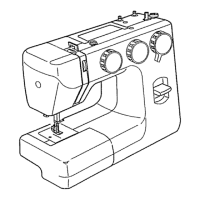
Diagram labeling the primary parts of the overlock sewing machine for identification.

Overlock Machine Threading Introduction

Initial Threading Setup and Preparations

Steps for preparing the machine before threading, including thread guide setup and tension dial settings.

Lower Looper Threading Procedure

Step-by-Step Guide for Lower Looper

Detailed instructions with diagrams for correctly threading the lower looper.

Upper Looper Threading Procedure

Step-by-Step Guide for Upper Looper

Detailed instructions with diagrams for correctly threading the upper looper.

Right Needle Threading Guide

Procedure for Threading Right Needle

Instructions and diagrams for threading the right needle on the overlock machine.

Left Needle Threading Guide

Procedure for Threading Left Needle

Instructions and diagrams for threading the left needle on the overlock machine.

Three-Thread Stitch Machine Threading

Threading for Wide and Narrow Stitches

Guidance for threading the machine for both wide and narrow three-thread overlock stitches.

Troubleshooting Common Sewing Issues

Fabric Feed and Needle Breakage Solutions

Addresses fabric feeding problems and needle breakage with causes and corrective actions.

Face Plate and Belt Cover Maintenance

Face Plate and Belt Cover Removal/Attachment

Instructions for removing and attaching the machine's face plate and belt cover.

Machine Base and Side Cover Procedures

Machine Base Removal and Attachment

Steps for removing and attaching the machine base unit.

Side Cover Removal and Attachment

Steps for removing and attaching the side cover unit.

Looper Cover and Front Panel Unit Procedures

Looper Cover Unit Removal and Attachment

Instructions for removing and attaching the looper cover unit.

Front Panel Unit Removal and Attachment

Instructions for removing and attaching the front panel unit.

Servicing Gauge and Needle Bar Height

Servicing Gauge Specifications and Application

Details on the servicing gauge and its specifications for various measurements.

Needle Bar Height Adjustment Procedure

Procedure for setting and adjusting the needle bar height for optimal performance.

Presser Bar Height Adjustment

Correct Setting and Adjustment Procedure

Procedure for setting and adjusting the presser bar height.

Feed Dog Height Adjustment

Correct Setting and Adjustment Procedure

Procedure for setting and adjusting the feed dog height.

Feed Timing Adjustment

Correct Setting and Adjustment Procedure

Procedure for adjusting the feed timing of the sewing machine.

Upper Knife Timing Adjustment

Correct Setting and Adjustment Procedure

Procedure for adjusting the upper knife timing.

Lower Looper Position Adjustment

Correct Setting and Adjustment Procedure

Procedure for setting and adjusting the lower looper position.

Needle and Lower Looper Clearance

Setting Needle-Looper and Needle-Guard Clearance

Procedure for adjusting clearance between needles and lower looper/guards.

Lower Looper Timing Adjustment

Correct Setting and Adjustment Procedure

Procedure for setting and adjusting the lower looper timing.

Upper and Lower Loopers Timing Synchronization

Synchronizing Upper and Lower Looper Timing

Procedure for synchronizing the timing of both upper and lower loopers.

Upper Looper Position Adjustment

Correct Setting and Adjustment Procedure

Procedure for setting and adjusting the upper looper position.

Clearance Between Loopers

Setting Looper-to-Looper Clearance

Procedure for adjusting the clearance between the upper and lower loopers.

Needle and Upper Looper Clearance

Setting Needle-Upper Looper Clearance

Procedure for adjusting clearance between the needle and upper looper.

Position of Knives Adjustment

Setting Lower and Upper Knife Positions

Procedure for leveling the lower knife and setting the upper knife position.

Looper Thread Guide Positions

Adjusting Looper Thread Guides and Take-Up Lever

Procedure for adjusting the lower looper thread guide and take-up lever positions.

Differential Feed Ratio Adjustment

Setting the Differential Feed Ratio

Procedure for adjusting the differential feed ratio for varied fabric handling.

Main and Sub Feed Dog Clearance

Adjusting Main and Sub Feed Dog Clearance

Procedure for setting the clearance between the main and sub feed dogs.

Stitch Length Adjustment

Setting the Actual Stitch Length

Procedure for adjusting the stitch length to the desired measurement.

Machine Oiling Procedure

Recommended Oiling Points and Frequency

Guidance on where and how often to apply oil for machine maintenance.

Related product manuals