EasyManua.ls Logo

Kenmore 60556 User Manual

Kenmore 60556
8 pages
To Next Page IconTo Next Page
Page #1 background imageLoading...
Page #1 background image
®
FOO WASTE DISPOSERS
J
Installation, Care & Use Manual
TOOLS AND MATERIALS YOU WILL NEED:
Slotted Screwdriver, Adjustable Pliers, Plumber's Putty,
Electrical Tape
TOOLS, MATERIALS, AND ACCESSORIES
YOU MAY NEED:
Phillips Screwdriver, Drain Auger, 3/8" Electrical Clamp
Connector, Wire Nuts (2), Second 1 1/2" Drain Trap,
Hammer, Hacksaw, Water Hose Clamp, Pipe Wrench,
Copper Ground Wire, Dishwasher Drain Connection Kit, Air
Gap, Electrical On/Off Switch, Drain Tube Extension
Read through the entire installation, Care
& Use manual before installing the dis-
poser. Determine which of the tools,
materials, and accessories you will need
before you begin. Make sure you have all
necessary disposer parts before install=
ing the disposer (see part identification
diagram below).
O s j/K OR
'LT-- _t _,-f",_P -
1 <=_-'"-Je .................. fl/r,l. _-N
0_ _ U
Mounting Assembly Disposer Two-Bolt Discharge
A: Stopper H: MountingGasket/SplashBaffle N:Bolt(2)
B:Sink Flange h LowerMounting Ring ._lr O:Discharge Tube (1-1/2" Diam.)
C:FiberGasket J: DishwasherInlet " = P: Flange
D: Backup Ring K: Discharge Outlet Q:Gasket
E: MountingRing L: Wrenchette OF{
F:Screws(3) -- One-Bolt Discharge
G: Snap Ring N:Bolt
,_ O: Discharge Tube (1-1/2" Diam.)
"-- p::Flanget
SAFETY SYMBOLS
Danger indicates an
imminently hazardous situation which,
if not avoided, will result in death or
serious injury.
I_iWARNING I Warning indicates
a potentially hazardous situation
which, if not avoided, could result in
death or serious injury.
I _,CAUTIONI Caution indicates a
potentially hazardous situation which,
if not avoided, may result in minor or
moderate injury.
Part No. 73110 - 1/02
Question and Answer IconNeed help?

Do you have a question about the Kenmore 60556 and is the answer not in the manual?

Kenmore 60556 Specifications

General IconGeneral
BrandKenmore
Model60556
CategoryGarbage Disposal
LanguageEnglish

Summary

Product Overview and Safety

Tools and Materials Required

Lists tools, materials, and accessories needed for installation.

Disposer and Mounting Assembly Identification

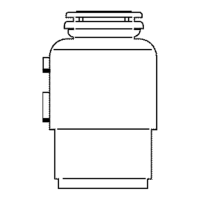
Identifies key components of the disposer, mounting assembly, and discharge types.

Safety Symbols Explained

Explains the meaning of DANGER, WARNING, and CAUTION symbols for safe operation.

Installation Instructions

Check Installation Dimensions

Verifies critical dimensions for proper disposer fit and waste pipe alignment.

Disconnect Existing Sink Drain

Guides on safely disconnecting the old drain trap and removing the sink flange.

Disassemble New Disposer Mounting Assembly

Details on taking apart the new disposer's mounting hardware for installation.

Install Sink Flange

Instructions for correctly seating the sink flange with plumber's putty.

Attach Upper Mounting Assembly

Covers attaching the mounting rings and securing the sink flange.

Remove Existing Disposer

Procedures for safely disconnecting and removing the old disposer unit.

Clean Sink Drain Line

Emphasizes clearing the drain line to prevent blockages after installation.

Prepare Dishwasher Drain Connection

Instructions for removing the knockout plug for dishwasher connection.

Connect Disposer to Electrical Supply

Details direct wiring or plug-in options and grounding requirements.

Connect Disposer to Mounting Assembly

Guides on physically mounting the disposer onto the assembly.

Attach Discharge Tube to Waste Drain Line

Explains connecting the discharge tube for two-bolt or one-bolt configurations.

Connect Dishwasher Drain

Instructions for connecting the dishwasher drain hose, often via an air gap.

Attach Specification Decal

Applying the decal with essential information for service.

Final Installation Check and Safety

Final steps to check for leaks and overview of critical safety warnings.

Operating and Maintenance

Continuous Feed Disposer Operation

How to use a disposer that runs continuously with cold water.

Batch Feed Disposer Operation

How to use a disposer activated by the stopper with cold water.

Operating Best Practices

Recommended actions and things to avoid for optimal performance.

Cleaning the Disposer

Steps for cleaning the grind chamber and baffle to prevent odors.

Releasing a Jammed Disposer

Procedure to free a disposer motor that has stopped using the wrenchette.

Warranty and Service

Kenmore Food Waste Disposer Warranty

Details the warranty periods for different disposer models.

Service and Repair Contact Information

Provides phone numbers and contact details for repair services.

Related product manuals