continuedfrompage3
Tools and materials
needed
A. Gloves
B. Safetyglasses
C. Measuring tape
D. Pencil
E Masking tape or thumb tacks
F. Scissors
6. Electric drill
H. 3/16" drill bit
I. 3/8" and 3/4" wood drill bits
J. Flat-bladescrewdriver
K. Phillips screwdrivers: No. 2 for power supply cord clamp
screwand No. 3 for 1/4-20 x 3" round head bolts.
L. Studfinder (optional)
To cut 2" diameter power supply cord hole --
M. Key hole saw for wood cabinet or,
N. 2" diameter hole drill bit for wood or metal cabinet
O. 7/16" nut driver for 1/4" x 2" lag screws
To cut wall or roof vent opening
M. Key hole saw
P. Caulkinggun and weatherproof caulking compound
Q. Ducttape
e T.ma,oFUgs Z°r., Parts supplied
O Full size
Tamafioreal
O Fullsize
A Tamafioreal
R. 2, 1/4-20 x 3" bolts and 2 washers
(secure microwave hoodto cabinet)
S. 4, 1/4-20 x 3" bolts and 4 spring toggle-heads
(for drywall)
T. 4, 1/4"x 2" lag screws (for wood studs)
U. 1 power supply cord clamp and
1 mounting screw (dark colored)
V. 1 power supply cord bushing
Notshown:
Uppercabinet and wall papertemplates
Wall/roof vent damper assembly
Mounting plate (attached to back of microwave hood)
aluminum filters
charcoal filters
Note:Depending on model, aluminum filter and charcoal
filter may be combined.
Location
Ubicacibn
II nlllll II nllllln
A
tofloor
al piso
30"rain. cabinet
openingwidth.
30",
aberturadel gabinete
NOTE:There must beat least one wall stud within cabinet opening.
NOTA:debe haberal menos un montante de pared dentro de la
abertura dd gabinete.
12"to14" recommended
cabinetdepth
12"a 14",profundidaddel
gibinete recomendada
B
'i r ...... q-
I
I
I
I i
I
I I
wallstuds
Montantes
depared
ienede lap#gina 3
Herramientas y materiales
que se necesitan
A. Guantes
B. Anteojos protectores
C. Cinta de medir
D. Ldpiz
E. Cinta adhesivao tachuelas
F. Tijeras
G. Taladroeldctrico
H. Broca de barrena de 3/16°
I. Brocasde barrenade 3/8" y 3/4" para madera
J. Destornilladorde punta plana
K. Destornilladores Phillips: No. 2 para prensade tornillo de
cablede alimentaci6ny No. 3 para pernos de cabeza
redondade 1/4-20 x 3".
L. Localizadorde perno prisionero (opcional)
Parahacer unorificiode 2" de di_metropara el
cablede alimentaci6n--
M. Sierra de calar paragabinetede maderao,
N. Broca de barrena de 2"de di_metro para gabinetede
maderao metdlico
O. Llavede tuerca de 7/16" para tornillos con cabeza
cuadradapara madera
Parahacer unorificiode salida de aire en la
paredo el cielo raso--
M. Sierra de calar
P. Pistola para calafateoy masilla para calafatear
impermeable
Q. Cinta adhesive paraconductos
Partes provistas
R. 2 pernos de 1/4-20 x 3" y 2 arandelas
(parafijar la campanadel horno al gabinete)
S. 4 pernos de 1/4-20 x 3" y 4 tuercas acodilladasde
resorte (para muros interiores sin mortero)
T. 4 tornillos con cabezacuadrada para maderade 1/4" x 2"
(para montantes de pared)
U. 1 abrazaderaparacable de alimentaci6ny un tornillo de
sujeci6n (color oscuro)
V. 1 manguito para el cable de alimentaci6n
No aparecen en las ilustraciones:
Plantillas de gabinetesuperior y de pared
Conjunto de la compuerta del orificio de salida deaire en
la pared/el cielo raso
Placade montaje (fijada a la parte traserade la campana
del horno)
4
filtros de aluminio
filtros de carb6n
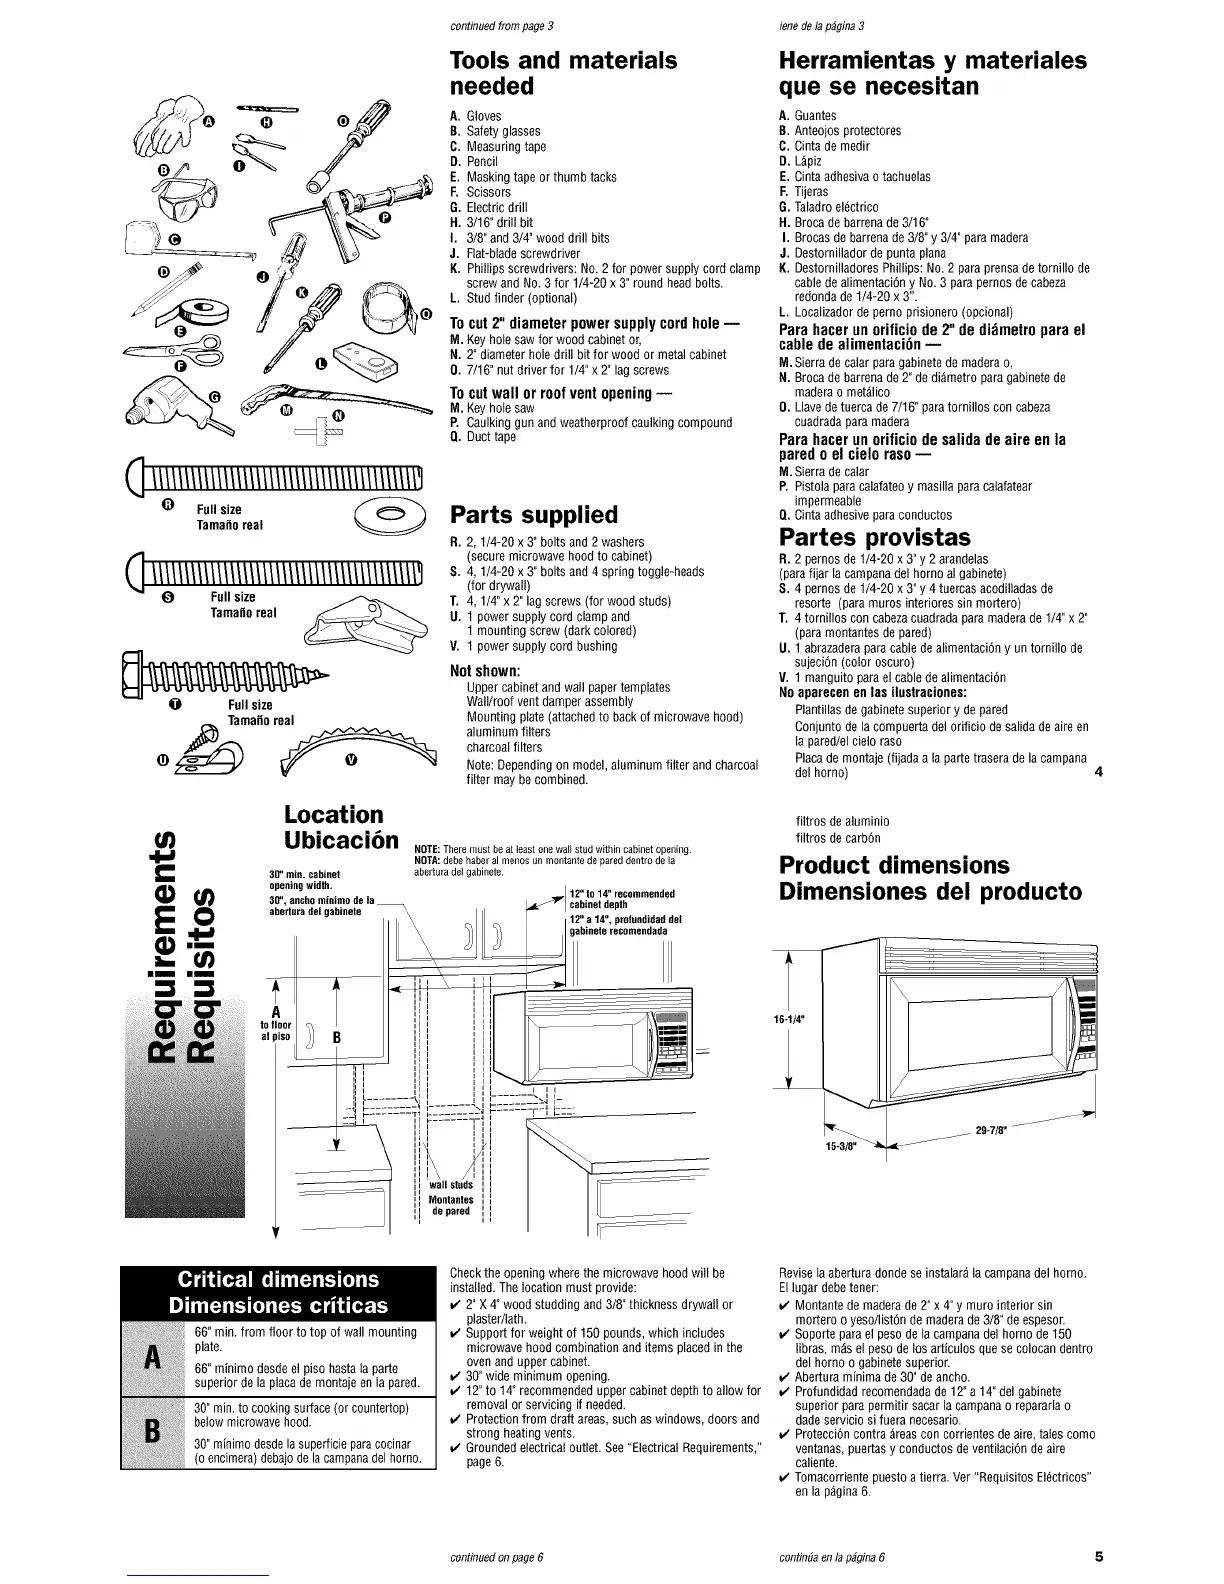
Product dimensions
Dimensiones del producto
164/4"
/
15-3/8"
66" rain. from floor to top of wall mounting
plate.
66" minimo desdeel piso hastala parte
superior de la placade montaje en la pared.
_ 30" min. to cooking surface(orcountertoP)belowmicrowavehood.
30" minimo desde lasuperficie paracocinar
1oeoc meraldebaiode campanahomo
Checkthe opening where the microwave hood will be
installed.The location must provide:
2" X 4" wood studding and 3/8" thickness drywall or
plaster/lath.
Support for weight of 150 pounds, which includes
microwave hood combination and items placed in the
oven and upper cabinet.
30" wide minimum opening.
12" to 14" recommended upper cabinet depthto allow for
removal or servicing if needed.
Protection from draft areas, such aswindows, doors and
strong heating vents.
Groundedelectrical outlet. See"Electrical Requirements,"
page6.
Revisela abertura donde se instalad la campanadel horno.
Ellugar debetener:
Montantede maderade 2" x 4"y muro interior sin
mortero o yeso/list6n de maderade 3/8" de espesor.
Soporte parael pesode la campanadel horno de 150
libras, rods el peso de los articulos que se colocan dentro
del homo o gabinete superior.
Abertura minima de 30" de ancho.
Profundidad recomendadade 12"a 14"del gabinete
superior para permitir sacar la campanao repararlao
dade servicio si fuera necesario.
Protecci6ncontra dreascon corrientes de aire, tales como
ventanas,puertas y conductos deventilaci6n de aire
caliente.
Tomacorriente puesto a tierra. Vet "Requisitos Eldctricos"
en la p_gina 6.
continued onpage6 contint_aenla p#gina 6 5
 Loading...