Do you have a question about the Kenwood DNX450TR and is the answer not in the manual?
Safety guidelines for operating the unit, including connecting accessories and maintenance.
Safety measures for handling and using the unit's battery to prevent hazards.
Advice on protecting the display from damage or malfunction.
Explanation and solution for condensation forming on the disc player lens.
Guidelines for handling discs to prevent damage and ensure proper playback.
Process for the unit to acquire satellite signals for navigation.
Instructions on how to clean the unit's exterior safely.
Advice on conserving vehicle battery life when using the unit.
Information regarding the accuracy, sources, and limitations of map data.
Guide to the initial configuration screens upon first use or reset.
Setting the country for navigation system, language, and units.
Selecting the language for the control screen and settings.
Configuring the AV-IN source connection for audio/video input.
Setting screen and button illumination colors for user preference.
Steps to connect and configure iPod/iPhone devices for music and data.
Steps to connect devices for application linking and screen mirroring.
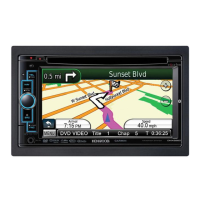
Location for inserting discs and how to eject them.
Button for resetting the unit to factory default settings.
Buttons for accessing menus, navigation, and power functions.
Controls for audio volume and hands-free phone functions.
Slot for updating map data via microSD card.
Using Menu, Return, and common menu keys for navigation.
Interacting with lists using touch keys and flick scrolling.
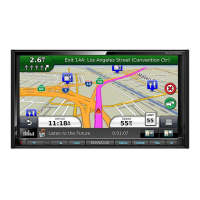
Steps to activate the navigation screen and main menu.
Steps to locate and select points of interest for navigation.
Guidance on following the navigation route with voice and visual prompts.
Modifying routes by adding stops or taking detours.
Viewing traffic maps, avoiding delays, and understanding traffic service.
Instructions for updating system software and map data.
Instructions for connecting discs, iPod/iPhone, and USB devices.
Basic operations for playing, pausing, and navigating music tracks.
Searching for music tracks using list and refined search options.
Connecting media sources for movie and picture playback.
Using touchscreen controls to manage movie and picture playback.
Methods for station search and tuning for DAB and AM/FM radio.
Using auto memory and recalling preset radio stations.
Steps to pair a Bluetooth-enabled cell phone with the unit.
Establishing the Bluetooth connection after phone registration.
Methods for making calls via records, phonebook, presets, or voice.
Important safety warnings and advice before commencing unit installation.
List and identification of all accessories included with the unit.
Steps for connecting wiring harnesses and initial unit setup.
Instruction for attaching the trim plate accessory to the unit.
Detailed steps for installing the GPS antenna indoors for optimal reception.
Instructions for positioning, cleaning, and securing the microphone for clear audio.
Connecting FM/AM antenna, rear camera, and AV output.
Connecting audio pre-outs for external amplifiers.
Standard wiring configuration for ISO connectors.
Alternative wiring configuration for specific vehicles like Volkswagen.
Connecting rear view camera and iPod/AV-IN accessories.
Connecting TV tuner output and external interfaces.
Legal information regarding product copyrights and trademarks.
Steps for connecting Android devices for app audio/video and Bluetooth.
Steps for connecting iPod/iPhone via Lightning or 30-pin connectors.
Steps for connecting iPod/iPhone via Bluetooth for music playback.
Requirements for using the Aha™ service on iPhone, iPod touch, and Android.
| Brand | Kenwood |
|---|---|
| Model | DNX450TR |
| Category | Car Navigation system |
| Language | English |