Do you have a question about the Kenwood GE-90 and is the answer not in the manual?
Ensure the AC voltage selector switch matches your line voltage to prevent damage.
Guidelines for optimal placement, avoiding direct sunlight, extreme temperatures, and vibration.
Advice on cleaning, service, and critical warnings against fire or shock hazards.
Instructions for inspecting the unit for shipping damage and retaining packing materials.
Purpose of the manual and how to best utilize the equalizer's features.
Instructions to record model and serial numbers for future reference.
Ensure secure connections, turn off power before connecting/disconnecting, and manage cords properly.
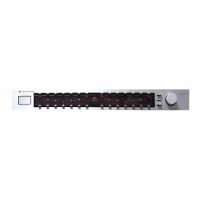
Detailed explanation of the power switch, equalizer controls, tape monitor, equalizer switch, and attenuator.
Describes the effect of adjusting specific frequency bands (60 Hz to 16 kHz) on sound.
Explanation of the Power Indicator and Equalizer Recording Indicator.
Step-by-step guide to turning on the unit, setting up tape monitoring, and adjusting equalizer settings.
Instructions covering reading manual, retaining instructions, heeding warnings, following instructions, and power sources.
Advice on water/moisture, ventilation, heat, power cord protection, cleaning, nonuse periods, object entry, and servicing.
Details on equalizer characteristic, variable range, frequencies, response, distortion, output, and dimensions.
The Kenwood GE-90 is a stereo graphic equalizer designed to enhance your listening experience by allowing precise adjustment of sound frequencies. This manual provides comprehensive instructions for its setup, operation, and maintenance, ensuring you can optimize its performance to suit your audio preferences.
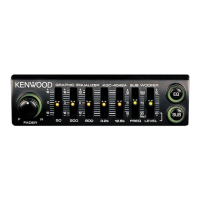
The GE-90 functions as a stereo graphic equalizer, enabling you to modify the frequency characteristics of your audio signals. It features separate controls for the left and right channels, allowing independent adjustment of seven distinct frequency bands: 60 Hz, 160 Hz, 400 Hz, 1 kHz, 2.5 kHz, 6 kHz, and 16 kHz. Each band can be adjusted upward or downward by up to 10 dB in 2 dB steps.
The equalizer is equipped with a Power Switch to turn the unit on and off, indicated by a Power Indicator light. The core of its functionality lies in the Left and Right Channel Equalizer Controls. When these controls are in their center positions, a flat output is achieved, meaning no frequency modification occurs. By pressing the upper button for each frequency band, the output level is increased, while pressing the lower button reduces it. This granular control allows for detailed sound shaping. For instance, increasing the 60 Hz band can boost bass sounds from instruments like a pipe organ or contrabass, adding weight and stability to the audio. Conversely, decreasing this band can eliminate hazy bass tones for clearer sound. The 160 Hz control helps adjust low-frequency signals, particularly useful for enhancing bass from smaller speakers. The 400 Hz control primarily influences vocal sounds, allowing you to fine-tune their presence. The 1 kHz band highlights the strength or weakness of a sound, and increasing its output can enhance musical presence. The 2.5 kHz frequency band is crucial for the brightness, brilliance, and crispness of wind instruments, making it a striking part of the sound for listeners. The 6 kHz control is effective for managing the brightness of a sound, and increasing its output can enhance the naturalness of sounds like violin strings. Finally, the 16 kHz control adjusts very high-frequency sounds, such as those from cymbals, and can be moved downward to reduce tape hiss noise.
Beyond basic equalization, the GE-90 includes a Tape Monitor Switch, which allows you to select between playing back a tape deck (TAPE) or listening to other program sources connected to your amplifier, such as a turntable or FM/AM tuner (SOURCE). An Equalizer Switch enables or disables the equalizer's effect; when set to ON, the frequency characteristics are modified, while in the OFF position, they remain unchanged. The Equalizer Recording Switch works in conjunction with the Equalizer Switch. When both are ON, signals recorded on tape will be equalized. If you wish to record non-equalized signals while still hearing the equalized sound, you can set the Equalizer Switch to ON and the Equalizer Recording Switch to OFF. This provides flexibility for recording preferences. An Attenuator control is also included, offering an adjustment range from 0 to -20 dB (with 0 dB being normal use). This control serves to supplement the equalizer by adjusting the overall output level. An Equalizer Recording Indicator light illuminates when the Equalizer Recording Switch is set for equalized recording.
For international users, the GE-90 features an AC Voltage Selector Switch on the rear panel, allowing it to operate on either 110-120 volts or 220-240 volts AC. This switch is factory-set to the prevailing voltage of the region where the unit is shipped. Users are advised to verify this setting matches their local line voltage before connecting the power cord to an AC outlet. Units shipped to the U.S.A. and Canada are designed for 120 volts AC only and do not include this selector switch.
The GE-90 is designed for ease of use and adaptability within your audio system. Its intuitive controls allow for quick and precise sound adjustments. To begin, ensure all connections are secure, with R terminals connected to R and L to L to prevent noise. Always turn off the power switches of both the GE-90 and your integrated amplifier before connecting or disconnecting any cords. It's also recommended to avoid bundling input/output cords with power and speaker cords, and to keep input/output cords as short as possible to maintain tone quality and prevent noise.
To operate the equalizer, first depress the power switch to turn on the unit. Set your amplifier's TAPE MONITOR switch to "TAPE" or "ON." If you're listening to a tape, set the GE-90's Tape Monitor switch to TAPE; for other sources like a turntable or FM tuner, set it to SOURCE. Next, set the EQUALIZER switch to ON. You can then adjust the individual equalizer controls for the left and right channels to tailor the sound to your preference. The red LED indicators for each frequency band provide visual feedback on the current adjustment level.
For recording, the GE-90 offers versatile options. To record equalized programs onto tape, follow the steps for listening, then set the EQUALIZER REC switch to ON. This ensures that the modified frequency characteristics are applied to the signal being recorded. If you prefer to record non-equalized programs while still monitoring the equalized sound, simply set the EQUALIZER REC switch to OFF. This flexibility allows you to customize your recording process without compromising your listening experience. The Attenuator can be used to fine-tune the overall output level, providing an additional layer of control over your audio.
The GE-90's design emphasizes user convenience, allowing you to easily adjust sound characteristics to match different music genres, room acoustics, or personal preferences. Whether you want to boost the bass for a richer sound, clarify vocals, or add sparkle to high frequencies, the GE-90 provides the tools to achieve your desired audio profile.
Maintaining your Kenwood GE-90 is straightforward, focusing on basic care and safety. For cleaning the cabinet, it is crucial to avoid volatile solvents such as alcohol, paint thinner, gasoline, or benzine, as these can damage the finish. Instead, use a silicone cloth or a clean, dry cloth to gently wipe the surface.
Regarding service and internal components, it is strongly advised not to remove the cabinet or touch any internal parts. All servicing should be referred to qualified service personnel. Unauthorized modifications can pose a dangerous shock hazard and will void the product warranty. This ensures your safety and the longevity of the device.
When unpacking the unit, inspect it for any possible shipping damage. If damage is found or the unit fails to operate, notify your dealer immediately. If the unit was shipped directly to you, contact the shipping company without delay, as only the consignee can file a claim for shipping damage. It is recommended to retain the original carton and packing materials. This will protect your unit from damage if you need to transport or ship it in the future.
For installation, choose a location that avoids direct sunlight, extreme temperatures (both high and low), and heat-radiating sources. The location should also be relatively free of vibration and excessive dust. Ensure that power is off before making any system connections to prevent electrical hazards.
The GE-90 is designed for reliable operation, but adhering to these maintenance and safety guidelines will help ensure its continued performance and your safety. Always refer to the model and serial numbers, found on the back of the unit and on the warranty card, when seeking information or service from your Kenwood dealer.
| Total Harmonic Distortion | 0.005% |
|---|---|
| Gain | ±12 dB |
| Input Sensitivity | 150 mV |
| Output Level | 1V |
| Band Control Range | ±12 dB |
| Type | Graphic Equalizer |
| Power Consumption | 12W |
| Frequency Response | 10Hz |
| Frequency Bands | 7 bands per channel |