b
efore plugging in
●
Make sure your electricity supply is the same as the one shown
on the underside of your appliance.
Important – UK only
●
T
he wires in the cord are coloured as follows:
Green and Yellow = Earth, Blue = Neutral, Brown = Live.
●
The appliance must be protected by a 13A approved (BS1362)
f
use.
WARNING: THIS APPLIANCE MUST BE EARTHED.
Note:
●
F
or non-rewireable plugs the fuse cover MUST be refitted when
replacing the fuse. If the fuse cover is lost then the plug must not
be used until a replacement can be obtained. The correct fuse
c
over is identified by colour and a replacement may be obtained
from your Kenwood Authorised Repairer (see Service).
●
If a non-rewireable plug is cut off it must be DESTROYED
I
MMEDIATELY. An electric shock hazard may arise if an
unwanted non-rewireable plug is inadvertently inserted into a
13A socket outlet.
●
This appliance conforms to EC directive 2004/108/EC on
Electromagnetic Compatibility and EC regulation no. 1935/2004
of 27/10/2004 on materials intended for contact with food.
before using for the first time
1 Remove the plastic blade covers from the knife blade. Take
care the blades are very sharp. These covers should be
discarded as they are to protect the blade during manufacture
and transit only.
2 Wash the parts see ‘care & cleaning’
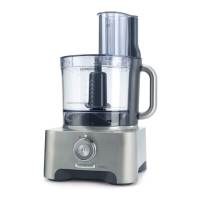
key
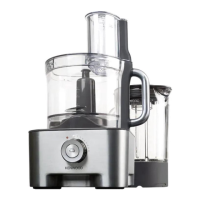
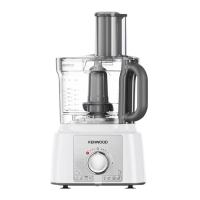
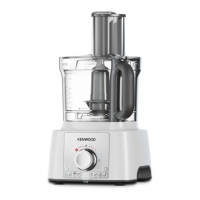
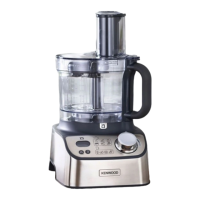
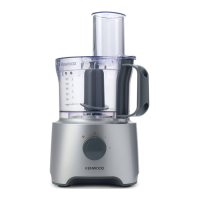
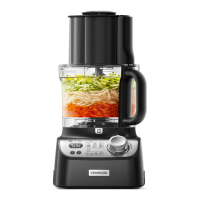
processor
1
power unit
2
detachable drive shaft
3
Trïtan™ bowl
4
Trïtan™ lid
5
wide feed tube
6
pushers
7
safety interlocks
8
cord storage (at back)
9
power on light
bk
auto button
bl
speed/pulse control
weighing function (Type FPM91)
bm
kg/lb button
bn
display screen
bo
on/zero button
bp
weighing tray
thermoresist blender
bq
filler cap
br
lid
bs
goblet
bt
sealing ring
ck
blade unit
cl
filler cap vents
A - standard attachments
cm
k
nife blade
cn
dough tool
co
d
ual whisk
cp
f
olding tool
cq
max capacity disc
cr
4
mm slicing disc
cs
2
mm slicing disc
ct
4mm grating disc
dk
2mm grating disc
dl
a
ttachment storage box
B - optional attachments
Not all the attachments listed below will be included with your food
processor model. Attachments are dependent upon the model
variant. For more information or to order additional attachments
refer to the “service and customer care” section.
dm
extra fine grater disc (if supplied)
dn
fine Julienne disc (if supplied)
do
decorative slicing disc (if supplied)
dp
French fry disc (if supplied)
dq
mini bowl and blade (if supplied)
dr
compact chopper/grinder (if supplied)
ds
citrus juicer (if supplied)
dt
metal juice extractor (if supplied)
to use your food processor
1 Fit the detachable drive shaft onto the power unit – push
down lightly to ensure the drive shaft is fully engaged.
2 Then fit the bowl to the power unit. Place the handle towards
the back on the right hand side and turn clockwise
2
until it
locks.
3 Fit an attachment over the bowl drive shaft.
●
Always fit the bowl and attachment onto the processor before
adding ingredients.
4 Fit the lid
3
- ensuring the top of the drive shaft/tool locates into
the centre of the lid.
5 Fit the pushers to the feed tube – turn the small pusher clockwise
to lock in position .
●
The processor will not operate if the bowl, lid or
wide feed tube pusher are not fitted correctly into
the interlocks. Check that the feed tube and bowl
handle are situated to the right hand side.
6 Plug in. The Power On light will come on and flash until the bowl
and lid are fitted correctly. Select one of the following options: -
Auto Button – the light will come on when the Auto Button is
pressed and the optimum speed for the attachment will be
automatically selected.
Speed Control – manually select the required speed (refer to the
recommended speed chart).
Pulse – use the pulse (P) for short bursts. The pulse will operate
for as long as the control is held in position.
7 At the end of processing turn the speed control to the ‘O’ off
position or if using the Auto press the button and the light will go
out.
●
The Power On light will flash if either the lid, bowl or
wide feed tube are not fitted.
●
The Power On and Auto lights will flash if the Auto is
selected but the interlocks are not engaged.
7
 Loading...