EasyManua.ls Logo

Kenwood Super Eleven - User Manual

Kenwood Super Eleven
13 pages
Print Icon
To Next Page IconTo Next Page
Loading...
HIGH
SPEED
DC
STEFIEO
FIECEIVEFI
Super
€,teven
INSTFUCTION
MANUAL
(prENwclocl
CONTENTS
SAFETY
PRECAUTIONS..,.............,
SYSTEM
CONNECTION
DIAGRAM
sysrEM
coNNEcrloNs
................
CONTROLS,
IN DICATORS
AND CONN
ECTORS.......,..
OPERATING
INSTRUCTIONS
.......,......
tN cASE
OF
DIFFICULTY
..............
sPECtFtCAT|ONS............
FOR YOUR
RECORDS
Record
the
serial
number,
found on
the back of
the
unit, in the spaces
designated
on the
warranty card,
and
in
the space
provided
below.
Refer
to the
model and
serial
numbers whenever
you
call upon
your
Kenwood
dealer
for
information
or service
on
this
product.
Model Super
Eleven Serial
number
UNPACKING
Unpack the
unit carefully
and
make sure
that all
accessories
and cables
are
put
aside
so they
will not
be lost.
Examine
the unit
for
any
possibility
of shipping
damage.
lf
your
unit is damaged
or
fails
to
operate.
notify
your
dealer
immediately.
lf
your
unit was
shipped
to
you
directly,
notify the shipping
company
without
delay. Only
the consignee
(the
person
or company
receiving the unit)
can
file
a
claim against
the carrier
for shipping
damage.
We recommend that
you
retain the
original
carton and
packing
materials for use should
you
transport or
ship
the
unit in
the future.
I NSTALLATION
PRECAUTIONS
(a)
Avoid locations
subject
to direct
sunlight.
{b}
Avoid high or low
temperature
extremes.
(c)
Keep
the
unit away
from heat
radiating
sources.
(d)
Choose a
location that
is
relatively
free of vibration
or
excessive
dust.
(e)
Make sure
power
is off
before
making any
system
connections.
WARNING:
TO
PREVENT
FIRE
OR SHOCK
HAZARD,
DO
NOT EXPOSE
THIS APPLIANCE
TO
RAIN
OR
MOISTURE.
IMPORTANT!
It is very
important
to
check
the
Voltage Selector
Switch setting
and
make sure that
it corresponds
to
your
line
voltage before
connecting
the
power
cord
2
2
3
5
8
11
12
I
into
an
AC outlet.
lf the
Voltage
Selector
required
i
re-setting. further details
as follows.
AC VOLTAGE SELECTION
This
unit
operates on AC
120V,22OV or 240V.
The
AC
Voltage
Selector Switch
on the
rear
panel
is set to the
voltage
that
prevails
in the area to which
the
unit
is
shipped.
Before
connecting
the
power
cord
to
your
AC outlet, make
sure that the setting
position
of this switch
matches
your
line
voltage.
lf not, it must be set
to
your
voltage in
accordance
with the
following direction.
il^e-'
Our warranty does
not
cover
damage caused
by
excessive
line
voltage due to improper setting
of th€
AC Voltage
Selector Switch.
AC
120V-
Position
@
AC 220V-
Posilion
@
DCD
@
AC 240V-
Position
@
DDD
@
1.
Remove screw and
stopper
Plate.
2. Slide
lever to
your line voltage.
3.
Lock
lever
with stopper
Plate
and
screw.
AC VOLTAGE SELECTOR
SWITCH
Question and Answer IconNeed help?

Do you have a question about the Kenwood Super Eleven and is the answer not in the manual?

Summary

Important Setup and Safety Information

AC Voltage Selection

Instructions for setting the AC voltage selector switch to match your line voltage before connecting the power cord.

Unit Unpacking

Installation Precautions

Appliance Warning

Safety Precautions

Cleaning Guidelines

Guidelines for cleaning the unit's cabinet using appropriate materials.

Ventilation Hole Instructions

Information on ensuring proper ventilation and avoiding blockages or foreign objects.

Service and Modification Warnings

Instructions to refer all service to qualified personnel and avoid unauthorized modifications.

Power Cord Safety

Precautions for handling the power cord to avoid fire or shock hazards.

System Connection Diagram

System Connections

Speaker Connections

Detailed instructions for connecting speaker systems to the receiver's terminals, including polarity.

Turntable Connections

Instructions for connecting turntables to the PHONO input jacks and ground terminal.

AUX Jack Connections

Information on connecting other high-level signal sources to the AUX input jacks.

Tape Deck Connections

Instructions for connecting tape decks for playback and recording via TAPE A and TAPE B jacks.

DIN Connector Use

Details on connecting a tape deck with a DIN connector for integrated input/output.

Second Tape Deck Setup

Instructions for connecting a second tape deck to the REC and PLAY jacks marked B.

AC Outlet Usage

Explanation of the switched and unswitched AC outlets on the rear panel for powering other components.

Speaker Terminal Warning

FM Antenna Installation

Indoor FM Antenna Setup

Guidance on positioning the T-type indoor antenna for optimal FM reception, noting potential reflection issues.

Outdoor FM Antenna Recommendations

Recommendations for using outdoor antennas for better FM reception, especially in distant areas.

AM Antenna Installation

AM Loop Antenna Adjustment

Instructions for positioning the AM loop antenna for best reception, including wall mounting.

Outdoor AM Antenna Setup

Guidance on installing an outdoor wire antenna for AM reception in challenging environments.

Front Panel Controls and Indicators

Speaker Selection Switches

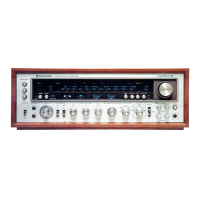
Explanation of the SPEAKERS A, B, and C switches for activating speaker systems.

Power Switch Operation

Description of the power switch for turning the receiver on and off.

Headphone Jacks

Information on connecting stereo headphones to the front panel jacks.

Timer Control and Indicator

Details on the timer function for automatic shut-off and its indicator.

MAC Switch Function

Explanation of the M.A.C. (Multiple Acoustic Compensator) switch for activating the circuit.

Multiple Acoustic Compensator Adjustment

Details on the M.A.C. controls for adjusting audio frequency response across multiple bands.

Balance Control Operation

Instructions for using the balance control to adjust left and right channel audio levels.

Volume Control Operation

Description of the volume control for adjusting overall left and right channel audio levels.

Dubbing Switch Function

Explanation of the dubbing switch for recording and copying tape signals with or without processing.

Monitor Switch Function

Details on the monitor switch for selecting audio sources during recording or playback.

Meter Range Switch

DC Coupled;Subsonic Switch

Loudness Control

Peak Power Display

Reverberation Display Explanation

Lock;FM Muting Switch

Mono;Stereo Switch

Adaptor Switch Function

Frequency Display Information

Input Selector Switches and Indicators

FM Selector

Indicator for FM broadcast reception.

AM Selector

Indicator for AM broadcast reception.

Phono 1 Selector

Indicator for PHONO 1 input source.

Phono 2 Selector

Indicator for PHONO 2 input source.

AUX Selector

Indicator for AUX input source.

Signal Indicator Guide

Stereo and Tune Indicators

Microphone Mixing Features

MIC Input Jack

Description of the MIC input jack for microphone connection.

MIC Mixing Control Operation

How to adjust the microphone mixing level relative to the source signal.

Panpot Control Usage

Control for adjusting the stereo placement of microphone sound.

Reverberation Controls

Reverberation Mode Selection

Switch to select reverberation effect mode (OFF, MIC, MIC SOU).

Reverberation Depth Adjustment

Control to adjust the depth of the reverberation effect.

Reverberation Delay Time

Control to adjust the delay time for the reverberation effect.

Tuning Knob Operation

Operating the Receiver

Tune Indicator Guide

Explains the meaning of the TUNE indicator lights during FM tuning.

FM Reception Procedure

Step-by-step guide for tuning and receiving FM broadcasts.

AM Reception Procedure

Instructions for tuning and receiving AM broadcasts.

Turntable Operation

How to operate turntables connected to the receiver.

Tape Deck Operation

Instructions for tape playback and recording, including monitoring.

Adaptor Usage

How to use the ADAPTOR switch with external units like Dolby NR units.

Dolby FM Broadcast Reception

Steps for receiving Dolby FM broadcasts using the adaptor and specific switch settings.

Tape Deck Monitoring

How to monitor tape recordings using the ADAPTOR switch with a three-head tape deck.

FM De-Emphasis Switch

Information on the FM de-emphasis switch and its preset position for delivery areas.

Microphone Mixing

Microphone and Source Mixing

How to mix microphone sound with AM, FM, or phono sources.

Microphone Only Mode

Using the MIC MIXING control for microphone-only output, suitable for public address.

Reverberation Effects

Echo Effect Adjustment

Instructions for applying echo effect using DEPTH and DELAY TIME controls.

Duet Effect Adjustment

How to adjust reverberation for a duet effect by controlling DEPTH and VOLUME.

Dubbing and Monitor Switch Operations

Recording Without Signal Processing

How to record and monitor without signal processing using DUBBING and MONITOR switches.

Dubbing Tape A to Tape B

Instructions for copying tapes from Tape A to Tape B without signal processing.

Dubbing Tape B to Tape A

Recording With Signal Processing

Dubbing with Signal Processing (A to B)

Dubbing with Signal Processing (B to A)

Troubleshooting Common Issues

Playback Troubleshooting (AM, FM, Phono, Tape)

Common issues and remedies for playback problems across different sources.

AM Reception Issues

Troubleshooting specific problems that occur only during AM reception.

FM Reception Issues

Troubleshooting specific problems that occur only during FM reception.

Phono Playback Issues

Troubleshooting common problems encountered during phono playback.

Specifications

Audio Section Specifications

Technical specifications for the audio output, distortion, sensitivity, and frequency response.

FM Tuner Section Specifications

Technical specifications related to the FM tuner's sensitivity, quieting, and signal-to-noise ratios.

AM Tuner Section Specifications

Technical specifications for the AM tuner's sensitivity, signal-to-noise ratio, and selectivity.

General Specifications

General specifications including power consumption, AC outlets, dimensions, and weight.

Reverb Section Specifications

Specifications for the reverberation section, including reverberating time and delay time.

Multiple Acoustic Compensator Specs

Loudness Control Specifications

Subsonic Filter Specifications

Output Level and Impedance

Kenwood Super Eleven Specifications

General IconGeneral
Power output120 watts per channel into 8Ω (stereo)
Damping factor40
Input sensitivity2.5mV (MM), 150mV (line)
Output150 mV (line)
Speaker load impedance4Ω to 16Ω
Tuning rangeFM: 88 - 108 MHz

Related product manuals