4
6
7
1
5
4
2a
2b
10
8
9
4
3
Description
ZB03380001
ZB03390001
ZB04080001
ZB04090001
1 Bracket base 1 1 1 1
2a Supporting pipe T22 1 – 1 –
2b Supporting pipe T33 – 1 – 1
3 Lug plate 1111
4 Sealing cap 2 2 2 2
5 Bracket block 1111
6 Support 1 1 1 1
7 Hook 1 1 1 1
8 Washer 1111
9 Hexagon nut 1 1 1 1
10 Grub screw 2 2 2 2
Number of soil stand brackets
Ŷ
Use the indicated number of soil stand brackets for in-
stallation in accordance with the steel panel radiator's
length (Fig.3).
Ŷ
Transport and store only in the protective packaging.
Pre-assembly of the soil stand bracket
Ŷ
Prepare tools and fixing material (screws, washers and
anchor) (Fig.1).
Ŷ
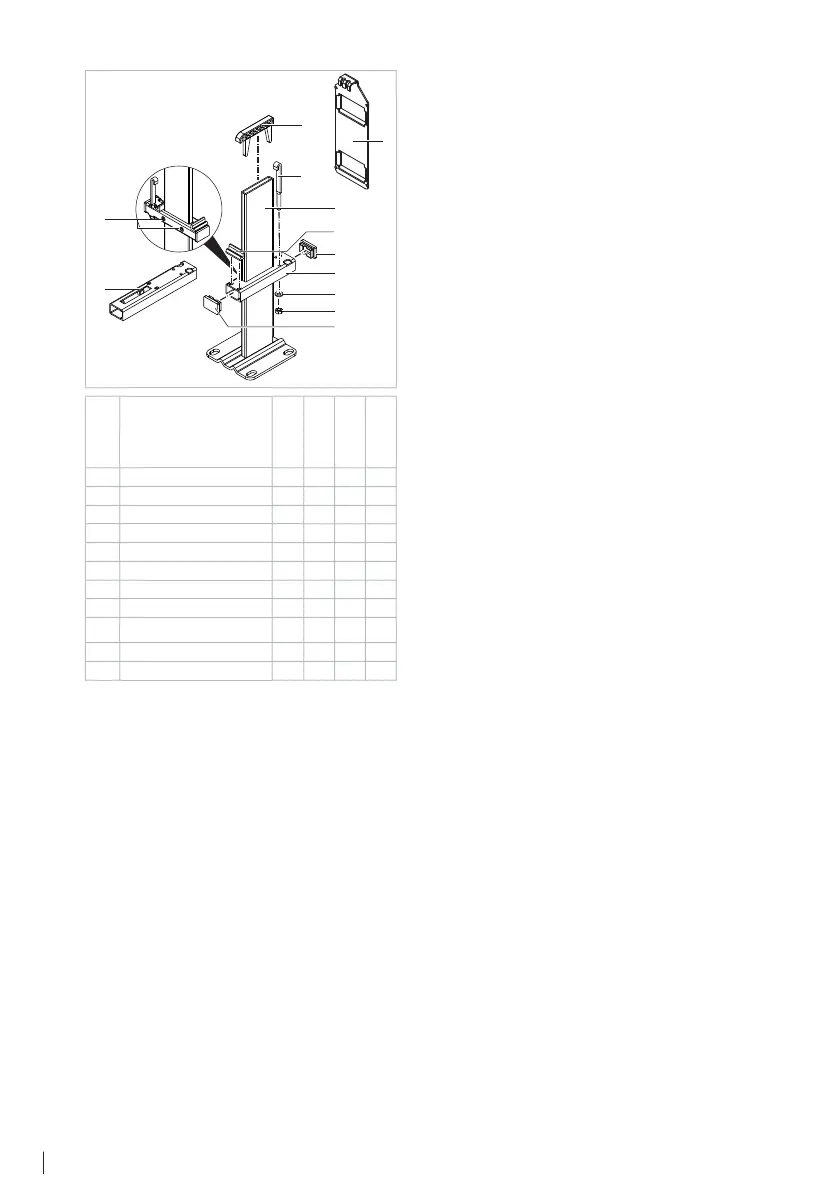
Insert the sealing caps (4) into the two end openings of
the supporting pipe (2a/2b) (Fig. 4)
.
Ŷ
Insert the bracket block (5) into the front openings in
the supporting pipe (2a/2b) (Fig. 4).
Ŷ
Slide the pre-assembled supporting pipe onto the bra-
cket base and adjust a distance of 150 mm from the
finished floor (Figs. 5/6).
Ŷ
Using the grub screws (10), fix the supporting pipe
hand-tight (Fig. 6).
Ŷ
Insert the support (6) into the top of the bracket base
(recess facing toward the front) (Fig. 6).
Ŷ
For the installation dimensions of the soil stand bra-
ckets on the radiator, refer to the table in Fig. 7.
Installing brackets
Ŷ
Align the soil stand brackets on the floor at the speci-
fied spacing and mark the holes to be drilled (Fig. 8).
Ŷ
Drill the holes at the marked locations (Fig. 9).
Ŷ
Place the soil stand brackets in position, align and,
using suitable anchors, washers and screws (4 screws
per bracket, max. Ø 10 mm), fasten the brackets to the
floor (Fig. 10).
Installing the radiator
Ŷ
Carefully place the radiator on the bracket bases
(Fig. 1).
Ŷ
Attach the lug plates (3) to the top of the radiator at
the same position as the soil stand brackets (Fig. 12).
Ŷ
Attach hook (7) to the lower lug on the lug plate (3) and
insert hook through the oblong hole in the supporting
pipe (2a/2b). Using the hexagon nut (9) and the washer
(8), fasten hook hand-tight (Fig. 13).
Ŷ
After loosening the grub screws (10) and the hexagon
nuts (9), align the radiator horizontally. Then tighten
the grub screws (10) and the hexagon nuts (9) again
(Figs. 13/14).
Ŷ
Cover the radiator completely again with the packag-
ing (Fig. 15).