EasyManua.ls Logo

KERO 260 - User Manual

KERO 260
108 pages
Go to English
Print Icon
To Next Page IconTo Next Page
Loading...
CE:
ARMIN
SCHMID
Heiz-
und
Klimasysteme
Olensbachstrasse 9
CH-9631
Ulisbach
Tel.
0848 870 850
Fax 0848 870 855
www.armin-schmid.ch
verkauF@armin-schmid.ch
~\,?
--- ---
ARMIN
SCHMID
ULISBACH
ZÜRICH
.
BERN
.
BASEL
.
LAUSANNE
Question and Answer IconNeed help?

Do you have a question about the KERO 260 and is the answer not in the manual?

Overview

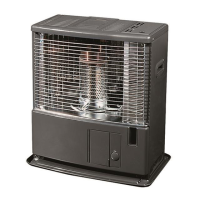
This document describes a KERO portable radiant heater, available in two models: 260 and 360.

Function Description

The KERO heater is a portable radiant heating system designed for intermittent use. It operates on liquid fuel and incorporates an automatic shut-off device in case of knocks or if the heater is not level. It also features an AIR SENSOR® atmospheric safety device that monitors room temperature and ensures proper ventilation. The device is designed to provide optimal combustion and can be regulated to adjust flame height.

Important Technical Specifications

Models: KERO 260 and KERO 360

Specification KERO 260 KERO 360
Heating Output 2400 W 3000 W
Fuel Consumption Rate 200 g/h 250 g/h
Control Heating Time +/- 13 h +/- 13.4 h
Fuel Tank Capacity 3.2 l 4.0 l
Dimensions (HxWxD) 44x47x31 mm 50x47x31 mm
Net Weight 8.2 kg 9.2 kg
Gross Weight 9.2 kg 11 kg
Country of Origin CHINA CHINA
Airsensor Control Built-in Built-in
Fuel Tank Type Lift-out Cartridge Lift-out Cartridge
Automatic Safety Shut-off System Built-in Built-in
CE Yes Yes
Regulation 10% Yes Yes
Shut Off Refueling Tank Yes Yes

Fuel Requirements:

  • Only use top-quality liquid combustible fuel for mobile heaters, with aromatics removed and totally free of impurities (max 1% aromatics and a flash-point above 61°C).
  • The use of TOSAINE or TOSAINE PLUS fuels is strongly recommended for optimal performance and reduced odors.
  • Never use contaminated, chemically treated, water-containing, or petrol-containing fuel.
  • Fuel should be stored away from direct sunlight and heat sources.
  • Do not store fuel from one season to the next, as it loses purity and efficiency.

Usage Features

Unpacking and Assembly:

  1. Remove the heater from its cardboard box.
  2. Detach adhesive tapes from the protection grid and open it by pushing upwards, sliding the bottom forward, and pulling downwards. Reverse the process to reinstall.
  3. Remove packing materials from the combustion cylinder and fuel tank compartment.
  4. Place the combustion cylinder on the circular wick guide, ensuring it is correctly positioned by turning its lever left and right.
  5. Install two R20/1.5V batteries in the battery compartment at the rear, observing polarity.

Ignition:

  1. Ensure the heater is on a level surface to allow the automatic shut-off device to function correctly.
  2. Push the ignition lever downwards until it stops to activate the automatic shut-off device. If the lever does not stay down, the device is active, and the room should be ventilated.
  3. Before first use or after wick replacement, allow the wick to absorb fuel for at least one hour.
  4. Ensure the burner is correctly positioned by rotating its spiral rod left and right.
  5. Slowly push the ignition lever downwards until it stops. The wick will rise, and the heater will ignite automatically. Visually confirm the heater is lit.
  6. If white smoke appears without ignition, gently push the ignition lever partway down again.
  7. Never use matches or a lighter to ignite the heater.

Flame Height Adjustment:

  • The heater allows for a 10% regulation range to optimize combustion.
  • To decrease combustion, slightly raise the adjustment knob.
  • If the flame is too high or uneven, gently shake the combustion cylinder lever once or twice. If the problem persists, turn off the heater and contact a retailer.
  • Persistent bad combustion can lead to soot and/or CO emissions.

Extinction:

  • Push the "STOP" button to activate the automatic shut-off device, which rapidly lowers the wick and extinguishes the flame.
  • An excessive accumulation of carbon on the wick may prevent proper shut-off; always visually check that the device has functioned correctly.
  • For less odor, push the "STOP" button and manually assist the wick lowering lever.

Re-ignition:

  • Wait at least five minutes after turning off the heater before re-igniting.
  • Re-lighting a warm burner may cause odors.

Safety Warnings:

  • Never remove batteries while the heater is operating.
  • Ensure batteries are in good condition.
  • Do not use the heater in hermetically sealed rooms (caravans, boats, vehicle cabins, etc.).
  • Maintain a minimum clearance of 1 meter between the heater and any objects, furniture, or walls.
  • Use the heater in a well-ventilated room free of flammable vapors.
  • Ensure the room has adequate air intake and effective air outlet (minimum 50 cm² for each opening).
  • Do not use the heater in undersized rooms:
    • 2400 W model: > 37 m³
    • 3000 W model: > 46 m³
  • Do not use the heater in rooms below ground level.
  • Any tampering with or modification to the safety system is prohibited, as it invalidates the warranty and risks system failure.

Maintenance Features

During the Season:

  • To dust the appliance, wait until it has completely cooled down.
  • Open the burner protection grid, remove dust without touching the burner.
  • Close the grid, ensuring the burner is correctly positioned.

After the Season:

  • Needle Cleaning:
    • Remove the needle from the fixed tank.
    • Clean the needle with fuel.
    • Handle the needle gently to avoid damage.
    • Use up all remaining fuel (refer to storage instructions).
    • Return the needle to its place.
  • Storage:
    • Empty the tank and bottom tray.
    • Light the heater and let it burn until it extinguishes itself.
    • Clean the wick according to instructions.
    • Remove batteries.
    • Clean the heater thoroughly.
    • Store the heater in its original packaging.
    • Store the manual pump with the heater to prevent its use for other liquids.
    • When reusing the heater, ensure new, clean paraffin/lamp oil is used.
    • Check battery power.

Wick Replacement:

  • Wick and its replacement are not covered by warranty.
  • If the wick becomes abnormally hard, blocked, or combustion is abnormal, have it replaced by a qualified specialist (e.g., your retailer).
  • Only use PETROWICK or original NF-marked wicks. Non-original wicks can degrade combustion quality and risk carbon monoxide emissions.
  • The replacement wick has two marking lines: one horizontal (align with the top edge of the wick holder) and one vertical (align with the notch at the top of the wick and the lug of the wick holder).
  • After positioning the wick, press it against the wick holder to secure it.
  • Ensure the tank gasket is correctly seated.
  • Actuate the wick adjustment button and the rapid shut-off button several times to ensure the wick slides easily on its cylinder.
  • Screw the four guide-wick fixing tabs without fully tightening, position the wick in the high position, then tighten the tabs.
  • Verify the wick height (9mm for Type 260, 11mm for Type 360).
  • Reassemble the heater body.

KERO 260 Specifications

General IconGeneral
BrandKERO
Model260
CategoryHeater
LanguageEnglish

Related product manuals