EasyManua.ls Logo

Keter Evotech Newton 11x7.5 User Manual

Keter Evotech Newton 11x7.5
68 pages
To Next Page IconTo Next Page
Page #1 background imageLoading...
Page #1 background image
MANUAL
Create amazing spaces
USER MANUAL | MODE D’EMPLOI | MANUAL DEL USUARIO | MONTAGEANLEITUNG |
MONTAGEHANDLEIDING | MANUALE PER L’UTENTE | MANUAL DO UTILIZADOR
NEWTON
11×7.5
For outdoor use only. Not for commercial use | Utilisation non commerciale à l'extérieur seulement | Para uso
externo. No para uso commercial | Alleen voor buitenshuis gebruik. Niet voor commercieel gebruik | Uso esterno.
Non indicato per usi commerciali
SKU: 17212856
5017311
IMPORTANT | IMPORTANT | IMPORTANTE | BALANGRIJK | IMPORTANTE
RETAIN FOR FUTURE REFERENCE: READ CAREFULLY
À CONSERVER POUR DE FUTURS BESOINS DE RÉFÉRENCE : À LIRE SOIGNEUSEMENT
CONSERVE PARA FUTURA REFERENCIA. LEA CUIDADOSAMENTE
BEWAREN VOOR TOEKOMSTIGE RAADPLEGING: ZORGVULDIG LEZEN
CONSERVARE PER RIFERIMENTO FUTURO: LEGGERE ATTENTAMENTE
WARRANTY ACTIVATION
Thank you for your purchase of the Keter shed.
In order to activate your warranty, please log onto
our website and fill in the form under warranty
activation.
ACTIVATION DE LA GARANTIE
Nous vous remercions pour l’achat de votre abri
Keter. Pour activer votre garantie, veuillez vous
connecter à notre site Web et remplir le formulaire
d'activation de la garantie.
ACTIVACION DE GARANTIA
Gracias por su compra de una caseta Ket er. Para
activar su garantia, ingrese en nuestro sitio de
internet y complete el formulario que esta bajo la
activacion de garantia.
keter.com/en/warrant-activation
WWW.KETER.COM
US, Canada: (EN/FR)
keter.com/en-us/contact-us.html
Tel: +1-888-374-4262
Email: NACS@keter.com
UK
Tel: +44-121-506-0008, CSUK@keter.com
Mon - Fri | 8am - 4pm
For other European countries see the last page
Pour les autres pays d’Europe, voir la dernière page
Para otros países europeos vea la la última página
Per altri Paesi europei, consultare l’ultima pagina
Voor andere Europese landen, zie de laatste pagina
TM
Question and Answer IconNeed help?

Do you have a question about the Keter Evotech Newton 11x7.5 and is the answer not in the manual?

Keter Evotech Newton 11x7.5 Specifications

General IconGeneral
Product NameKeter Evotech Newton 11x7.5
CategoryGarden Houses
Dimensions11x7.5 feet
MaterialEvotech Composite
ColorBrown
Assembly RequiredYes
Weather ResistanceYes
UV ProtectionYes
LockableYes
Floor IncludedYes
External Height252 cm
Internal Depth201 cm
Internal Height246 cm
Door Opening Width148.5 cm
Door Opening Height181 cm
Warranty10-year limited warranty

Summary

Introduction and Support

Important Reference and Safety Notes

Retain for future reference. Read carefully and check safety.

Customer Support and Warranty Activation

Provides contact details and instructions for warranty activation.

Site Preparation and Foundation

Ground Leveling and Base Construction

Instructions for preparing the ground and recommended foundation base.

External Access and Floor Dimensions

Ensuring assembly space and noting floor measurements.

Assembly Prerequisites

Pre-Assembly Checks, Tools, and Assistance

Guidelines on checking parts, required tools, and assembly assistance.

Shed Component Identification

Floor, Wall, and Door Parts Identification

Lists and identifies all floor, wall, and door components with codes.

External Component Parts

Roof, Window, and Metal Components

Identifies parts for the roof, windows, and metal frame.

Hardware and Small Parts

Small Parts and Screw Identification

Lists and describes small parts and various screw types with sizes.

Spare Parts Information

Note regarding the possibility of extra small parts included.

Floor Assembly - Part 1

Steps 1-2: Connecting and Securing Floor Panels

Connects and secures the initial floor panels using specified parts and screws.

Floor Assembly - Part 2

Steps 3-4: Joining and Reinforcing Floor Structure

Joins floor sections and reinforces the structure with screws.

Floor Assembly - Part 3

Steps 5-6: Attaching Front/Back and Final Securing

Attaches front/back panels and secures the entire floor assembly.

Wall Assembly - Part 1

Steps 7-8: Attaching and Securing Side Walls

Attaches side wall panels and secures them with clips and screws.

Wall Assembly - Part 2

Steps 9-10: Connecting Rear Walls and Profiles

Connects rear walls and attaches corner profiles to the structure.

Wall Assembly - Part 3

Steps 11-12: Securing Side Panels and Back Support

Secures side panels and attaches a back support to the wall.

Wall Assembly - Part 4

Steps 13-14: Connecting Rear Panels and Side Profiles

Connects rear panels and attaches side profiles to the walls.

Wall Assembly - Part 5

Steps 15-16: Corner Brackets and Base Reinforcement

Attaches corner brackets and reinforces the shed's base.

Wall Assembly - Part 6

Steps 17-18: Attaching Trim and Securing Wall Trim

Attaches base trim and secures wall trim pieces.

Wall Assembly - Part 7

Steps 19-20: Securing Walls and Roof Support Attachment

Secures wall panels and attaches a roof support beam.

Wall Assembly - Part 8

Steps 21-22: Center and Vertical Support Installation

Installs center and vertical supports for the structure.

Wall Assembly - Part 9

Steps 23-24: Top Brackets and Top Trim Attachment

Installs top brackets and attaches a top trim piece.

Wall Assembly - Part 10

Step 25: Attaching Decorative Clips

Attaches decorative clips to the wall structure.

Wall Assembly - Part 11

Step 26: Securing Wall Base to Floor

Secures the wall base to the floor, noting pre-drilled holes.

Wall Assembly - Part 12

Step 27: Installing Vertical Support Beams

Attaches vertical support beams to the floor and walls.

Roof Structure Assembly - Part 1

Steps 28-29: Connecting and Assembling Roof Beams

Connects and assembles main roof support beams.

Roof Structure Assembly - Part 2

Steps 30-31: Attaching and Connecting Roof Arches

Attaches roof supports and connects roof arch components.

Roof Structure Assembly - Part 3

Step 32: Installing Interior Roof Support Rails

Installs internal support rails along the roof structure.

Roof Structure Assembly - Part 4

Step 33: Securing the Roof Structure

Secures the main roof structure components with screws.

Roof Panel Installation - Part 1

Step 34: Attaching Main Roof Panels

Attaches the primary roof panels to the shed's structure.

Roof Panel Installation - Part 2

Steps 35-36: Securing Roof Sections and Ridge Caps

Secures roof sections and installs ridge caps on the roof.

Roof Beam Installation

Steps 37-38: Attaching and Securing Roof Beams

Attaches and secures the main roof beams to the structure.

Roof Panel Attachment

Step 39: Securing Roof Panels

Secures the roof panels to the structure using screws.

Roof Panel Reinforcement

Steps 40-41: Attaching and Securing Roof Supports

Attaches additional supports to roof panels and secures them.

Internal Wall Support Installation

Step 42: Installing Internal Wall Beams

Installs internal support beams onto the shed walls.

Roof Section Installation - Part 1

Steps 43-44: Attaching and Securing Roof Sections

Attaches and secures a roof section to the structure.

Roof Section Installation - Part 2

Steps 45-46: Attaching and Securing Roof Panels

Attaches and secures additional roof panels to the structure.

Roof Securing Details

Steps 47-48: Securing Roof Panels and Supports

Secures roof panels and attaches support elements.

Completing Roof Panel Installation

Steps 49-50: Attaching and Securing Final Roof Panels

Attaches and secures the final roof panels.

Final Roof Section Fitting

Steps 51-52: Securing and Attaching Last Roof Sections

Secures and attaches the last roof sections.

Roof Finishing Touches

Steps 53-54: Securing Remaining Roof Sections

Secures remaining roof sections and panels.

Final Roof Panel Attachment

Steps 55-56: Attaching and Securing Final Roof Panels

Attaches and secures the final roof panels.

Roof Securing Procedures

Steps 57-58: Attaching and Securing Roof Panels and Sections

Attaches and secures roof panels and sections.

Roof Structure Components

Steps 59-60: Attaching and Assembling Roof Supports

Attaches roof supports and assembles roof sections.

Roof Trim and Component Securing

Steps 61-62: Installing Roof Trim and Securing Components

Installs roof trim and secures various roof components.

Final Roof Panel Securing

Steps 63-64: Securing Final Roof Components and Panels

Secures the final roof components and panels.

Roof Reinforcement and Attachment

Steps 65-66: Attaching and Securing Roof Supports

Attaches and secures roof supports and related parts.

Roof Panel Fastening

Steps 67-68: Securing Roof Panels and Supports

Secures roof panels and attaches support elements.

Final Roof Panel Attachment

Steps 69-70: Securing Roof Panels and Base Screws

Secures roof panels and attaches screws to the shed base.

Door Assembly - Initial Steps

Steps 71-72: Attaching Hinges and Assembling Door Frame

Attaches door hinges and assembles the door frame components.

Door Assembly - Panel Installation

Steps 73-74: Attaching and Securing Door Panels

Attaches and secures the door panels to the frame.

Door Assembly - Frame Securing

Steps 75-76: Attaching Frame Parts and Securing Frame

Attaches frame parts and secures the door frame.

Door Assembly - Handle Attachment

Steps 77-78: Attaching Door Handles and Securing Frame

Attaches door handles and secures the door frame.

Door Assembly - Frame Reinforcement

Step 79: Securing the Door Frame

Secures the door frame structure with screws.

Door Assembly - Hinge Installation

Step 80: Attaching Door Hinges

Attaches the door hinges to the door panels.

Door Assembly - Handle Fitting

Step 81: Installing Door Handles and Locks

Installs the door handles and associated locking mechanisms.

Door Assembly - Latch Mechanism

Step 82: Installing the Door Latch

Installs the door latch mechanism onto the door.

Door Assembly - Slide Adjustment

Step 83: Adjusting Door Slides

Adjusts the door sliding mechanism for proper operation.

Shed Leveling and Options

Adjusting Shed Level with Shims

Guidance on using shims to ensure the shed or door is level.

Door Alignment Procedures

Aligning Doors with Screws

Instructions for aligning doors correctly using screws.

Roof Securing Procedures

Steps 85-86: Securing Roof Panels and Trim

Secures roof panels and attaches roof trim pieces.

Window Assembly - Initial Installation

Step 87: Attaching Windows to Shed Structure

Installs the windows into the prepared openings in the shed.

Window Assembly - Panel Fitting

Step 88: Fitting Window Panels into Frames

Fits the window panels into the window frames.

Window Assembly - Final Securing

Step 89: Securing Windows in Place

Secures the installed windows using screws.

Foundation Securing Instructions

Anchoring the Shed to a Foundation

Detailed instructions for securely attaching the shed to a foundation.

Optional Lock Installation

Using a Padlock for Security

Illustrates the use of a padlock for securing the shed doors.

Care and Safety Guidelines

General Safety Precautions and Usage

Essential safety advice for assembly, usage, and handling of the shed.

Shed Maintenance and Cleaning Procedures

Guidelines for cleaning and maintaining the shed's condition.

Safe Storage and Environmental Factors

Advice on storage practices and environmental considerations.

Extended Safety and Usage Advice

Handling, Wind, and Site Considerations

Further advice on handling, wind direction, and site selection.

10-Year Limited Warranty

Warranty Coverage and Exclusions

Details warranty coverage, exclusions like normal wear, and claim procedures.

Warranty Claim Submission and Process

Explains how to submit a warranty claim and Keter's responsibilities.

Customer Support and Replacement Parts

Procedure for Missing or Broken Parts

Instructions for obtaining replacement parts and contacting customer service.
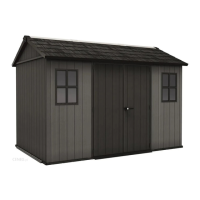
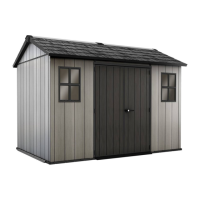
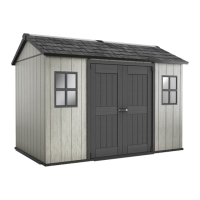
Related product manuals