This document provides installation instructions and specifications for the Model F201 faucet, a single-handle bathroom faucet designed for countertop mounting. The manual covers both the faucet installation and the pop-up drain installation, along with troubleshooting and maintenance guidelines.
Function Description:
The Model F201 is a single-handle faucet designed for use in bathrooms. It controls the flow and temperature of water through a single lever. The faucet is intended to be mounted on a countertop, with the water supply lines connecting from underneath the sink. It includes a pop-up drain system for basin functionality.
Important Technical Specifications:
- Dimensions (Faucet):
- Overall Height: 7 inches (178 mm)
- Spout Height (from base to aerator): 4 11/16 inches (119 mm)
- Spout Reach (horizontal distance from center of faucet body to center of aerator): 5 1/8 inches (130 mm)
- Base Diameter: 1 15/16 inches (50 mm)
- Mounting Hole Diameter: 1 5/8 inches (42 mm)
- Faucet Body Width (at base): 3 1/2 inches (89 mm)
- Overall Faucet Body Depth (from back to front of spout): 6 7/16 inches (164 mm)
- Handle Length: 4 3/8 inches (111 mm)
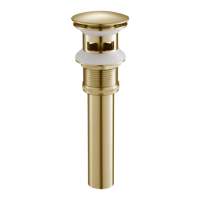
- Dimensions (Pop-Up Drain):
- Drain Nut Diameter: 2 7/16 inches (62 mm)
- Maximum Countertop Thickness for Drain: 2 7/16 inches (max 62 mm)
- Thread Type: G1 1/4 Thread
- Tail Piece Diameter: 1 4/16 inches (32 mm)
- Material: The product is made of solid brass, ensuring durability and compliance with market needs for design and functionality.
Usage Features:
- Single-Handle Operation: The faucet features a single lever for easy control of water flow and temperature.
- Countertop Mounting: Designed for installation directly onto a bathroom countertop.
- Pop-Up Drain System: Includes components for a pop-up drain, allowing users to open and close the basin drain.
- Pre-Installation Flushing: For first-time installations, it is recommended to flush the pipes by opening the angle valve for 60 seconds to clear any debris before connecting the faucet.
- Integrated Net Filter: A net filter is attached to the connecting end of the supply hoses and should not be removed, likely to prevent debris from entering the faucet.
Installation Process:
The installation process is divided into two main sections: Faucet Installation and Pop-Up Installation.
Faucet Installation Steps:
- Preparation: Shut off water suppliers, remove the old faucet, and clean the mounting surface. Flush pipes if it's a first-time installation.
- Hardware Removal: Remove existing mounting hardware from the mounting pipe.
- Faucet Placement: Place the rubber O-ring into the bottom gap of the faucet, then insert the faucet into the faucet hole on the countertop.
- Securing from Below: From underneath the sink, slide the rubber washer, metal washer, and mounting bracket onto the threaded shank.
- Tightening: Adjust the faucet body's position if needed, then tighten the mounting nuts with a Phillips screwdriver until snug.
- Hose Connection: Connect and tighten the supply hoses using two adjustable wrenches, being careful to avoid twisting or kinking. Turn on the angle valve and check for leaks.
Pop-Up Installation Steps:
- Disassembly: Remove all components from the drain piece: thin and thick silicone washers, hard washer, drain nut, and tail piece.
- Drain Insertion: Insert the drain and thin silicone washer into the basin. Apply Teflon to the exposed male threading area of the drain piece.
- Securing Drain: Insert the thick silicone washer and hard washer over the exposed male threaded area, then screw the drain nut onto the drain. Do not overtighten.
- Tail Piece Attachment: Screw the tail piece onto the drain using the tail washer.
- Waste System Connection: Install the waste system (not included) and check for leakage.
Maintenance Features:
- Cleaning and Care:
- Regularly clean the faucet with a soft cloth to maintain its appearance.
- For heavy cleaning, use mild liquid detergents or non-abrasive liquid polisher.
- Always rinse with water and dry with a soft cloth after cleaning.
- Avoid: Abrasive cleaners, steel wool, and harsh chemicals, as these can dull the finish and void the warranty.
- Troubleshooting Guide: The manual includes a troubleshooting section for common issues:
- Low flow: Often caused by a clogged aerator or filter. The action is to unscrew and check/replace the aerator (some models may require a wrench).
- Faucet leaks from under handle: Typically due to a loose bonnet nut or a cartridge needing reseating. The action is to remove the handle and cap, then use a wrench to ensure the bonnet nut is tight.
- Water will not shut off completely: Usually caused by a dirty or worn-out plastic washer in the cartridge. The action is to adjust or replace the cartridge. A warning is provided that failure to securely tighten the bonnet nut with a wrench could result in water damage.