Do you have a question about the Kidde SA-USB and is the answer not in the manual?
Provides an overview of the SA-USB Interface Card's functionality and PC communication.
Details the step-by-step process for installing the SA-USB card into the panel.
Instructions for connecting the SA-USB card to a computer via USB.
Guidance on how to install the necessary drivers for the SA-USB card.
Instructions and notes for connecting the SA-USB card to a printer.
States compliance with FCC rules, including conditions for operation.
Specifies the environmental conditions for the device's operation.
Provides information on where to find additional support and contact details.
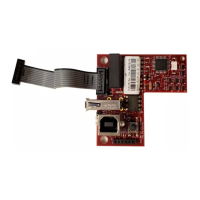
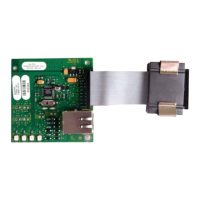
The SA-USB Interface Card is a versatile device designed to provide USB connectivity for supported printers or a PC, enabling various functionalities within a fire alarm system. It facilitates the printing of system events from a control panel and supports PC communications for configuration and firmware updates.
The primary function of the SA-USB Interface Card is to bridge the control panel with external USB devices. When connected to a supported printer, it allows the control panel to print system events, providing a physical record of critical activities. This is particularly useful for auditing and record-keeping purposes in fire alarm systems.
Additionally, the card enables communication with a PC, which is crucial for system management. Through this connection, users can access the configuration utility (CU) to adjust system settings and the Firmware Update Utility (FUU) to update the device's firmware. This ensures that the system remains up-to-date with the latest features and security patches.
The card features several connectors and LEDs to indicate its status and facilitate connections. Key connectors include:
The LEDs provide visual feedback on the card's operational status:
The default printer baud rate is 9600, ensuring reliable communication with connected printers.
The SA-USB Interface Card is designed for straightforward installation and use.
| Brand | Kidde |
|---|---|
| Model | SA-USB |
| Category | Recording Equipment |
| Language | English |