EasyManua.ls Logo

KidKraft 53208 User Manual

KidKraft 53208
14 pages
To Next Page IconTo Next Page
Page #1 background imageLoading...
Page #1 background image
© 2010 KidKraft, LP
Assembly Instructions
Customer Service
1-800-933-0771
www.kidkraft.com
1
USE AND MAINTENANCE:
-Use on level surfaces only
-Please check assembly at regular intervals, and frequently
tighten hardware if necessary. If maintenance is not carried
out, the product could cease to function properly.
WARNING:
ADULT ASSEMBLY REQUIRED.
Product includes small parts with potentially
hazardous sharp points and sharp edges in
the unassembled state. Keep unassembled
parts away from children.
WARNING:
CHOKING HAZARD. Small parts
and sharp points, not suitable for
children under 3 years.
WARNING:
If used improperly, your kitchen may be pulled over or fall, creating risk of injury or damage. To minimize
this risk, we recommend that you use the enclosed wall anchor kit, which gives you the option of attaching
the kitchen to a wall. In addition, children should not be permitted to climb or pull on the kitchen.
© 2010 KidKraft, LP
Item #53208
Vintage Kitchen
in White
All manuals and user guides at all-guides.com
all-guides.com
Question and Answer IconNeed help?

Do you have a question about the KidKraft 53208 and is the answer not in the manual?

KidKraft 53208 Specifications

General IconGeneral
BrandKidKraft
Model53208
CategoryIndoor Furnishing
LanguageEnglish

Summary

Vintage Kitchen Assembly Instructions

Parts List Overview

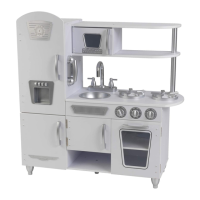
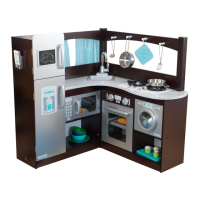
Details the components included in the kit, with numbered parts for identification.

Hardware Identification

Lists all necessary hardware, including bolts, nuts, screws, and tools for assembly.

Step 1: Initial Panel Connection

Connects main side panels using cross dowel bolts and nuts.

Step 2: Back Panel Attachment

Attaches rear panels to the side structures using cross dowel bolts.

Step 3: Securing Side Structures

Fastens side panels together using white hex bolts and twist nuts.

Step 4: Inserting Back Panels

Slides the back panels into the assembled side sections.

Step 5: Attaching Lower Shelf

Installs the bottom shelf using cross dowel bolts.

Step 6: Mounting Oven Rack Support

Secures the support for the oven rack using white screws.

Step 7: Installing Top Shelf

Attaches the upper shelf structure using cross dowel bolts.

Step 8: Faucet and Burner Installation

Installs the faucet and stove burners onto the countertop.

Step 9: Stove Top to Unit Connection

Connects the stove top assembly to the main kitchen unit.

Step 10: Upper Shelf Assembly

Attaches the upper shelving unit to the main structure.

Step 11: Securing Upper Shelves

Fastens the upper shelves using cross dowel bolts.

Step 12: Countertop Support Installation

Installs the support pole and decorative piece for the countertop.

Step 13: Decorative Panel Attachment

Adds decorative panels to the main kitchen body.

Step 14: Main Shelf Support Mounting

Attaches the main support for the shelves.

Step 15: Side Panel to Support Connection

Connects side panels to the main shelf support.

Step 16: Rear Panel Fastening

Secures a back panel using white bolts and nuts.

Step 17: Door Latch and Screw Installation

Attaches latches and screws to doors for mounting.

Step 18: Mounting Back Panels

Attaches back panels using white bolts and nuts.

Step 19: Door Attachment to Unit

Connects doors to the main kitchen unit using white bolts and nuts.

Step 20: Securing Oven Back Panel

Attaches the back panel for the oven section.

Step 21: Final Back Panel Attachment

Secures the last back panel using white bolts and nuts.

Step 22: Oven Rack Insertion

Installs the oven rack into its designated slot.

Step 23: Sink Installation and Removal

Installs the sink and provides instructions for its removal.

Safety, Use, and Maintenance Guidelines

Covers parental supervision, cleaning, and general product care.

Product Warranty Information

Details the warranty terms and how to submit a claim.

Related product manuals