EasyManua.ls Logo

KidKraft 65156 User Manual

KidKraft 65156
9 pages
To Next Page IconTo Next Page
Page #1 background imageLoading...
Page #1 background image
Item #65156
Please retain this information
for future reference
To order replacement parts,
please visit www.kidkraft.com
Designer Dollhouse
Assembly Instructions
A. Silver Cross Dowel
Bolt x 12 pcs
2 5/16 in / 58 mm
D. Gold Cross Dowel
Bolt x 2 pcs
11/16 in / 17 mm
G. Pink Round Head
Screw x 3 pcs
13/16 in / 20 mm
E. Round Head Screw
x 4 pcs
7/16 in / 11 mm
F. Silver Round Head
Screw x 6 pcs
13/16 in / 20 mm
B. Cross Dowel Nut
x 12 pcs
C. Silver Cross Dowel
Bolt x 2 pcs
11/16 in / 17 mm
H. White Round Head
Screw x 5 pcs
13/16 in / 20 mm
I. Pink Screw x 4 pcs
1 in / 25 mm
Allen Wrench x 1 pc
The following tool
(not included) is
required for assembly:
Phillips
®
Screwdriver
1
22
13
11
12
2
3
5
4
16
19
20
15
x 2
x 2
x 2
x 2
14
21
18
17
8
x 10
x 10
9
10
7
6
23
24
26
27
28
29
30
31
32
25
© 2010 KidKraft, LP
Customer Service
1-800-933-0771
www.kidkraft.com
1
WARNING:
WARNING:
CHOKING HAZARD. Small parts and
sharp points, not suitable for children
under 3 years.
WARNING:
If used improperly, your kitchen may be pulled over or fall, creating risk of injury or damage. To minimize
this risk, we recommend that you use the enclosed wall anchor kit, which gives you the option of attaching
the kitchen to a wall. In addition, children should not be permitted to climb or pull on the kitchen.
USE AND MAINTENANCE:
-Use on level surfaces only
-Please check assembly at regular intervals, and frequently
tighten hardware if necessary. If maintenance is not carried
out, the product could cease to function properly.
ADULT ASSEMBLY REQUIRED.
Product includes small parts, sharp points,
and sharp edges in unassembled state. Keep
unassembled parts away from children under
3 years of age.
Question and Answer IconNeed help?

Do you have a question about the KidKraft 65156 and is the answer not in the manual?

KidKraft 65156 Specifications

General IconGeneral
BrandKidKraft
Model65156
CategoryToy
LanguageEnglish

Summary

Designer Dollhouse Assembly Overview

Parts and Hardware Identification

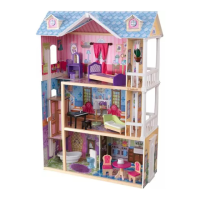
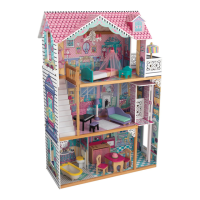
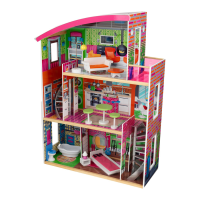
Lists and identifies all components and hardware required for dollhouse assembly.

Safety Warnings and Precautions

Details essential safety advice for adult assembly and product usage, including choking hazards.

Dollhouse Assembly Steps

Step 1: Base Assembly

Attaching side panels to the base using specific dowel bolts and nuts.

Step 2: Attaching Side Panels

Connecting the main side structures of the dollhouse.

Step 3: Attaching Support Beams

Securing horizontal support beams to the dollhouse structure.

Step 4: Attaching Additional Supports

Adding more structural supports for stability and form.

Step 5: Preparing Staircases

Assembling the spiral staircases before installation.

Step 6: Installing Staircases

Attaching the prepared staircases to the dollhouse interior.

Step 7: Inserting Vertical Panels

Placing and securing interior vertical partition panels.

Step 8: Attaching Top Structure

Connecting the upper sections of the dollhouse.

Step 9: Installing Floors

Inserting the dollhouse floor panels into the structure.

Step 10: Securing Floors

Fastening the installed floor panels to maintain rigidity.

Step 11: Attaching Roof Sections

Connecting the main roof pieces to the top of the dollhouse.

Step 12: Securing Roof

Finalizing the roof attachment for structural integrity.

Step 13: Attaching Doors

Installing the dollhouse doors.

Step 14: Final Check

Reviewing and ensuring all parts are correctly assembled.

Product Care and Warranty Information

Parental Supervision Requirement

Advises parents on necessary supervision for safe play.

Important Product Information

Details unique handcrafted qualities and notes on potential imperfections.

Cleaning Instructions

Provides guidance on how to clean the dollhouse surface safely.

Sole and Limited Warranty

Outlines the warranty terms, coverage, and claim process.

Related product manuals