Do you have a question about the King Industrial KC-26DS and is the answer not in the manual?
Details the 2-year limited warranty for industrial use and proof of purchase requirements.
Information on how to obtain replacement parts from authorized service centers.
Comprehensive safety rules for operating power tools to prevent accidents and ensure user protection.
Procedures for unpacking, cleaning, and preparing the drum sander for initial use.
Guidelines for safely moving the drum sander to its work area using appropriate equipment.
Instructions for safe electrical hookup, grounding, and 220V operation.
Recommendations and precautions regarding the use of extension cords with the sander.
Guidance on connecting the dust collection system to the sander's dust chutes.
Step-by-step guide for removing and installing sanding belts on the drums.
Procedures for adjusting conveyor belt tension and ensuring proper tracking.
Instructions for adjusting or replacing the drive belts for the sanding drums.
Detailed steps for removing and replacing a worn-out conveyor belt for optimal performance.
Guidance on adjusting the rear sanding drum for parallelism with the front drum.
Guide to operating the sander, including starting, stopping, and setting height.
Instructions for lubricating moving parts and performing regular checks for safe operation.
Information on accessing the latest parts diagram and list via the King Canada website.
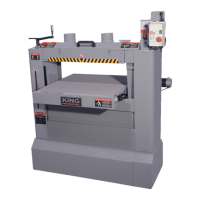
This document describes the King KC-26DS 26" x 12" Drum Sander, an industrial power tool designed for sanding various workpieces. The manual provides comprehensive instructions for its unpacking, setup, operation, and maintenance, emphasizing safety and proper usage to ensure optimal performance and longevity.
The King KC-26DS is a horizontal drum sander primarily used for sanding workpieces to a desired thickness and smoothness. It features two sanding drums, with the rear drum typically fitted with a finer grit sanding paper than the front drum. This configuration allows for both coarse and fine sanding in a single pass, enhancing efficiency and achieving superior finishes. The machine is equipped with a conveyor belt system that feeds the workpiece through the sanding drums, ensuring consistent and even material removal. The conveyor belt speed is adjustable, allowing users to control the feed rate based on the material and desired finish. The sanding height is also adjustable via a crank handle, enabling precise control over the workpiece thickness.
The sander is designed for ease of use and precision. Upon receiving the sander, users are instructed to unpack and clean all rust-protected surfaces with a mild solvent, avoiding harsh chemicals that could damage painted surfaces. Applying a light coating of paste wax is recommended to prevent future rust. The machine should be transported to its work area using appropriate lifting equipment due to its weight.
Electrical connections are critical for safe operation. The sander requires a 220V, 15-amp branch circuit with a 15-amp time delay fuse or circuit breaker and must be properly grounded. All electrical work should be performed by a qualified electrician. The manual explicitly warns against using extension cords due to potential power loss, but if necessary, an adequately sized and capacity-matched cord is required.
Operating the sander involves several steps. Before starting, the dust collector must be turned on. The machine is activated by a green "ON" button on the control box, and a key switch engages the conveyor belt. The conveyor speed can be adjusted using a dedicated knob. To set the sanding height, the crank handle is used. If the workpiece thickness is unknown, the user can place the workpiece under the sanding drums, raise the conveyor table until contact is made, and then read the depth gauge on the front of the machine to determine the current thickness. Workpieces should be placed at the center of the conveyor belt for proper feeding, guided by a centering gauge on the machine frame. The sander accommodates workpieces with a maximum thickness of 12 inches and a minimum thickness of 1/4 inch, with strict warnings against sanding pieces outside these dimensions.
Replacing sanding belts is a straightforward process. The upper guard must be lifted and tilted to access the sanding drums. The belts are secured by spring-loaded clamps at either end of the drums. To remove a belt, the right clamp is pushed forward to release the belt tab, then the belt is unwound, and the left clamp is pushed to release the other tab. Mounting a new belt involves inserting one tab into the left drum slot, pushing the clamp to secure it, rolling the belt onto the drum while keeping the edges snug, and then securing the other tab into the right drum slot. The spring-loaded clamps ensure the belt is held tightly during rotation. It is recommended to use finer grit paper on the rear drum for optimal sanding results.
Adjustments for the conveyor belt tension and tracking are also detailed. If the belt slides or has improper tension, adjustment bolts on either side of the conveyor table can be used to center the belt and ensure good traction. The sanding drum drive belts, powered by a single motor, can become loose. To adjust them, the right end guard and front guard are removed, and the motor's height position is adjusted by turning M12 nuts on the height adjustment bolts. If the motor needs replacement, the entire motor assembly can be removed by unbolting its base plate. Replacing the conveyor belt involves removing the guards at both ends of the sander and the four cap screws at the bottom of the feed table assembly, allowing the feed table to be removed to access and replace the belt. The parallelism of the rear sanding drum can be adjusted using cap screws and a T-wrench to ensure it is parallel with the front drum, which is factory-adjusted.
Regular maintenance is crucial for the sander's performance and safety. Users are reminded to disconnect the machine from the power source before performing any maintenance or lubrication. Key maintenance tasks include lubricating the table height adjustment screw shafts at both ends of the machine with grease at all times. Before each sanding operation, it is important to verify that all nuts and screws are properly tightened and that the sanding belts are securely mounted and free from looseness or tears. Accumulation of dust and particles on or in the machine should be prevented by regular cleaning. The sander is equipped with two 4-inch dust chutes, and ring clamps must be used to connect dust collection hoses to these chutes. The manual strongly warns against operating the machine without a dust connector attached and running, highlighting the importance of dust management for both machine longevity and user safety.
The manual also emphasizes general safety instructions applicable to all power tools, such as knowing the tool's limitations, proper grounding, keeping guards in place, removing adjusting keys and wrenches before operation, maintaining a clean work area, avoiding dangerous environments, keeping children away, child-proofing the workshop, using the proper speed, using the right tool, wearing proper apparel (avoiding loose clothing, gloves, and jewelry), always wearing safety glasses (ANSI Z87.1) and a face/dust mask if dusty, avoiding overreaching, maintaining tools with care, disconnecting tools before servicing, avoiding accidental starting, using recommended accessories, never standing on the tool, checking damaged parts, and never leaving the machine running unattended. These guidelines are fundamental to ensuring a safe and efficient working environment.
| Model | KC-26DS |
|---|---|
| Disc Speed | 3450 RPM |
| Motor Power | 1 HP |
| Table Tilt | 0 - 45 degrees |
| Voltage | 110V |
| Dust Port Diameter | 2 in |
| Type | Combination Belt/Disc Sander |
| Belt Size | 6 x 48 inch |