Do you have a question about the KMART Side Drawer Oak Look 42619673 and is the answer not in the manual?
| Brand | KMART |
|---|---|
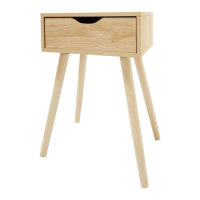
| Model | Side Drawer Oak Look 42619673 |
| Category | Indoor Furnishing |
| Language | English |
Guidance on cleaning, maintenance, and storage for the furniture item to ensure longevity and proper use.
Crucial safety precautions, load limits, and general warnings for safe assembly and use of the furniture.
List of all included hardware parts with quantities and specifications for identification during assembly.
Connect parts A, B, 3, and 4 to board 1 using screws, ensuring alignment.
Slide board 10 into the groove of the assembled structure for stability.
Attach board 2 to the structure using screws (Part C) to complete the main frame.
Fix part H onto board 2 using screws (Part G) to provide structural support.
Screw the legs (Part 11) into part H to provide a stable base for the unit.
Assemble parts 6, 7, 8 with screws (Part D) and slide in board 9 for the drawer.
Attach part 5 to the drawer frame (step 6) using screws (Part A).
Slide the assembled drawer into the unit and note wall fixing attachments.