26
●
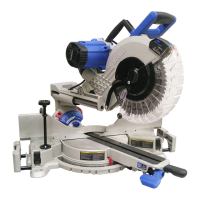
Place arbor nut (XX) on arbor. Press and hold the arbor lock button (Aa-Fig. 16) in. Using the
wheel wrench (OO) turning clockwise to tighten arbor nut (XX) securely. Release the arbor lock
button. (Fig. 15)
● Close the upper wheel guard (ZZ) and tighten the wheel guard lock knob (YY).
REMOVING THE CUTTING WHEEL (FIG. 15, 16, 17)
WARNING: To avoid injury from an accidental start, make sure the switch is in the OFF
position and the plug is not connected to the power source outlet.
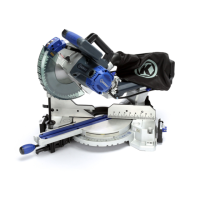
● Disconnect the saw from the power source.
● Move the sliding table to the front of the saw.
● Loosen the cutting head lock knob (MM) and pull out the hold-down latch (SS) to raise the
cutting head to its upmost position. Release the hold-down latch (SS) and tighten the cutting
head lock knob (MM). (Fig. 15)
● Loosen the wheel guard lock knob (YY) to open the upper wheel guard (ZZ).
● Place the wheel wrench (OO) on the arbor nut (XX).
● Press the arbor lock button (Aa), holding it in rmly while turning the wheel wrench
counterclockwise to loosen. (Fig. 16)
● Remove the arbor nut (XX), outer ange (1) and cutting wheel (J). (Fig. 17)
NOTE: Do not remove the inner ange (2).
WHEEL WRENCH STORAGE (FIG. 18)
For convenient storage and prevention of loss,
there is a clip (NN) behind the arm (1) for storing
the wheel wrench (OO) when not in use.
18
NN
OO
1
 Loading...