FILTER ASSEMBLY
OPERATION
Place the paper filter above
cage, and attach it with
rubber band as shown in
figure.
1. This vacuum includes a paper filter for fine dust pick up.
2. The paper filter should always be removed for wet pick ups.
3. When vacuuming liquids the unit has a float that will rise to the top and
shut off suction when the tank is full. This will increase the motor’s rpm’s.
Turn off the vac and dump out liquids to continue using the unit.
1. Line up the motor head with the tank.
Pull the side latches out and lower the head into place, let go of the latches.
Latches should snap into the tank tabs. (Fig. 1).
2. Insert the hose into the vacuuming or blowing port.
3. To turn unit on use switch on motor head.
4. Familiarize yourself with the control and features of your vacuum cleaner.
VAC ASSEMBLY
Fig. 1
Filter use
Note:
The accessories may vary
depending on the model purchased.
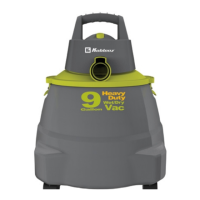
OWNER’S MANUAL
All Purpose and Wet/Dry Vacuum
Electrical Rating: 120 V~ 60 Hz 4 A
CONGRATULATIONS!
You have just purchased a Koblenz
®
. Vacuum Cleaner. Please read this manual
carefully before operating the machine. Model and serial number may be found
on the side of your vac. You should record both model and serial numbers
and keep them in a safe place for future use.
IMPORTANT SAFETY INSTRUCTIONS
WARNING
When using an electric vacuum cleaner, basic precautions
should be followed including the following:
This vacuum cleaner is for domestic use only; it may be used for
vacuuming wet or dry materials and as a blower.
To reduce the risk of fire, electric shock or injury:
1. Do not use to pick up flammable or combustible liquids, such as gasoline
or use in areas where such items may be present.
2. Use product only as described in this manual, use only manufacturer’s
recommended attachments.
3. Do not pick up anything that is burning or smoking; such as cigarettes,
matches or hot ashes.
4. Do not leave vacuum plugged in. Unplug from outlet when not in use and
before servicing.
5. Turn off all controls before unplugging.
6. Do not put any object into openings. Do not use with any opening blocked.
Keep free of dust, lint, hair and anything that may reduce air flow.
7. Do not use without filter in place.
8. Do not allow vacuum to be used as a toy, or to run unattended at any
time. If used near children, close supervision is necessary.
9. Do not store outdoors.
10.Do not use with a damaged cord or plug. If vacuum is not working as it
should,or if it has been dropped, damaged, or submerged into water,
return it to an authorized service center.
11.Do not pull or carry by cord, use cord as a handle, close a door on a cord
or pull cord around sharp edges or corners, do not run vacuum over cord.
Keep away from heated surfaces.
12.Do not unplug by pulling on cord. To unplug, grasp the plug, not the cord.
13.Do not handle plug or appliance with wet hands.
14.Use extra care when cleaning stairs.
15.Keep
hair, loose clothing, fingers and all parts of body away from
openings and moving parts.
16.Never use vacuum cleaner as a pump.
17. If the line cord is damaged it must be replaced by the manufacturer or
an authorized service center.
18.Connect to a properly grounded outlet only. See grounding instructions.
GROUNDING INSTRUCTIONS
This appliance is for use on a 120V~ circuit, and has a grounded plug
that looks like the plug illustrated in figure A. A temporary adapter may
be used to connect this plug to a non grounded outlet if a properly
grounded outlet is not available. The temporary adapter should be used
only until a properly grounded outlet can be installed by a qualified
electrician.The green colored rigid ear, lug or the like extending from the
adapter must be connected to a permanent ground such as a properly
grounded outlet box cover. Whenever the adapter is used, it must be
held in place by a metal screw. (fig. B).
NOTE: In Canada, the use of a temporary adapter
is not permitted by the Canadian Electrical Code.
WARNING
Improper connection of the equipment grounding conductor can result in
a risk of electric shock. Check with a qualified electrician or service person
if you are in doubt as to whether the outlet is properly grounded.
Do not modify the plug provided with the appliance if it does not fit the
outlet, have a proper outlet
installed by a qualified electrician.
3-Prong
Grounded Plug
Adapter
2-Prong
Outlet
Green
Grounding Lug
Make sure this
is a metal screw
connected to a
known ground
Figure B
Figure A
Properly
Grounded
Outlet
3-Prong
Grounded Plug
Save these instructions
Read all instructions before
using this vacuum cleaner.
19-1072-00-8
Product Description
• Tank
• On/off switch
• Vacuuming
port
• Tool caddy
• Air blower port
• Lid release tab
• Filter and band
For: PV-525 KG5 US
Filter
Rubber band
Fig. 1
YOUR VACUUM COMPONENTS
A) Tank
B) On/Off switch
C) Suction port
D) Air blower port
E) Tool caddy
F) Floor tool holder
G) Lid release tab
H) Filter and band
I) Flexible hose
J) Pick up tool
K) Crevice tool
L) Inflator
M) Shoulder strap
N) Extension wands
O) Combination carpet / floor tool
P) Belt slot
A
D
G
B
P
E
J
K
L
H
F
C
I
M
O
N