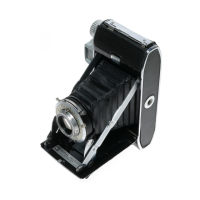
FOCUSING TUBE ASSEMBLY.
On
each
side
of the opening into which the
focus-
ing tube
assembly
(figure
9)
is
to
fit,
the outside
edge
of
the
flange
projects
about
1/
16
inch
for
a
distance
of
about
1 1/ 2 inches.
Coat
the
inside
of
the flange
at
these
pOints with
black
wood
lacquer
dope.
Remove the
inside
focusing tube
from
the outside
focusing tube.
Turn
back
the focusing tube
insert
until
it
fits
tightly
against
the
focusing tube flange with the
stop
stud
on the bottom.
Do
not
exert
too much
pressure
on the
insert;
otherwise
its
shape
may
be
distorted,
causing
binding
of
the focusing tube
assembly
after
it
has
been
reassembled
to the
camera.
Line up the focusing
barrel
in
the
case
so
that
the
stop
stud
will
be on
the
right-hand
side
of
the
stop
plate
located
in the
bottom
of
the
camera
case.
Do
not
attempt
to
insert
thefocusingbarrel
into the
case.
While in
this
position, the cutout
portion
on
the
insert
is
lined up
directly
above the
built-up
portion
of
the
case,
and the
insert
is
pencil
marked
in this
position.
The
insert
is
then
turned
approxi-
mately
half way
back
on
the
focusing
barrel
with
the
stop
stud
on the
right-hand
side
of
the
stop
plate.
The
focusing
barrel
is
inserted
in the
case
until
the
stop
stud
is
beyond the tube opening
shoulder
of
the
case.
The
insert
is
then
turned
back
until the
pencil
mark
on the
insert
is
lined up with the
built-
up
portion
of
the
case.
The
tube
is
then
pushed
into
the
case
until
it
locks into
position.
Then
the
re-
taining
ring
is
screwed
into
position
using
special
tool No. 501-B.
With
the
outer
tube fully extended,
insert
the
inside
focusing tube in
such
a
manner
that
when the
inside
tube
is
screwed
all
the way in, the
shutter
operating
lever
is
at
the top and the
inner
end
of
the
inside
focusing tube extends s lightly
farther
into
the
case
than
the
focusing tube flange.
To
do
this
will
usually
require
several
trials,
starting
the
inside
focusing tube on
different
threads
of
the
outer
tube.
Replace
the
retaining
ring
lock
screw.
Fasten
the
focusing
tube guide
assembly
(figure
10) to the
inside
focusing tube with the two
upper
focusing tube guide
screws
(figure
9)
and
the
four
lower
focusing
tube guide
screws
(figure 10).
The
inner
end
of
the
shutter
operating
lever
and end
as-
sembly
must
extend through the
slot
in
the
shutter
operating
lever
slide
.
Fasten
the focusing tube guide
lug
assembly
to the
focusing
tube guide
assembly
with the two focusing tube guide lug
screws.
Hook
the guide lug
spring
over
the
studs
on the focusing
tube guide lug
assembly
and on
the
right
shutter
operating
lever
lug
assembly
.
REPLACEMENT OF SHUTTER (See
figure
9).
Insert
the
shutter
light
guard
in the focusing
tube
assembly
with the
smaller
opening
toward
the
back
of
the
camera
and with the
large
cutout
portion
directly
in
the
center
of
the
shutter
operating
lever
and end
assembly.
CAUTION:
The
shutter
light
guard
is
made
of
thin
metal
and should
be
handled
with
care
.
If
it
is
bent
by rough handling,
it
may
bind on the
shutter
operating
disk
and
cause
faulty
operation
of
the
shutter.
Replace
the
shutter
complete
in
the focusing
-
tube-guiding
the end of the
wire
through
the
open-
ing in the
shutter
light
guard
at
the
sametime
guid-
ing the end
of
the
shutter
operating
lever
and end
assembl
through the hole in the
shutter
operating
disk
figure
10).
Seat
the
shutter
firmly
with the
caDre
release
nut in
the
cutout
slot
in the
focusing
tube.
With a
jeweler's
screwdriver,
turn
on the shut:.
ter
retaining
ring
.
Insert
the
contact
wire,
which
comes
out
of
the
shutter,
into the
left
side
hole
of
the focusing tube
guide
assembly.
Insert
the ground
wire,
which
ex-
tends
from
the
shutter
light
guard,
in the
hole
on
the
right
side
of the
focusing
tube guide
assembly
.
Fasten
the long
contact
wire
to
the
left
side
of the
contact
plate
on the focusing tube guide
assembly.
Fasten
the ground
wire
to the
contact
plate
on the
right
side
of
the
focusing
tube guide
assembly
.
PARTS
ON
MECHANISM
PLATE.
The
range
finder
couplet
bar
(figure
11)
will
fit
into the
case
with the end having the cutout
toward
the
back
.
Push
the
range
finder
couplet
bar
shaft
through the
couplet
bar
until
the
back
end
is
flush
with
the
end of
the
couplet
bar.
Extend the
focusing
tube
assembly
to the
limit
of
travel.
The
front
end of the
range
finder
couplet
bar
shaft
fits
in a hole in the
front
of
the
case
which
is
located
near
the top
right
corner
of
the
focusing
tube guide
assembly.
This
hole extends through
the
case
and on the
front
of
the
case
is
covered
only
by
the
leather.
With the
free
end
of
the
range
finder
couplet
bar
spring
turned
toward
the top
of
the
case
and
resting
against
the
right-hand
spool
housing
assembly,
insert
the
projecting
end
of
the
range
finder
couplet
bar
shaft
in the hole in
the
case.
Then, allowing the
leather
covering
on
the
front
of
the
case
to
be
pushed out, push the
front
end of the
shaft
far
enough into the hole
so
that
the
back
end
of
the
shaft
can
be
slipped
past
the overhanging
back
edge
of
the
mechanism
plate.
Guiding the
back
end
of
the
shaft
into the hole in
the
mechanism
plate,
push down the
leather
on the
front
of
the
case
with
the
flat
side
of
a
screwdriver
blade.
In
order
to
prevent
the
range
finder
adjusting
screw
bracket
(figure
1)
from
catching
on
the
range
finder
couplet
bar
and throwing the
range
finder
out
of
adjustment,
follow the
instructions
givenonpage
4.
Check the focusing tube
assembly
to
make
sure
that
it
operates
smoothly,
without binding
or
side
play. Since the
upper
guide
rod
is
eccentric
at
one
end,
it
provides
an
adjustment
of
the
sidewise
mo-
tion
of
the
focusing
tube
assembly
as
the
latter
is
extended
or
retracted
. By
means
of
the
screw-
driver
slot
in the
back
end,
turn
the guide
rod
as
required
for
smooth
operation
of
the
focusing
tube
assembly
.
If
not enough
adjustment
can
be obtained
with the guide
rod,
loosen
the two
focusing
tube guide
lug
screws
(figure 10), the focusing tube
guideTug
assembly
as
required
, and
tighten
the
screws.
Place
the key
post
gear
(figure
8)
over
the
pin
on the key
complete.
The
flattened
sides
of the key
post
gear
pin
must
be
turned
vertically
to
allow
the
gear
to
seat
properly
over
the pin.
Then
place
the
key
post
wa1lher
over
the key
post
gear
and
replace
19
 Loading...