Carburetor Servicing
WARNING
Accidental Starts can cause severe injury or
death.
Disconnect and ground spark plug lead(s)
before servicing.
Before working on engine or equipment, disable
engine as follows: 1) Disconnect spark plug lead(s). 2)
Disconnect negative (–) battery cable from battery.
NOTE: Main and slow jets are fi xed and size specifi c
and can be removed if required. Fixed jets for
high altitudes are available.
NOTE: Keep solvent away from plastic or rubber parts if
non-compatible or damage may occur.
● Inspect carburetor body for cracks, holes, and other
wear or damage.
● Inspect fl oat for cracks, holes, and missing or
damaged fl oat tabs. Check fl oat hinge and shaft for
wear or damage.
● Inspect fuel inlet needle and seat for wear or damage.
● Inspect spring loaded choke plate to make sure it
moves freely on shaft.
Float Replacement/Overhaul/Choke Repair
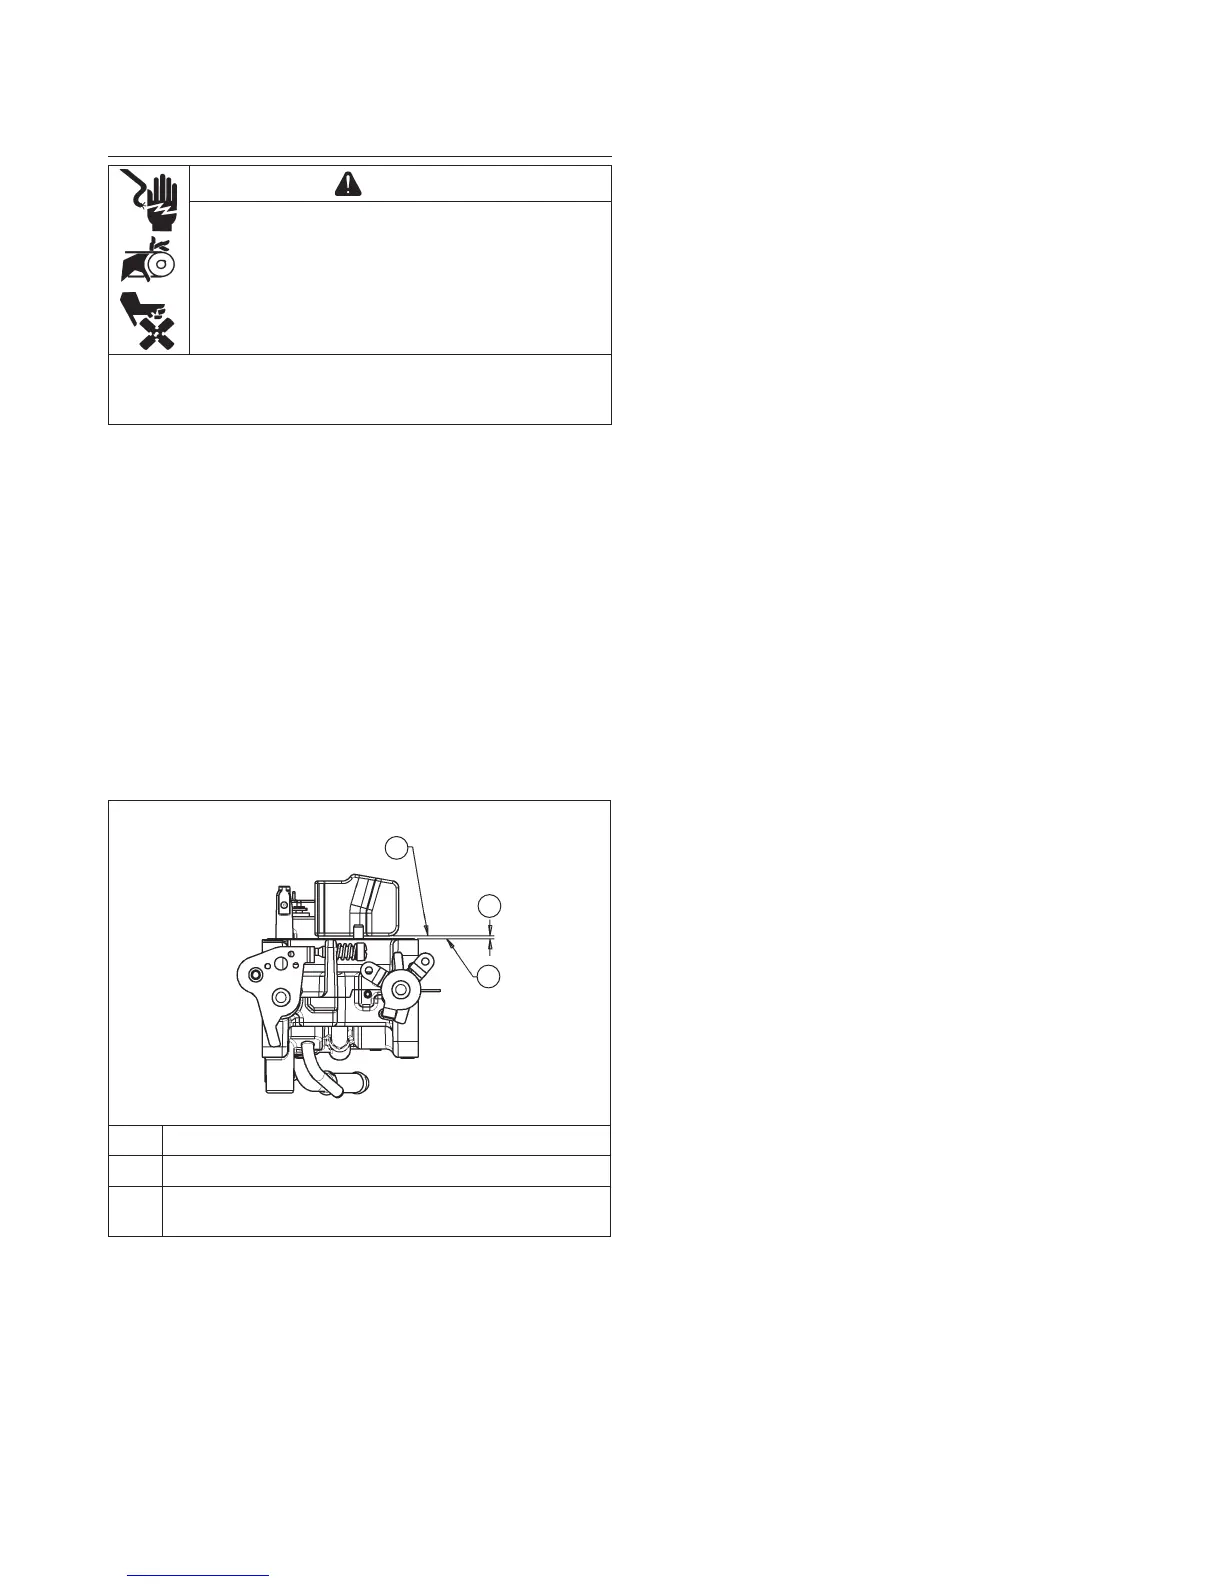
Float Setting
C
B
A
A Top of Float Body (Carburetor Body Inverted)
B Top of Gasket Crush Ribs
C
1.6 mm (0.063 in.) +/- 0.5 mm (0.02 in.) Float
Setting
NOTE: Inlet needle center pin is spring loaded. Make
sure fl oat rests against fuel inlet needle without
depressing center pin.
If symptoms described in Troubleshooting-Carburetor
Related Causes indicate fl oat level problems, remove
carburetor from engine to check and/or replace fl oat.
Use a fl oat kit to replace fl oat, pin, fl oat valve.
1. Perform removal procedures for appropriate air
cleaner and carburetor outlined in Disassembly.
2. Clean exterior surfaces of dirt or foreign material
before disassembling carburetor. Disconnect
accelerator pump vacuum hose from bottom of bowl.
Remove screws and carefully separate fuel bowl
from carburetor. Transfer any remaining fuel into an
approved container. Discard bowl screws and
gasket; save other parts.
3. Remove fl oat pin, lift out fl oat and inlet needle;
discard parts. Seat for inlet needle is not serviceable
and should not be removed.
4. Use a 1/4" open end wrench and carefully remove
nozzle tubes from bowl. Note and mark jets by
location for proper reassembly. Main jets and main
nozzles may be size/side specifi c. Main jets are
pressed into bottom of main nozzle tubes and are
not serviced separately. Slow jets are located to
outside of nozzle tubes and are removed with a
narrow, straight blade screwdriver. Save parts for
cleaning and reuse.
5. Remove accelerator pump cover screws from
bottom of bowl while holding pump cover in place.
Accelerator pump spring will be pushing against
cover as it is directly under it. Remove and discard
spring and diaphragm. Solenoid can also be
removed using a 1/2" wrench and gasket discarded.
6. Carburetor is now disassembled for appropriate
cleaning and installation of parts in overhaul kit.
Further disassembly is not necessary. Throttle shaft
assembly, fuel inlet seat, idle fuel adjustment screws
are non-serviceable items and should not be
removed. Choke shaft assembly is serviceable,
however it should not be removed unless a choke
repair kit will be installed.
To install choke repair kit go to step 7, otherwise go
to step 14.
7. Clean areas around choke lever/shaft assembly and
self-relieving choke mechanism thoroughly.
8. Note position of spring hooks and choke plate for
correct reassembly later. Remove screws attaching
choke plate to choke shaft. Pull shaft out of
carburetor body, note preload of spring and discard
removed parts.
9. Clean I.D. of both choke shaft bores as required.
10. Install new spring, plastic dust seal cover, and dust
seal on shaft.
11. Slide choke shaft assembly into carburetor,
connecting spring hooks to levers. Before seating
choke shaft completely, lever needs to be rotated
clockwise slightly to get past stop. This preloads
choke plate for proper starting function.
12. Position and reinstall choke plate to fl at side of
choke shaft. Start screws. Close choke and check
plate alignment within carburetor throat, then tighten
screws securely. Do not overtighten.
13. Check for proper operation and free movement of
parts.
Fuel System
2524 690 34 Rev. D KohlerEngines.com