Do you have a question about the Konica Minolta AccurioPress C7090 and is the answer not in the manual?
Details the buttons and indicators on the main control panel.
Describes the power-on and power-off sequence for the main machine.
Explains how to view paper jam information and follow on-screen instructions to clear.
Provides safety and operational advice for clearing paper jams, including fusing unit temperature.
Provides daily cleaning instructions for various machine components like PF units and duplex parts.
This document serves as a Quick Guide for the C7100 and C7090 devices, focusing on basic operations, configuration, and maintenance. It is structured to provide users with essential information for operating and maintaining their machines effectively.
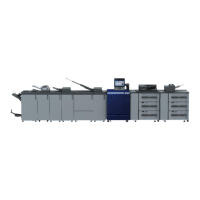
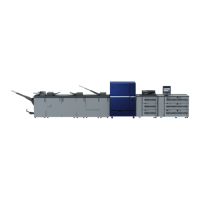
The guide begins with a comprehensive "Confirmation of Product Configuration," detailing the various components and options available for the C7100 and C7090. This section is crucial for understanding the specific setup of an installed device. It introduces the names and functions of the main machine and its optional components, including paper output systems, paper feed systems, controller systems, and other miscellaneous options. For paper output systems, options like the Relay Unit (RU-518m, RU-702, RU-510), Humidifier (HM-103), Intelligent Quality Optimizer (IQ-501), Auto Inspection Unit (UK-301), Banner Output Tray Unit (MK-761), Folding Unit (FD-503), Trimmer Unit (TU-510), Large Capacity Stacker (LS-507), Saddle Stitcher (SD-513, SD-506, SD-510), Perfect Binder (PB-503), and Finisher (FS-532/FS-541) are listed. Many of these options have sub-components, such as the Folding Unit (FD-504), Creaser Unit (CR-101, CR-102/CR-103), Trimmer Unit (TU-503, TU-504), Job Separator (JS-507), Punch Unit (PK-525), Post Inserter (PI-502), Perforation Unit (PE-101/PE-102), Banner Unit (MK-764), and Dust Box (MK-765). For paper feed systems, options include the Paper Feeder Unit (PF-712), Paper Feeder Unit with scanner and ADF (PF-713), Large Capacity 3-stage Paper Feed Unit (PF-812), Multi Bypass Tray (MB-510/MB-511), Large Capacity Unit (LU-208/LU-208XL), Banner Paper Tray Unit (MK-760), Dehumidifier Heater (HT-506/HT-511/HT-515/HT-518), and Feed Adjuster (FA-505). Controller system options include the Image Controller (IC-609, IC-318L/IC-319/IC-316). Other options listed are the Intelligent Media Sensor (IM-101), Authentication Unit (AU-201S), and Status indicator light (MK-744C). An illustrative image of the machine with its control panel is provided, demonstrating a typical configuration. Users are advised to refer to the User's Guide for more details on other options.
The "Name of Each Component and Control Panel" section provides a detailed overview of the machine's physical parts and the functionalities of its control panel. This includes identifying the main power switch, sub power switch, front door, toner bottle, and Fusing Conveyance Unit. The control panel is described with various buttons and indicators: the Power Save button for manually setting or resetting Power Save mode; a Brightness adjustment dial for the touch panel; a Utility/Counter button to display the Utility screen and counters; a Reset button to return settings to default; a Power LED that lights up orange when the main power switch is on and blue when the sub power switch is on; a Data LED that flashes when print data is being received; and a Start/Stop button that lights up blue when operation is possible and orange when it cannot be started. For optional components, the guide illustrates their control panels, highlighting specific buttons such as the Storage button (Output Tray), Eject button (Paper in stacker tray) for the LS-507, Function selection button and Start/Stop button for the PI-502, and Finishing Options button and Start/Stop button for the FD-503. QR codes are provided for accessing video tutorials on how to use these optional control panels.
"Power-On/Off" outlines the correct procedure for starting and shutting down the machine, including its main and sub power switches, as well as the KM and Fiery controllers. For the main machine, it emphasizes the order of turning on the main power switch (Power LED turns off then orange) and then the sub power switch (Power LED turns orange then blue), with an approximate warm-up time of 6 minutes and 30 seconds. Messages like "Please wait," "Confirming scanner connection," "Machine is warming up," and "Now adjusting" indicate the machine's status during startup. For power-off, the sub power switch is turned off first (Power LED turns blue then orange), followed by the main power switch (Power LED turns orange then off, and the control panel darkens). Important tips include waiting at least 10 seconds before turning the power on again after a recent power-off, and not turning off the main power if messages like "Cooling in progress Power is turned off automatically" or "Power off in progress Please do not turn the main power off" are displayed. The guide also mentions the Power Save function and weekly timer for automatic power management. For the KM Controller, the machine is turned on/off first, then the controller. For the Fiery Controller, the main power (at the rear) is turned on, then the Power button (on the side of the LCD panel). The main power of the Fiery Controller can usually be left ON, but should be turned off if the product is not used for a long period. To power off the Fiery Controller, users touch the upper right corner of the LCD panel, press [Shutdown system], and are presented with options to Shutdown system (turns off both Fiery and Windows server), Reboot system (reboots only Fiery), Restart server (reboots both Fiery and Windows server), Brightness (changes screen brightness), and Restart display (reboots only display). The optional UK-301 also needs to be turned on after the machine is on, but normally synchronizes with the sub power switch. Recommended useful functions like machine/controller power synchronization setting and next day continuation setting are also covered, with details on where to configure them.
The "Paper Feed Route and Paper Jam Processing" section illustrates the internal paper path and provides instructions for handling paper jams. A diagram shows the typical paper feed route through various output trays. When a paper jam occurs, the control panel displays a [Paper JAM] message and the jam location. Users are instructed to follow on-screen instructions to clear the jam. The [JAM Position] screen shows a message display area for clearing methods, a jam number/work procedure illustration display area, and buttons for [Illustration] (to show the highest priority process), [Next] (for the next page of the procedure), and [JAM Position] (to return to the main jam screen). Precautions for clearing paper jams include keeping the main or sub power switch on to allow tray and conveyance fixing unit movement, operating green parts (levers, knobs) as instructed, and being aware of the high temperature of the fusing unit. The system also features an "automatic purge function" to eject print paper to the nearest subtray, preventing further jams, and users are advised not to open machine doors during this operation.
"Replenishment and Replacement of Consumables" defines consumables as parts requiring processing such as replenishment, disposal, and replacement. Key consumables include toner bottles, waste toner boxes, staple needles (replenishment and disposal of scraps), glue pellets for perfect binders, humidification tank water, and trimming scrap. The guide provides QR codes for video tutorials on typical replacement procedures: replacing a toner bottle, replacing a waste toner box (with a note to contact service for handling waste toner boxes), and replacing staple needles. To check consumables status, users are instructed to look for a replacement message on the touch panel's upper left, which also highlights the consumable item in yellow in the [Consumable and Scrap Indicators] on the lower left. A help screen can be accessed by pressing the yellow-highlighted area, the "?" button, or the hard "Help" button on the control panel. Additionally, consumables information can be checked on the Print Manager screen by pressing the [Expand] button twice and hovering the mouse over the consumables icon.
Finally, "Cleaning" provides guidance on maintaining stable output by regularly cleaning various components. Users are advised to check and clean these points daily before turning on the machine. Specific cleaning instructions are provided for:
The "Usage Environment and Machine Specifications" section emphasizes the importance of maintaining proper environmental conditions for optimal performance and comfortable use. It recommends a room temperature of 21°C to 26°C and humidity of 40% RH to 60% RH. For handling paper and consumables, it advises storing them away from direct sunlight, air conditioners, in a low humidity environment, on a stable horizontal surface, and in a place with little or no dust. Paper should be kept wrapped as much as possible, even after opening. Consumables should be managed according to their packaging instructions, and spare paper and consumables should always be on hand. The installation surface must be level, and professional assistance should be sought if the installation location needs to be changed.
| Brand | Konica Minolta |
|---|---|
| Model | AccurioPress C7090 |
| Category | Printer |
| Language | English |