


Do you have a question about the Konica Minolta bizhub C364 and is the answer not in the manual?
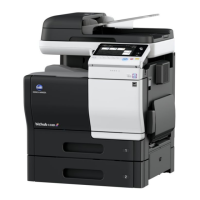
| Category | All in One Printer |
|---|---|
| Functions | Print, Copy, Scan, Fax |
| Printing Technology | Laser |
| Print Speed | 36 ppm |
| Print Resolution | 1200 x 1200 dpi |
| Max Resolution (BW) | 1200 x 1200 dpi |
| Max Resolution (Color) | 1200 x 1200 dpi |
| Duplex Printing | Yes |
| Max Paper Capacity | 3, 650 sheets |
| Scan Resolution | 600 x 600 dpi |
| Copy Resolution | 600 x 600 dpi |
| Reduction/Enlargement | 25% - 400% |
| Dimensions | 615 x 685 x 779 mm |
| Supported Paper Sizes | A6 |
| Copy Speed | 36 cpm |
| Interface | USB 2.0, Ethernet |
| Standard Paper Capacity | 1, 150 sheets |
Describes the basic steps to make a copy, from loading the original to starting the copy process.
Describes how to create a sample copy to check for irregularities before printing a large number of copies.
Explains how to copy originals onto both sides of paper to halve paper consumption and reduce waste.
Describes how to reduce and copy multiple pages (e.g., 2, 4, 8) onto a single sheet to save paper.
Explains how to staple copied sheets in a corner or at two positions for project proposals or booklet materials.
Details how to punch copied sheets for filing, useful for binding printed materials into files.
Describes various folding and binding options like Half-Fold, Tri-Fold, Center Staple & Fold, and Z-Fold for output sheets.
Explains how to scan originals of different sizes simultaneously using the ADF by detecting each page's size.
Explains how to scan and copy multiple originals with different settings for each set, useful for mixed original types.
Details how to copy front and back sides of cards onto a single page to reduce sheet usage.
Explains how to copy two-page spreads from books or catalogs separately into left/right pages or as one page.
Describes how to split two-page spreads into left and right pages in a single operation, using the ADF.
Explains how to scan catalogs and staple them to create booklets, requiring specific finishers.
Explains how to enlarge or reduce images using specified zoom ratios, either automatically or manually.
Describes how to enlarge, divide, and print an original image on multiple sheets to create a large poster.
Details how to insert cover sheets before the first or after the last page, using different paper colors or thicknesses.
Details how to insert an original scanned from the Original Glass after a specified page scanned via the ADF.
Explains how to add date and time stamps to copied sheets, specifying position and format.
Details how to add page and chapter numbers to copied sheets, specifying position and format.
Describes how to add predefined or custom stamps (e.g., "PLEASE REPLY", "DO NOT COPY") to the first page or all pages.
Explains how to overlay an image scanned from the first page onto subsequent pages for combined visuals.
Details how to erase margins from all four sides of an original by specifying width, useful for removing fax headers or punch hole shadows.
Explains how the machine detects the original's outline and erases outside areas, preventing black printing in those zones.
Describes how text like "Copy" or "Private" is printed as concealed text in the background to indicate unauthorized copies.
Explains how to print visible stamps like "Copy" or "Private" on the entire page to deter unauthorized copying.
Details how Copy Guard prints watermarks and restriction patterns to prevent unauthorized copying, canceling jobs if detected.
Explains how Password Copy embeds watermarks and requires a password for copying, preventing unauthorized access.
Explains how to save original images to the machine's hard disk (user box) for later printing without needing the original.
Describes how to select paper size and type, including automatic selection and manual tray settings.
Describes how to enlarge or reduce images using specified zoom ratios, either automatically or manually.
Explains how to copy onto both sides of paper (Duplex) and reduce multiple pages onto a single sheet (Combine).
Details how to select the number of original pages to copy onto a single page, including layout options.
Describes how to specify paper output methods like stapling, punching, folding, and grouping/sorting.
Explains how to select binding positions for stapling copied sheets.
Describes how to select binding positions for punching sheets, noting country-specific variations.
Explains how to fold or bind paper, covering Half-Fold, Center Staple & Fold, Tri-Fold, and Z-Fold options.
Explains how to set scanning options correctly based on original properties like size, paper type, and binding.
Details how to scan originals of different sizes simultaneously using the ADF, with options for same or different widths.
Describes how to scan catalogs and staple them to create booklets, requiring specific finishers.
Explains how to skip blank pages in the original when using the ADF to reduce the number of printed sheets.
Explains how to set the binding position for scanning originals correctly, preventing reversal between front and rear faces.
Details how to copy two-page spreads from books or catalogs separately or as one page, using the Original Glass.
Explains how to split two-page spreads into left and right pages for copying, using the ADF.
Explains how to adjust color quality attributes like brightness, contrast, saturation, Red, Green, Blue, and Hue.
Explains how to adjust the density of cyan, magenta, yellow, and black toners to fine-tune color balance.
Describes how to arrange pages in a booklet format, print on both sides, and specify binding positions or covers.
Details how to fine-tune image positions horizontally or vertically on the paper, including on the back side.
Explains how to enlarge and print an original on multiple sheets to create a large poster.
Details how to arrange the original image on paper, including enlarging to paper limits or centering without enlargement.
Details how to insert front and back covers, potentially using different paper than the main document pages.
Describes how to insert sheets of different types, such as color or thick paper, into specified pages.
Explains how to insert an image scanned from the Original Glass after a specified page scanned via the ADF.
Details how to ensure chapter pages are always printed on the front side, potentially using different paper.
Explains how to add date and time stamps to copied sheets, specifying position and format.
Details how to add page and chapter numbers to copied sheets, specifying position and format.
Describes how to add predefined or custom stamps to the first page or all pages.
Explains how to repeatedly print stamps like "Copy" or "Private" on the entire page.
Details how to add date, time, or other text to the top/bottom margins (header/footer) of specified pages.
Describes how to overlay an image scanned from the first page onto subsequent pages for combined visuals.
Describes how text like "Copy" or "Private" is printed as concealed text in the background to indicate unauthorized copies.
Details how to copy front and back sides of cards onto a single page to reduce sheet usage.
Displays settings configurable only by the administrator, requiring a password for access.
Configure settings for using the Power key and machine actions in power save modes.
Adjust settings like print image tone, staple, punch, and fold positions for optimal output.
Adjust print start position and settings for defective print images.
Adjust the print start position at the leading edge of paper relative to the discharge direction.
Adjust the print start position on the left edge of paper relative to the discharge direction.
Adjust print start position for the back side of paper in 2-sided printing.
Adjust print start position on the left edge for the back side in 2-sided printing.
Adjust the staple, punch, or fold position.
Align staple position on the fold line for saddle-stitched paper.
Align the half-fold position to the exact center of the paper.
Adjust the first fold position for tri-fold operations if positions are uneven.
Adjust the second fold position for tri-fold operations if positions are uneven.
Adjust punch hole positions if they are displaced vertically.
Adjust punch hole positions if they are displaced sideways.
Adjust the density of images printed on thick paper, OHP transparencies, or envelopes.
Adjust print position for each color to correct color shifts in the print result.
Configure user authentication and account track methods, including restriction and management.
Configure general settings for user authentication, selecting methods and user registration.
Specify whether to permit users other than registered ones, and select login methods.
Configure LDAP/IC card authentication settings using an Authentication Unit.
Enter user information, configure function permissions, and confirm usage status for user authentication.
Register user information, configure function permissions, and set printable sheet limits.
Register authentication servers like Active Directory, NTLM, NDS, or LDAP.
Limit user access to destinations by combining reference groups and access levels.
Configure login methods and logout procedures for IC card or biometric authentication using the Authentication Unit.
Configure each function used in the copy mode.
Configure security settings, including passwords and data management.
Change the administrator password for the machine.
Select levels for users to authorize changing settings.
Restrict functions related to authentication and data management to enhance security.
Configure password rules, including character count and type restrictions.
Define penalties for incorrect password entries during authentication.
Select whether to obtain a job log to check usage, operations, and history.
Specify whether to hide personal information like destination and file name in the Job List.
Select whether to use Copy Guard for preventing unauthorized copying with watermarks and patterns.
Select whether to use Password Copy for preventing unauthorized copying with passwords.
Select whether to enable Enhanced Security Mode, which forcibly configures various security functions.
Formats the hard disk, deleting programs, address books, and settings.
Encrypts all data saved on the hard disk for protection purposes, requiring a password.