4
KOOLGLIDE INSTRUCTIONS
DEFINITIONS:
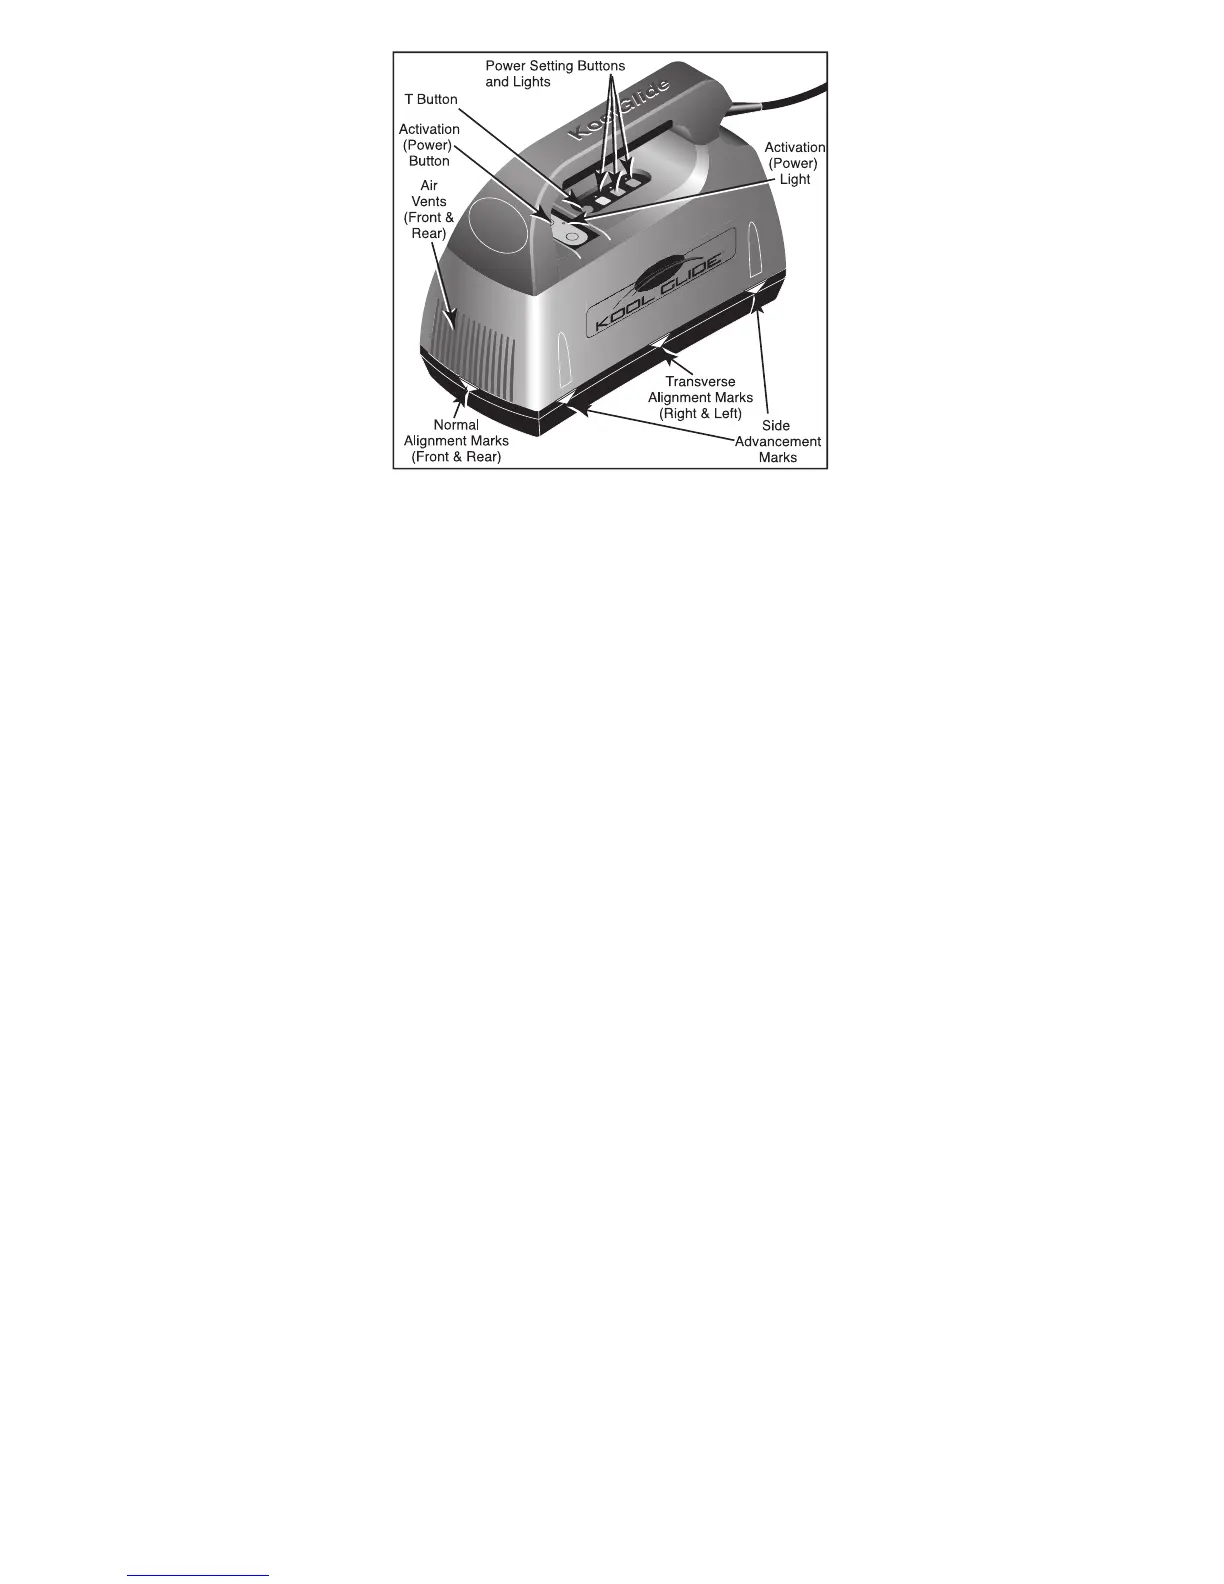
• Activation (Power) Button:
Button located under the
handle that activates the tool
when depressed from either the
right or left side.
• Power Setting Buttons: Low (L),
Medium (M), or High (H) power
setting buttons changes the
power settings on the Model
PRO.
• T Button: For use with tool
centered sideways over
the tape (see Installation
instructions).
• Normal Alignment Marks: Marks located on front and rear
center of the tool that aid in alignment (see Installation
Instructions).
• Transverse Alignment Marks: Marks located on center of
both sides of the tool that aid in alignment (see Installation
Instructions).
• Side Advancement Marks: The distance between these
marks defi nes the tools heating zone (see Installation
Instructions).
INSTALLATION CAUTIONS
Read “SAFETY INSTRUCTIONS” before using this tool.
• The PRO-W TOOL is optimised for bonding wood fl oors
and can bond thicker (3/4”-1”) wood than the PRO Carpet
Seaming Tool.
• Either tool can be used to seam carpet, however the runners
on the bottom of the PRO TOOL aids in aligning the tool on
top of the carpet seam.
NOTICE: After the tape is activated by the tool, the adhesive
will melt along the edges and the center of the tape.
• Do not use the tool without proper alignment over the tape or
reduced melting of the adhesive may result.
• Do not use PRO-W TOOL to bond wood greater than 1” thick
or tool may not activate (Activation Button indicator light
blinks three times).
• Do not touch the tool directly to the tape-this may result
in damage to the tool and a potential burn hazard to the
operator.
• Do not activate the tool over the same area of tape more than
once in 30 seconds - rapid multiple activations may result in
smoke and odor and deformation of the material.
• Do not move the tool while the Activation (Power) Button
indicator light is on. If tool is moved, light will fl ash 3 times
then go off. Moving tool may result in smoke and odor.
• Do not activate the tool sideways to the tape with the
Transverse Power Button (T) light off - this may result in poor
adhesive melting resulting in a poor bond.
• Make sure the tool is at the proper setting before activating
the tool. Failure to do so may result in smoke and odor or
poor adhesive melting resulting in a poor bond.
Instrucciones de instalación
de KOOLGLIDE
DEFINICIONES:
• Botón de Activación
(Encendido). Botón ubicado
debajo del mango, que activa
la herramienta cuando se lo
presiona, ya sea en su lado
derecho o izquierdo.
• Botones de Selección de
Potencia: Las botones de
potencia Baja (L), Media (M) y
Alta (H) cambia la potencia en
el Model PRO.
• Botón T: Para uso con la
herramienta centrada de
costado sobre la costura
(vea las instrucciones de
Instructions).
• Marcas Normales de Alineación: Marcas ubicadas en los
centros de las partes delantera y trasera de la herramienta,
que ayudan a la alineación (vea las instrucciones de
instalación).
• Marcas Transversales de Alineación: marcas ubicadas en los
centros de ambos lados de la herramienta, que ayudan a la
alineación (vea las instrucciones de instalación).
• Marcas de Avance Lateral: la distancia entre estas marcas
defi ne la zona de calentamiento de la herramienta (vea las
instrucciones de instalación).
PRECAUCIONES DE INSTALACION
Antes de utilizar esta herramienta, lea la sección
INSTRUCCIONES DE SEGURIDAD.
AVISO: Después de que la cinta sea activada por la
herramienta, el pegamento se encontrará a lo largo de los
bordes y del centro de la cinta.
• No utilice la herramienta sin la alineación apropiada sobre la
cinta o la fusión reducida del pegamento puede resultar.
• No utilice la HERRAMIENTA de la PROA para enlazar de
madera mayor de 1” densamente o la herramienta puede no
activar (la luz de indicador del botón de la activación centella
tres veces).
• No toque la herramienta directamente al grabar-este puede
dar lugar a daño a la herramienta y a un peligro potencial de
la quemadura a operador.
• No active la herramienta sobre la misma área de la cinta
más de una vez en 30 segundos - las activaciones multiples
rapidás pueden dar lugar a humo y olor y deformaton de la
madera.
• No mueva la herramienta mientras que la luz de indicador del
botón de la activación (energia) está prendido. Si se mueve
la herramienta, la luz ceniza de la Florida 3 veces después
se apagará. La herramienta móvil puede dar lugar a humo y
a olor.
• No active la herramienta de lado a la cinta con Luz transversal
del botÛn de la energía (t) apagado - esto puede dar lugar al
pegamento pobre que derrite dando por resultado un enlace
pobre.
• Cerciórese de que la herramienta esté en el ajuste apropiado
antes de activar la herramienta. La falta de hacer tan puede
dar lugar a humo y a olor o fusión adhesiva pobre dando por
resultado un enlace pobre.
 Loading...