1
100-ETER00 / 100-ETER01
100-ETER03 / 100-ETERE3
[ES] ALTA DEL SISTEMA KOOLNOVA POR WPS/ [IT] PRIMA ATTIVAZIONE DEL
SISTEMA KOOLNOVA TRAMITE WPS/ [EN] ACTIVATION OF KOOLNOVA SYSTEM
BY WPS/ [FR] INSTALLATION DU SYSTÈME KOOLNOVA PAR WPS/ [PT] REGISTO DO
SISTEMA KOOLNOVA POR WPS/ [DE] AKTIVIERUNG DES KOOLNOVA-SYSTEMS
DURCH WPS/ [DK] AKTIVERING AF KOOLNOVA-SYSTEMET MED WPS/ [NL]
ACTIVERING VAN KOOLNOVA SYSTEEM DOOR WPS
1.
[ES] Activar el modo WPS en el router de la instalación. Normalmente su router dispone
de un botón WPS dedicado para activar la función y un indicativo luminoso (consulte el
manual del dispositivo para realizar esta función).
[IT] Attivare la modalità WPS sul modem di casa. Normalmente il tuo modem ha un
pulsante WPS dedicato e una spia luminosa (fai riferimento al manuale del dispositivo per
eseguire questa funzione).
[EN] Activate the WPS mode on the installation router. Normally your router has a
dedicated WPS button to activate the function and an indicator light (refer to the manual
of the device to perform this function).
[FR] Activez le mode WPS sur le routeur de l’installation. Normalement, votre routeur
dispose d’un bouton WPS dédié pour activer la fonction et d’un témoin lumineux
(reportez-vous au manuel de l’appareil pour eectuer cette fonction).
[PT] Ativar o modo WPS no router de instalação. Normalmente, o router tem um botão
WPS dedicado para ativar a função e uma luz indicadora (consulte o manual do dispositivo
para executar esta função).
[DE] Aktivieren Sie den WPS-Modus am Installationsrouter. Normalerweise verfügt Ihr
Router über eine spezielle WPS-Taste zur Aktivierung der Funktion und eine Kontrollleuchte
(siehe Handbuch des Geräts zur Ausführung dieser Funktion).
[DK] Aktivér WPS-tilstanden på installationsrouteren. Normalt har din router en
dedikeret WPS-knap til at aktivere funktionen og en indikatorlampe (se manualen til
enheden for at udføre denne funktion).
[NL] Activeer de WPS-modus op de installatierouter. Normaal gesproken heeft uw router
een speciale WPS-knop om de functie te activeren en een indicatielampje (raadpleeg de
handleiding van het apparaat om deze functie uit te voeren).
2.
[ES] Seleccionar el código INT 44 desde cualquier mando ETERNAL. Para ello acceder al
menú de instalador. Durante 1 minuto la función WPS está activa, el diodo LED STATUS
(D9) parpadea y se le permite a la Unidad de Control conectarse por WPS con el router
de la instalación.
Para volver a activar la función WPS durante 1 minuto, introduzcir el código INT 40
(reset del WiFi), y posteriormente INT 44 de nuevo.
[IT] Selezionare il codice INT 44 da qualsiasi radiocomando ETERNAL. Per farlo,
accedete al menu dell’installatore. Per 1 minuto la funzione WPS è attiva, il LED STATUS
(D9) lampeggia e la centralina può collegarsi via WPS al modem di casa.
Per riabilitare la funzione WPS per 1 minuto, inserire il codice INT 40 (reset WiFi), poi
di nuovo INT 44.
[EN] Select the code INT 44 from any ETERNAL radio control. To do so, access the
installer menu. For 1 minute the WPS function is active, the STATUS LED (D9) ashes
and the Control Unit is allowed to connect via WPS to the installation router.
To reactivate the WPS function for 1 minute, enter the code INT 40 (WiFi reset), then
INT 44 again.
[FR] Sélectionnez le code INT 44 depuis n’importe quelle radiocommande ETERNAL.
Pour ce faire, accédez au menu de l’installateur. Pendant 1 minute, la fonction WPS est
active, la LED STATUS (D9) clignote et l’unité de contrôle est autorisée à se connecter
via WPS au routeur de l’installation.
Pour réactiver la fonction WPS pendant 1 minute, entrez le code INT 40 (reset WiFi),
puis INT 44 à nouveau.
[PT] Selecionar o código INT 44 a partir de qualquer central ETERNAL. Para isso,
aceder ao menu do instalador. Durante 1 minuto a função WPS está ativa, o LED
STATUS (D9) pisca e o comando pode conectar-se via WPS com o router da instalação.
Para reativar a função WPS durante 1 minuto, introduzir o código INT 40 (WiFi reset) e,
em seguida, INT 44.
[DE] Wählen Sie den Code INT 44 auf einer beliebigen ETERNAL-Funksteuerung. Rufen
Sie dazu das Installateurmenü auf. Für 1 Minute ist die WPS-Funktion aktiv, die STATUS-LED
(D9) blinkt und das Steuergerät kann sich über WPS mit dem Installationsrouter verbinden.
Um die WPS-Funktion wieder für 1 Minute zu aktivieren, geben Sie den Code INT 40
(WiFi-Reset) und dann erneut INT 44 ein.
[DK] Vælg koden INT 44 fra en hvilken som helst ETERNAL-radiostyring. For at gøre det skal
du gå ind i installatørmenuen. I 1 minut er WPS-funktionen aktiv, STATUS-LED’en (D9) blinker,
og kontrolenheden har tilladelse til at oprette forbindelse via WPS til installationsrouteren.
For at genaktivere WPS-funktionen i 1 minut skal du indtaste koden INT 40 (WiFi-reset)
og derefter INT 44 igen.
[NL] Selecteer de code INT 44 van elke ETERNAL-radiograsche bediening. Ga hiervoor naar
het installateursmenu. Gedurende 1 minuut is de WPS-functie actief, de STATUS-LED (D9)
knippert en de besturingseenheid mag via WPS verbinding maken met de installatierouter.
Om de WPS functie weer voor 1 minuut te activeren, voer je de code INT 40 (WiFi reset)
in en daarna weer INT 44.
3.
[ES] Si la conexión se ha realizado con éxito el diodo LED STATUS (D9) pasa a
encendido permanente y la instalación estará accesible vía APP KOOLNOVA. Si por el
contrario el diodo LED STATUS (D9) parpadea lentamente la instalación no se ha realizado
correctamente, repetir el proceso ALTA DEL WIFI POR WPS.
[IT] Se la connessione ha avuto successo, il LED STATUS (D9) si accende in modo
permanente e il sistema sarà accessibile tramite la app KOOLNOVA. Se invece il LED
STATUS (D9) lampeggia lentamente, l’installazione non è stata eettuata correttamente,
ripetere la procedura indicata sopra PRIMA ATTIVAZIONE DEL WIFI TRAMITE WPS.
[EN] If the connection was successful, the STATUS LED (D9) turns on permanently
and the installation will be accessible via the KOOLNOVA APP. If, on the other hand, the
STATUS LED (D9) is ashing slowly, the installation has not been carried out correctly,
repeat the process of ACTIVATION OF WIFI BY WPS.
[FR] Si la connexion a réussi, la LED STATUS (D9) s’allume en permanence et
l’installation sera accessible via la KOOLNOVA APP. Si, par contre, la LED STATUS (D9)
clignote lentement, l’installation n’a pas été eectuée correctement, répétez le processus
ENREGISTREMENT WIFI PAR WPS.
[PT] Se a ligação tiver sido bem sucedida, o LED STATUS (D9) ca permanentemente
aceso e a instalação ca acessível através da APP KOOLNOVA. Se, pelo contrário, o LED
STATUS (D9) piscar lentamente, a instalação não foi efectuada corretamente, repita o
processo WPS WIFI ON.
[DE] Wenn die Verbindung erfolgreich war, leuchtet die STATUS-LED (D9) dauerhaft
und die Installation ist über die KOOLNOVA APP zugänglich. Wenn hingegen die STATUS-
LED (D9) langsam blinkt, wurde die Installation nicht korrekt durchgeführt, wiederholen
Sie den Vorgang der AKTIVIERUNG DES WIFI ÜBER WPS.
[DK] Hvis forbindelsen lykkedes, lyser STATUS-LED’en (D9) permanent, og installationen
vil være tilgængelig via KOOLNOVA APP’en. Hvis STATUS-LED’en (D9) derimod blinker
langsomt, er installationen ikke udført korrekt, gentag processen med AKTIVERING AF
WIFI VED WPS.
INT
INT 44
OK
[ES] ALTA DE LAS ZONAS/ [IT] ATTIVAZIONE DELLE ZONE/ [EN] ACTIVATION
OF ZONES/[FR] ACTIVATION DES ZONES/ [PT] ACTIVAÇÃO DE ZONAS/ [DE]
AKTIVIERUNG VON ZONEN/ [DK] AKTIVERING AF ZONER/ [NL] ACTIVERING
VAN ZONES
1.
[ES] Alimentar por primera vez la unidad de control híbrida del sistema KOOLNOVA. El
LED TX BUS (D7) parpadea rápido y el LED STATUS (D9) parpadea lento.
[IT] Alimentare la centralina ibrida di sistema KOOLNOVA. Il LED TX BUS (D7) lampeggia
velocemente e il LED STATUS (D9) lampeggia lentamente
[EN] Power on the hybrid control unit of the KOOLNOVA system for the rst time. The TX
BUS LED (D7) ashes fast and the STATUS LED (D9) blinks slowly.
[FR] Lors de la première mise sous tension de l’unité de contrôle hybride du système
KOOLNOVA, la LED TX BUS (D7) clignote rapidement et la LED STATUS (D9) clignote
lentement.
[PT] Ligar a unidade de controlo híbrida do sistema KOOLNOVA pela primeira vez. O LED
TX BUS (D7) pisca rapidamente e o LED STATUS (D9) pisca lentamente.
[DE] Schalten Sie das Hybridsteuergerät des KOOLNOVA-Systems zum ersten Mal ein.
Die TX BUS-LED (D7) blinkt schnell und die STATUS-LED (D9) blinkt langsam.
[DK]Tænd for KOOLNOVA-systemets hybridstyreenhed for første gang. TX BUS LED’en
(D7) blinker hurtigt, og STATUS LED’en (D9) blinker langsomt.
[NL] Schakel de hybride besturingseenheid van het KOOLNOVA systeem voor de eerste
keer in. De LED TX BUS (D7) knippert snel en de LED STATUS (D9) knippert langzaam.
2.
[ES] Abrir la tapa de la unidad de control híbrida y presionar el pulsador de emparejamiento
PAIRING (S1). El LED rojo (D1) parpadea durante 5 minutos.
[IT] Aprire il coperchio frontale della centralina ibrida e premere il pulsante di abbinamento
PAIRING (S1). Il LED rosso (D1) lampeggia per 5 minuti.
[EN] Open the lid of the hybrid control unit and press the PAIRING button (S1). The red
LED (D1) ashes for 5 minutes.
[FR] Ouvrir le couvercle de l’unité de contrôle hybride et appuyez le bouton d’association
PAIRING (S1). La LED rouge (D1) clignote pendant 5 minutes.
[PT] Abra a tampa da unidade de controlo híbrida e prima o botão de emparelhamento
PAIRING (S1). O LED vermelho (D1) ca intermitente durante 5 minutos.
[DE] Önen Sie den Deckel des Hybridsteuergeräts und drücken Sie die PAIRING-Taste
(S1). Die rote LED (D1) blinkt 5 Minuten lang.
[DK] Åbn låget på hybridkontrolenheden, og tryk på PAIRING-knappen (S1). Den røde
LED (D1) blinker i 5 minutter.
[NL] Open het deksel van de hybride besturingseenheid en druk op de knop PAIRING
(S1). De rode LED (D1) knippert gedurende 5 minuten.
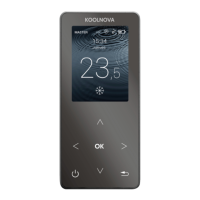
3.
[ES] Pulsar el botón superior para encender el termostato
ETERNAL.
[IT] Premere il pulsante sulla parte superiore per accendere il
termostato ETERNAL.
[EN] Press the top button to turn the ETERNAL thermostat
on.
[FR] Appuyez sur le bouton supérieur pour allumer le thermostat
ETERNAL.
[PT]Premir o botão superior para ligar o termóstato ETERNAL.
[DE] Drücken Sie die obere Taste, um den ETERNAL-Thermostat einzuschalten.
[DK] Tryk på den øverste knap for at tænde ETERNAL-termostaten.
[NL] Druk op de bovenste knop om de ETERNAL thermostaat aan te zetten.
4.
[ES] Para emparejar, pulsar el botón OK en todos los termostatos ETERNAL presentes en
el sistema.
[IT] Per associare, premere il tasto OK su tutti i comandi ETERNAL presenti nel sistema.
[EN] To pair, press the OK button on all ETERNAL thermostats in the system
[FR] Pour associer, appuyez le bouton OK sur tous les thermostats ETERNAL du système.
[PT] Para emparelhar, premir o botão OK em todos os termóstatos ETERNAL presentes
no sistema.
[DE] Zum Koppeln drücken Sie die OK-Taste an allen ETERNAL-Thermostaten im System.
[DK] Tryk på OK-knappen på alle ETERNAL-termostater i systemet for at parre.
[NL] Om te koppelen, drukt u op de OK knop op alle ETERNAL thermostaten in het
systeem.
5.
[ES]
Una vez emparejados los termostatos, presionar nuevamente el pulsador de
emparejamiento “PAIRING” (S1) para nalizar la instalación. El LED rojo (D1) deja de
parpadear.
[IT] Una volta terminata l’associazione dei comandi, premere nuovamente il tasto “PAIRING”
(S1) per concludere la congurazione. Il LED rosso (D1) smette di lampeggiare.
[EN] Once the thermostats have been paired, press the “PAIRING” button (S1) to nish
the installation. The red LED (D1) stops blinking.
[FR]
Une fois les thermostats associés, appuyez à nouveau le bouton-poussoir d’association
“PAIRING” (S1) pour terminer l’installation. La LED rouge (D1) cesse de clignoter.
[PT] Uma vez emparelhados os termóstatos, premir novamente o botão de emparelhamento
“
PAIRING” (S1) para concluir a instalação. O LED vermelho (D1) pára de piscar.
[DE] Sobald die Thermostate gekoppelt sind, drücken Sie die Taste “PAIRING” (S1), um
die Installation abzuschließen. Die rote LED (
D1) hört auf zu blinken.
[DK]Når termostaterne er blevet parret, skal du trykke på knappen “
PAIRING” (S1) for at
afslutte installationen. Den røde LED (
D1) holder op med at blinke.
[NL] Zodra de thermostaten gekoppeld zijn, drukt u op de knop “
PAIRING” (S1) om de
installatie te voltooien. De rode LED (
D1) stopt met knipperen.
BUS
GND B- A+ +24
AUX 1 AUX 2
L N
AC IN
COM D- D+H ALR
www.koolnova.com
RADIO CENTRAL UNIT
TX BUS
RX RADIO
STATUS
ZONE 3 ZONE 4 ZONE 5 ZONE 6ZONE 1 ZONE 2 ZONE 7 ZONE 8
868 MHz
BUS
RADIO CENTRAL UNIT
TX BUS
RX RADIO
STATUS
ZONE 3 ZONE 4 ZONE 5ZONE 1 ZONE 2
868 MHz
www.koolnova.com
RADIO CENTRAL UNIT
868 MHz
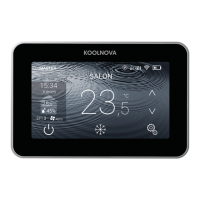
[ES] TERMOSTATO ETERNAL RADIO
Interfaz gráco con pantalla capacitiva de 4,3″ y acabados en color metalizado y cristal.
Brillo ajustable. Funcionalidades:
On-O de zona.
Stop del sistema, modos de funcionamiento y eciencia del sistema (MASTER).
Control de la temperatura y velocidad de la máquina.
Lectura de temperatura ambiente y humedad relativa de la zona.
Programaciones horarias y función SLEEP.
Acceso remoto a otras zonas del sistema.
6 idiomas (español, italiano, inglés, francés, portugués, alemán).
Función anti heladas.
Modo ECO.
[IT] TERMOSTATO ETERNAL RADIO
Interfaccia graco con schermo capacitivo di 4,3″ con riniture in colore metallizzato.
Luminosità regolabile. Funzioni:
On-O di zona.
Spegnimento del sistema completo, settaggio della modalità di funzionamento e
dell’ecienza termica dell’unità interna (MASTER).
Controllo della temperatura e velocità dell’unità interna.
Lettura della temperatura ambiente e della % di umidità relativa della zona.
Programmazioni orarie e funzione SLEEP.
Acceso e controllo remoto alle altre zone del sistema.
6 lingue (spagnolo, italiano, inglese, francese, portoghese, tedesco).
Funzione di protezione antigelo.
Modalità ECO.
[EN] ETERNAL RADIO THERMOSTAT
Graphic interface display with 4,3″ capacitive touch screen, metallic color and glass
nishes. Adjustable brightness. Functionalities:
On-O Zone.
System Stop, operating modes and system eciency (MASTER).
Control of machine temperature and speed.
Room temperature and relative humidity readings.
Schedules and SLEEP function.
Remote access to other zones of the system.
6 languages (Spanish, Italian, English, French, Portuguese, German).
Frost protection function.
ECO mode.
[FR] THERMOSTAT ETERNAL RADIO
Interface graphique avec écran capacitif de 4,3″ et nitions couleur métallisée et verre.
Luminosité réglable. Fonctionnalités:
On-O de zone.
Arrêt du système, modes de fonctionnement et ecience du système (MASTER).
Contrôle de la température et de la vitesse de la machine.
Achage de la température ambiente et de l’humidité relative de la zone.
Programmations horaires et fonction SLEEP.
Accès à distance à d’autres zones du système.
6 langues (espagnol, italien, anglais, français, portugais, allemand).
Fonction hors-gel.
Mode ECO.
[PT] TERMOSTATO ETERNAL RÁDIO
Interface gráca com ecrã capacitivo de 4,3″ e acabamentos em cor metálica e vidro.
Luminosidade regulável. Funcionalidades:
Zona On-O.
Paragem do sistema, modos de funcionamento e eciência do sistema (MASTER).
Controlo da temperatura e da velocidade da máquina.
Leitura da temperatura ambiente e da humidade relativa da zona.
Programação horária e função SLEEP.
Acesso remoto a outras zonas do sistema.
6 idiomas (espanhol, italiano, inglês, francês, português, alemão).
Função anti-congelamento.
Modo ECO.
[DE] ETERNAL RADIO THERMOSTAT
Grasches Display mit 4,3″ kapazitivem Touchscreen, Metallic-Farbe und
Glasoberächen. Einstellbare Helligkeit. Funktionalitäten:
OnEin-Aus-Zone.
Systemstopp, Betriebsarten und Systemezienz (MASTER).
Kontrolle der Maschinentemperatur und -geschwindigkeit
Messung der Raumtemperatur und der relativen Luftfeuchtigkeit.
Zeitpläne und SLEEP-Funktion.
Fernzugri auf andere Zonen des Systems.
6 Sprachen (Spanisch, Italienisch, Englisch, Französisch, Portugiesisch, Deutsch).
Frostschutzfunktion.
ECO-Modus.
[DK] ETERNAL RADIO THERMOSTAT
Grask interface-display med 4,3″ kapacitiv touchskærm, metalfarve og glasnish.
Justerbar lysstyrke. Funktionaliteter:
On-O Zone.
Systemstop, driftstilstande og systemeektivitet (MASTER).
Styring af maskinens temperatur og hastighed.
Aæsning af rumtemperatur og relativ luftfugtighed.
Tidsplaner og SLEEP-funktion.
Fjernadgang til andre zoner i systemet.
6 sprog (spansk, italiensk, engelsk, fransk, portugisisk, tysk).
Frostbeskyttelsesfunktion.
ECO-tilstand.
[NL] ETERNAL RADIO THERMOSTAT
Grasche interface display met 4,3″ capacitief aanraakscherm, metallic kleur en glazen
afwerking. Instelbare helderheid. Functionaliteiten:
Aan-uit zone.
Systeemstop, bedrijfsmodi en systeemeciëntie (MASTER).
Regeling van machinetemperatuur en -snelheid.
Metingen van kamertemperatuur en relatieve vochtigheid.
Schema’s en SLEEP-functie.
Toegang op afstand tot andere zones van het systeem.
6 talen (Spaans, Italiaans, Engels, Frans, Portugees, Duits).
Vorstbeveiligingsfunctie.
ECO-modus.
[ES]
[IT]
[EN]
[FR]
Guía rápida de instalación
Guida rapida di installazione
Quick setup guide
Guide d’installation rapide
A3107909 123-00250
PTA. Av. Juan López Peñalver, 8. Nave 6.
29590. Campanillas, Málaga. España
© 2020 Aucore S.L.
www.koolnova.com
www.koolnova.com
LED
D1
LED
D1
RADIO 50%RADIO 50%
MANUAL
AUTO
Pair thermostat.
Press OK to start.
AUTO
OK
RADIO 50%
Pairing...
RADIO 50%
LED D7
LED D9
23
°C
,5
MASTER
Domingo
DORMITORIO
AUTO
Z1
15:34
P
45%
25,5
°C
EFI 3
ECO
Off
ROOM 1
Z1
MASTER
Thursday
INT MASTER MÁQUINA
AC 3
EFI
RESET
AVANZADO
VOL SUELO
RADIANTE
CALIBRACIÓN RADIO
°C
INT
ECO
MASTER
ADVANCED
MACHINE
AC 3
RESET
VOL
RADIANT
FLOOR
CALIBRATION
EFI
3 s
[NL] Als de verbinding succesvol was, gaat de STATUS-LED (D9) permanent branden en
is de installatie toegankelijk via de KOOLNOVA APP. Als het STATUS-LED (D9) daarentegen
langzaam knippert, is de installatie niet correct uitgevoerd, herhaal het proces van
ACTIVATIE VAN WIFI DOOR WPS.
4.
[ES] Descargar la APP KOOLNOVA. El instalador debe informar a su cliente de la
necesidad de crear un “Nuevo usuario” si no dispone de ninguno. Y escanear el código
QR de la etiqueta incluida en la unidad de control para vincular el proyecto.
[IT] Scaricare l’APP KOOLNOVA. L’installatore deve informare il cliente della necessità
di creare un “Nuovo utente” se non ne ha uno. E scansionare il codice QR sull’etichetta
inclusa nella centralina per collegare il progetto.
[EN] Download the KOOLNOVA APP. The installer must inform his customer of the
need to create a “New user” if he does not have one. And scan the QR code on the label
included in the control unit to link the project.
[FR] Télécharger l’application KOOLNOVA APP. L’installateur doit informer son client
de la nécessité de créer un «Nouvel utilisateur» s’il n’en a pas. Et scanner le code QR
sur l’étiquette incluse dans l’unité de contrôle pour lier le projet.
[PT] Descarregar a APP KOOLNOVA. O instalador deve informar o seu cliente da
necessidade de criar um “Novo utilizador”, caso não o tenha. E digitalizar o código QR
na etiqueta incluída na central para associar o projeto.
[DE] Laden Sie die KOOLNOVA APP herunter. Der Installateur muss seinen Kunden
darüber informieren, dass er einen «Neuen Benutzer» anlegen muss, wenn er noch
keinen hat. Und scannen Sie den QR-Code auf dem Etikett, das in der Steuereinheit
enthalten ist, um das Projekt zu verknüpfen.
[DK] Download KOOLNOVA APP. Installatøren skal informere sin kunde om behovet
for at oprette en «Ny bruger», hvis han ikke har en. Og scanne QR-koden på etiketten
i kontrolenheden for at forbinde projektet.
[NL] Download de KOOLNOVA APP. De installateur moet zijn klant informeren over de
noodzaak om een «Nieuwe gebruiker» aan te maken als hij er geen heeft. En scan de
QR-code op het label in de besturingseenheid om het project te koppelen.
[ES] SELECCIONE UNA DE LAS DOS OPCIONES POSIBLES, A o B/ [IT] SELEZIONARE UNA DELLE DUE OPZIONI POSSIBILI, A o B/ [EN] SELECT ONE OF TWO POSSIBLE
OPTIONS, A or B/ [FR] SÉLECTIONNEZ L’UNE DES DEUX OPTIONS POSSIBLES, A ou B/ [PT] SELECCIONAR UMA DAS DUAS OPÇÕES POSSÍVEIS, A ou B/ [DE] WÄHLEN
SIE EINE VON ZWEI MÖGLICHEN OPTIONEN, A oder B/ [DK] VÆLG ET AF TO MULIGE VALG, A eller B/ [NL] KIES EEN VAN DE TWEE MOGELIJKE OPTIES, A of B.
a. b. c.
a.
b.
c.
A31100 WPS/ APP KOOLNOVA. INSTALACIÓN MANUAL. p.2.
SEC
INSTALACIÓN AUTOMÁTICA/ INSTALLAZIONE AUTOMATICA/
AUTOMATIC INSTALLATION/ INSTALLATION AUTOMATIQUE/
INSTALAÇÃO AUTOMÁTICA/ AUTOMATISCHE INSTALLATION/
AUTOMATISK INSTALLATION/ AUTOMATISCHE INSTALLATIE
A.
[ES] Le aconsejamos que haga la INSTALACIÓN AUTOMÁTICA: A. Si el router de su
instalación no cuenta con WPS, entonces realice la instalación manual.
[IT] Si consiglia di eseguire l’INSTALLAZIONE AUTOMATICA: A. Se il router della tua
installazione non ha WPS, allora esegui l’installazione manuale.
[EN] We recommend that you perform the AUTOMATIC INSTALLATION: A. If the router of
your installation does not have WPS, then perform the manual installation.
[FR] Nous vous conseillons de faire l’INSTALLATION AUTOMATIQUE: A. Si le routeur de
votre installation n’est pas équipé du WPS, effectuez l’installation manuelle.
[PT] Aconselhamos a fazer a INSTALAÇÃO AUTOMÁTICA: A. Se o router da sua
instalação não tiver WPS, então faça a instalação manual.
[DE] Recomendamos que efectue a INSTALAÇÃO AUTOMÁTICA: A. Se o router da sua
instalação não tiver WPS, então efectue a instalação manual.
[DK] Vi anbefaler, at du udfører den AUTOMATISKE INSTALLATION: A. Hvis routeren i din
installation ikke har WPS, skal du udføre den manuelle installation.
[NL] Wij raden u aan de AUTOMATISCHE INSTALLATIE uit te voeren: A. Als de router van
uw installatie geen WPS heeft, voer dan de handmatige installatie uit.
INSTALACIÓN MANUAL/ INSTALLAZIONE MANUALE/
MANUAL INSTALLATION/ INSTALLATION MANUELLE/
INSTALAÇÃO MANUAL/ MANUELLE INSTALLATION/
MANUEL INSTALLATION/ HANDMATIGE INSTALLATIE
B.
[ES] ALTA DEL WIFI CON APP KOOLNOVA/ [IT] PRIMA ATTIVAZIONE DEL WIFI
CON APP KOOLNOVA/ [EN] ACTIVATION OF WIFI WITH KOOLNOVA APP/ [FR]
ENREGISTREMENT WIFI AVEC L’APPLICATION KOOLNOVA/ [PT] REGISTO WIFI
COM A APLICAÇÃO KOOLNOVA/[DE] AKTIVIERUNG VON WLAN MIT KOOLNOVA
APP/ [DK] AKTIVERING AF WIFI MED KOOLNOVA APP/[NL] WIFI ACTIVEREN
MET KOOLNOVA APP/
1.
[ES] Escanear el código QR y realizar la instalación según se indica en el documento.
[IT] Scansionare il codice QR ed eseguire l’installazione come indicato nel
documento.
[EN] Scan the QR code and perform the installation as indicated in the document.
[FR] Scannez le code QR et procédez à l’installation comme indiqué dans le document.
[PT] Digitalizar o código QR e efetuar a instalação como indicado no documento.
[DE] Scannen Sie den QR-Code und führen Sie die Installation wie im Dokument
angegeben durch.
[DK] Scan QR-koden, og udfør installationen som angivet i dokumentet.
[NL] Scan de QR-code en voer de installatie uit zoals aangegeven in het document.
WAIT
[ES] CARGA DE LA BATERÍA/ [IT] CARICA DELLA BATTERIA/ [EN] BATTERY
CHARGE/ [FR] CHARGE DE LA BATTERIE/ [PT] CARGA DA BATERIA/ [DK]
BATTERIOPLADNING/ [NL] BATTERIJ OPLADEN
[ES] Antes de usar el mando por primera vez, es necesario cargar la batería. Para un
correcto funcionamiento del dispositivo, recargar mínimo cada 2 meses.
[IT] Prima di usare per la prima volta il telecomando, è necessario caricare la batteria.
Per un corretto funzionamento del dispositivo, si consiglia di eettuare un ciclo di ricarica
ogni 2 mesi.
[EN] Before using the remote control for the rst time, you must charge the battery. To
ensure a right operation of the device, recharge at least every 2 months.
[FR] Avant d’utiliser l’interface pour la première fois, vous devez charger la batterie. Pour
un fonctionnement correct de l’appareil, rechargez-le au moins tous les 2 mois.
[PT] Antes de utilizar o telecomando pela primeira vez, é necessário carregar a pilha.
Para garantir um funcionamento correto do aparelho, recarregar pelo menos de 2 em 2
meses.
[DE] Bevor Sie die Fernbedienung zum ersten Mal benutzen, müssen Sie die Batterie
auaden. Um einen einwandfreien Betrieb des Geräts zu gewährleisten, sollten Sie den
Akku mindestens alle 2 Monate auaden.
[DK] Før du bruger fjernbetjeningen første gang, skal du oplade batteriet. For at sikre, at
enheden fungerer korrekt, skal du oplade den mindst hver anden måned.
[NL] Voordat u de afstandsbediening voor het eerst gebruikt, moet u de batterij opladen.
Laad de batterij minstens om de 2 maanden op om een goede werking van het apparaat
te garanderen.
[PT]
[DE]
[DK]
[NL]
Guia rápido do utilizador
Kurzbedienungsanleitung
Hurtig brugervejledning
Snelle gebruikershandleiding