22
SAFETY INSTRUCTIONS
1. This machine is not intended for use by persons (including children)
with reduced physical, sensory or mental capabilities. It is also not
intended for use by those with a lack of knowledge and experience,
unless they have been given instruction or supervision concerning the
use of the machine by a person responsible for their safety.
2. This appliance is for indoor use only.
3. This unite is suitable for low pile carpet. It is not suitable for uneven
floors or mixed carpet.
4. Do not use on wet or greasy dust.
5. Before operating, move away fragile objects (glass objects, lights
and etc) and other things that may possibly entangle the brushes
6. Don’t sit on the machine or put heavy things on it.
7. Clean the machine regularly. Empty the dust container.
8. Charge the machine if it hasn’t been used for a long time.
9. Charge it only when the low power alarms activates or if the machi-
ne switches off. Operate it when it is fully charged.
10. Unload precisely the battery when it stops to work
11. Do not use on dampy or wet flooring.
COMPONENTS
9. Spazzola principale
10. Contenitore per la polvere
11. Tasto di rilascio del contenitore per la polvere
12. Ruota universale
13. Tasto start/pausa
14. Spia LED
15. Sensore luminosità
16. Manico
17. Sensore ostacoli
21
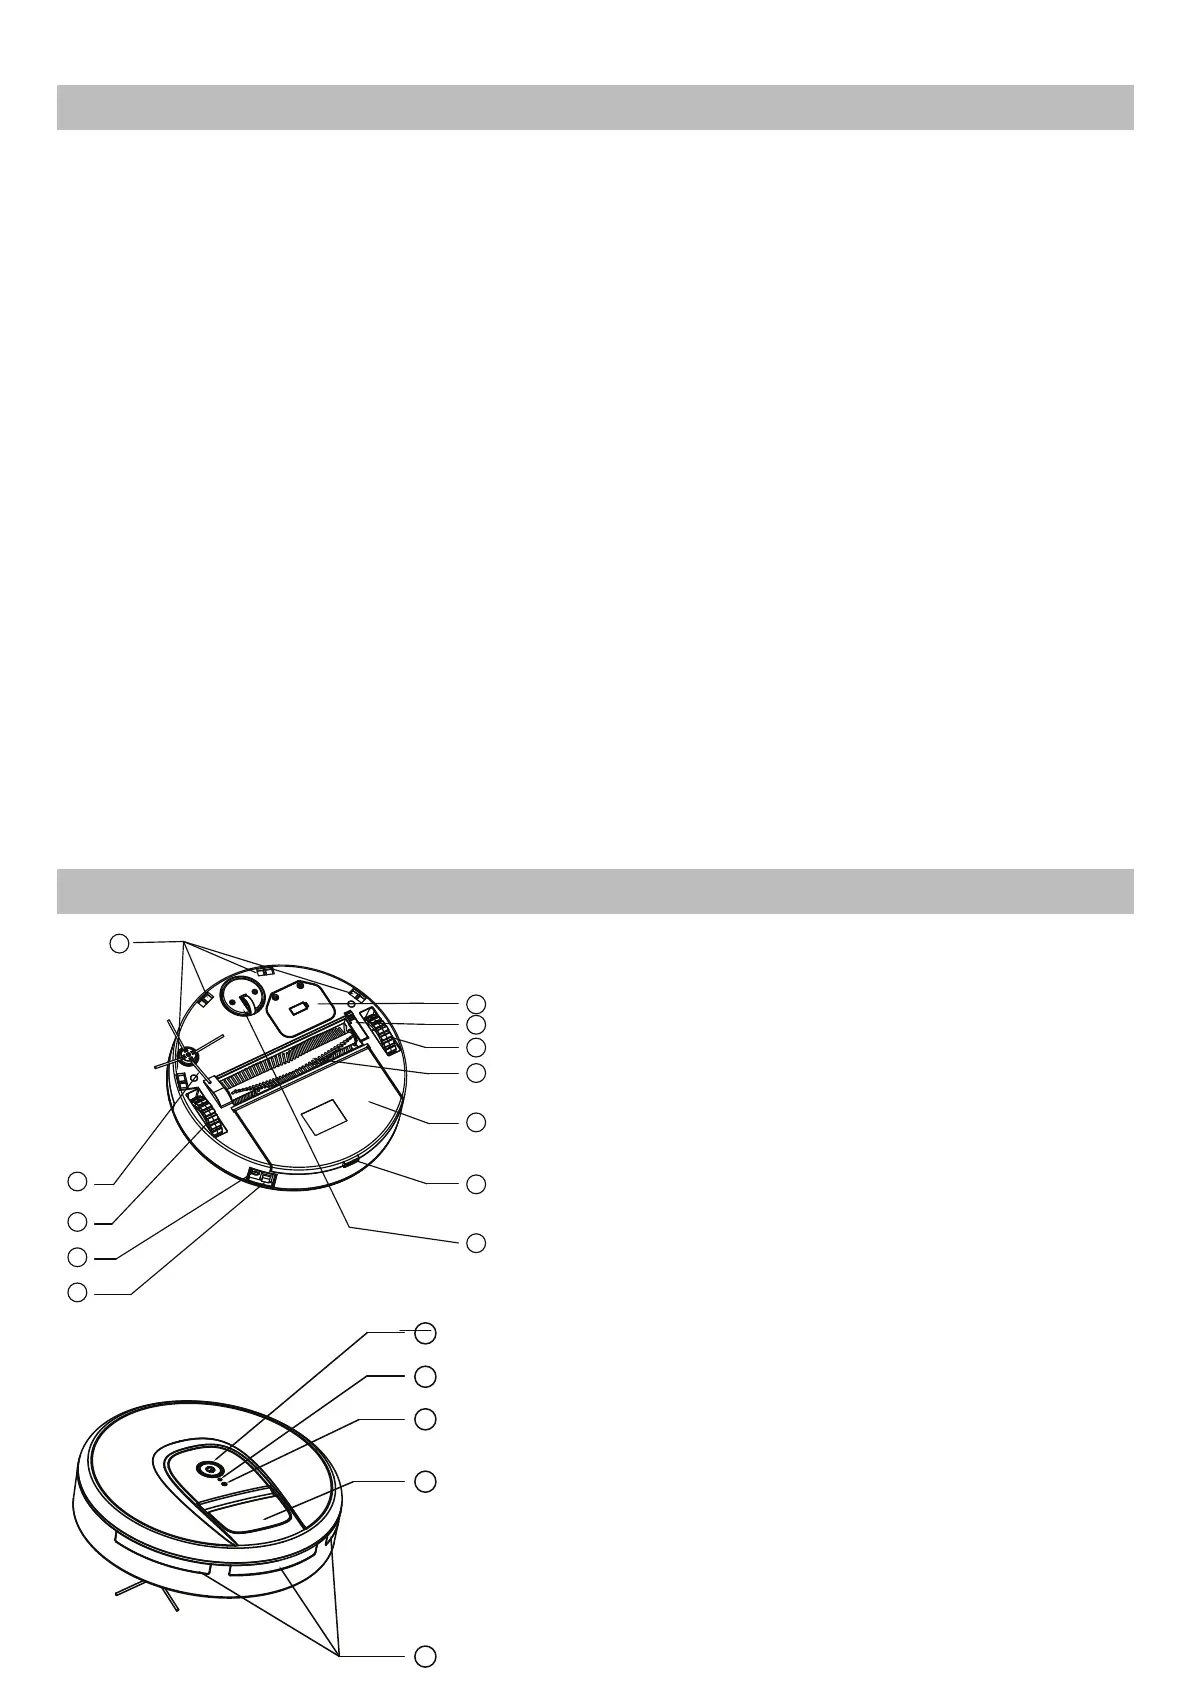
Components
1.cliff detection sensor 2.side brush 3.right wheel 4.charger port 5.On/off button
6.battery cover 7.middle brush holder 8.left wheel 9.brush wheel 10.dustbin
11.Dustin release button 12.Universal wheel 13.start/pause button 14.LED indicator
15.light sensor 16.handle 17.Obstacle sensor
How to operate
■ How to assemble side brush
1.Install the side brush.
2.Place the machine on the ground to be cleaned.
3.Turn on the power button, music play accordingly. LED indicator is
on ,The machine enters standby status.
4.Press start/pause button, machine starts working.
5.When in operation, press start/pause button, the machine will stop
temporarily.
6.When machine stops unexpectedly, LED indicator quick flashs in 3Hz,
please check carefully if machine being entangled or brush wheel fails to
operate, if machine being entangled, take it to the spacious place to
re-start, if brush wheel fails to operate, take it out and make it clean, If
the machine still can not start properly, product malfunction happens, a
long press on the on/off button to power off the machine, and start once
again, If the malfunction can not be recovery by its own, send it to
after-sale service center for repairing.
7.When machine stops working, LED indicator slow flashes 1Hz, it means
run out of battery, please charge it in time, the LED indicator flashes
when charging and will be constantly on after fully charged, plug out the
charger then.
There is a hexagonal hole at the bottom of side brush, align the brush
and press it until clicks in.
Hexagonal hole
face down
Carefully read this manual before operating the machine. Any
wrong operation may cause damage or injuries.
△Safety Instructions:
1. Do not use next to steps or on balconies. This machine does not have step
avoidance sensors.
2. This machine is not intended for use by persons (including children) with reduced
physical,sensory or mental capabilities.It is not also intended for use by those
with a lack of knowledge and experience, unless they have been given instruction
or supervision concerning the use of the machine by a person responsible for
their safety.
3. This appliance is for indoor use only.
4. This unite is suitable for low to medium file carpet. It is not suitable for uneven
floor or in mixed carpet.
5. Take off the side brush when cleaning undercoat carpet to protect the side
brush.
6. A damaged power supply should be replaced only with the original parts from
manufacturer.
7. Do not use on wet or greasy dust.
8. Before operation, move away the fragile things (glass, light and etc) and other
things possibly entangle brushes (long hair, plastic bag, rope, wire and etc)
9. Don’t sit on the machine or put heavy things on it.
10. Clean the machine regularly. Empty the dust container.
11. Charge the machine without use for three months.
12. Charge it only when alarms for low power or power off. Use it after fully charged.
13. Recycle the battery when machine become broken.
2
3
4
5
6
7
8
9
11
12
10
1
13
14
15
16
17
Un foro esagonale è situato sulla parte inferiore della spazzola laterale, allineare la spazzola
e premere no a sentire un “clic”.
Installare la spazzola laterale
Foro esagonale rivolto
verso il basso
9. Spazzola principale
10. Contenitore per la polvere
11. Tasto di rilascio del contenitore per la polvere
12. Ruota universale
13. Tasto start/pausa
14. Spia LED
15. Sensore luminosità
16. Manico
17. Sensore ostacoli
21
Components
1.cliff detection sensor 2.side brush 3.right wheel 4.charger port 5.On/off button
6.battery cover 7.middle brush holder 8.left wheel 9.brush wheel 10.dustbin
11.Dustin release button 12.Universal wheel 13.start/pause button 14.LED indicator
15.light sensor 16.handle 17.Obstacle sensor
How to operate
■ How to assemble side brush
1.Install the side brush.
2.Place the machine on the ground to be cleaned.
3.Turn on the power button, music play accordingly. LED indicator is
on ,The machine enters standby status.
4.Press start/pause button, machine starts working.
5.When in operation, press start/pause button, the machine will stop
temporarily.
6.When machine stops unexpectedly, LED indicator quick flashs in 3Hz,
please check carefully if machine being entangled or brush wheel fails to
operate, if machine being entangled, take it to the spacious place to
re-start, if brush wheel fails to operate, take it out and make it clean, If
the machine still can not start properly, product malfunction happens, a
long press on the on/off button to power off the machine, and start once
again, If the malfunction can not be recovery by its own, send it to
after-sale service center for repairing.
7.When machine stops working, LED indicator slow flashes 1Hz, it means
run out of battery, please charge it in time, the LED indicator flashes
when charging and will be constantly on after fully charged, plug out the
charger then.
There is a hexagonal hole at the bottom of side brush, align the brush
and press it until clicks in.
Hexagonal hole
face down
Carefully read this manual before operating the machine. Any
wrong operation may cause damage or injuries.
△Safety Instructions:
1. Do not use next to steps or on balconies. This machine does not have step
avoidance sensors.
2. This machine is not intended for use by persons (including children) with reduced
physical,sensory or mental capabilities.It is not also intended for use by those
with a lack of knowledge and experience, unless they have been given instruction
or supervision concerning the use of the machine by a person responsible for
their safety.
3. This appliance is for indoor use only.
4. This unite is suitable for low to medium file carpet. It is not suitable for uneven
floor or in mixed carpet.
5. Take off the side brush when cleaning undercoat carpet to protect the side
brush.
6. A damaged power supply should be replaced only with the original parts from
manufacturer.
7. Do not use on wet or greasy dust.
8. Before operation, move away the fragile things (glass, light and etc) and other
things possibly entangle brushes (long hair, plastic bag, rope, wire and etc)
9. Don’t sit on the machine or put heavy things on it.
10. Clean the machine regularly. Empty the dust container.
11. Charge the machine without use for three months.
12. Charge it only when alarms for low power or power off. Use it after fully charged.
13. Recycle the battery when machine become broken.
2
3
4
5
6
7
8
9
11
12
10
1
Un foro esagonale è situato sulla parte inferiore della spazzola laterale, allineare la spazzola
e premere no a sentire un “clic”.
Installare la spazzola laterale
Foro esagonale rivolto
verso il basso
1.Cliff detection sensor
2.Side brush
3.Right wheel
4.Charger port
5.On/off button
6. Battery cover
7.Middle brush holder
8.Left wheel
9.Brush wheel
10.Dustbin
11.Dustbin release button
12.Universal wheel
13.Start/pause button
14.LED indicator
15.Light sensor
16.Handle
17.Obstacle senso
17
16
15
14
13
 Loading...