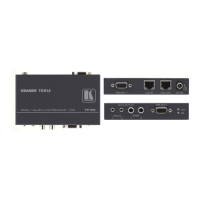
5 Connecting the TP-50 XGA / Audio Line Receiver – DA
You can use the TP-50 with an XGA / audio transmitter, for example, the
Kramer TP-121 or TP-45 transmitter
1
, and also connect an additional TP-50
unit to increase the number of outputs.
To configure a TP-45 / TP-50 XGA / Audio Line Receiver – DA system
2
as
illustrated in the example in Figure 3, do the following:
1. On the TP-45:
Connect an XGA source to the XGA IN HD15F connector
Connect an analog audio source to the ANALOG AUDIO 3.5mm
mini jack
3
If necessary, set the HS and VS switches on the TP-45 underside
Press the video SELECT button to choose XGA
Release the audio SELECT button to choose ANALOG AUDIO
4
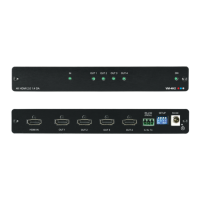
2. On the TP-50, connect the following:
The XGA OUT 1 HD15F connector to an XGA acceptor (for
example, display 1) and the ANALOG 1 AUDIO OUTPUT 3.5mm
mini jack
5
to an analog audio acceptor (for example, AV receiver 1)
The XGA OUT 2 HD15F connector to an XGA acceptor (for
example, display 2) and the S/PDIF 2 AUDIO OUTPUT RCA
connector to an S/PDIF acceptor (for example, AV receiver 2)
3. Connect the LINE OUTPUT RJ-45 connector on the TP-45 to the LINE
IN RJ-45 connector on the TP-50, via CAT5 cabling, see section 5.1.
4. Connect the 12V DC power adapter to the power socket and connect the
adapter to the mains electricity on both
6
the TP-45 and the TP-50 (not
shown in Figure 3).
The signal from the XGA source is transmitted via CAT5 cable, decoded
and converted at the XGA OUT HD15F connector to the XGA acceptor.
5. If required, connect the LINE LOOP RJ-45 connector on the TP-50 to
an additional TP-50 unit
7
.
1 Refer to the separate user manuals for these machines, which can be downloaded from the Internet at this URL:
http://www.kramerelectronics.com
2 Using up to 300ft (100m) of UTP cabling
3 Or you can connect a digital audio source to the S/PDIF RCA connector
4 If the digital audio input is connected, press the button to select S/PDIF
5 Alternatively, you can connect a digital audio acceptor to the S/PDIF RCA connector, or you can connect both
6 You can connect the power to the TP-50 to power both the TP-45 and TP-50
7 Alternatively, you can connect it to an additional TP-46 unit