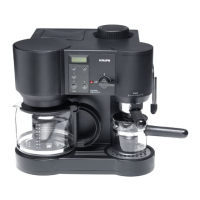
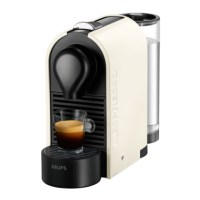
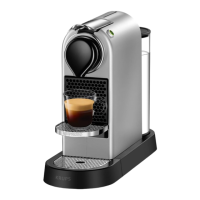
This document describes the KRUPS espresso machine, Type #F922, designed for household use. It is a versatile appliance capable of preparing espresso with ground coffee or pre-portioned ESE pods, frothing and steaming milk for cappuccinos, lattes, or hot chocolate, and dispensing hot water.
Function Description:
The KRUPS espresso machine operates by passing hot water under pressure through ground coffee or ESE pods to produce espresso. It also features a steam function for heating and frothing milk or other liquids. The machine is equipped with a water tank, a percolation head, a filter holder, and an auto-cappuccino accessory.
Important Technical Specifications:
- Power Rating: Users should ensure the appliance's power rating matches their electrical system.
- Electrical Connection: Must be connected to an earthed socket.
- Filter Cartridge: Uses KRUPS filter cartridge ref. 088.
- Descaling Kit: Uses KRUPS descaling kit ref. 054.
- Product Type: #F922.
Usage Features:
The machine includes several components and controls for ease of use:
- Lid (a): Covers the water tank.
- Removable and Swivelling Water Tank (b): For easy filling and cleaning.
- Cartridge Change Indicator (c): Reminds users when to change the filter cartridge.
- Function Selector (d): A rotary dial to select different functions (off, espresso, steam/hot water).
- On/Off Switch (e) and Operating Indicator Light (e1): To power the machine and indicate operation.
- Temperature Control Indicator Light (f): Illuminates when the appliance reaches the correct temperature.
- Steam/Hot Water Button (g): Toggles between steam and hot water functions.
- Percolation Head (h): Where coffee is brewed.
- Swivelling Ring (i): Used to lock the filter holder in place.
- Filter Holder (j): Holds ground coffee or ESE pods.
- Selection Ring (j1): Allows selection for 1 cup (ground coffee) / 1 ESE measure or 2 cups (ground coffee).
- Ejection Button (j2): For easy removal of used coffee grounds or pods.
- Auto-Cappuccino Accessory (k):
- Adjustable Steam Tap (k1): Controls steam intensity for frothing milk.
- Nozzle (k2): Dispenses steam or hot water.
- Flexible Frothing Tube (k3): Connects to the milk container.
- Milk Container with Lid (k4): For holding milk during frothing.
- Milk Container Support (k5): Holds the milk container.
- Removable Grid Plate (l), Adjustable Grid Plate Support (m), and Removable Drip Tray (n): Collects drips and spills, adjustable for different cup heights.
- Water Level Indicator (n1): Shows when the drip tray needs emptying.
- Measuring Spoon (o): For measuring ground coffee (1 spoon = 1 cup).
- Filter Cartridge (p) and Assembly Key (p1): For water filtration and installation.
First Use and Preparation:
- Fitting the Filter Cartridge: Assemble the key (p1), place the cartridge (p) in the tank (b), screw it into place, and set the cartridge change indicator (c) to track usage.
- Cleaning the Heating System: Fill the water tank (b), plug in the appliance, turn on (e to "I"), fit the filter holder (j) without coffee, place a container under it, and once the temperature light (f) illuminates, turn the function selector (d) to "U" to run water through. Repeat until half the tank is empty. Then, move the container under the nozzle (k2), turn the steam tap (k1) to "!!!", switch the steam/hot water button (g) to "M", wait for the temperature light (f), and turn the function selector (d) to "M" to run the remaining water through the nozzle.
Espresso Function:
- Preheating: Preheat the filter holder and cups by running hot water through them.
- Ground Coffee: Align the selection ring (j1) to 1 or 2 cups, add ground coffee (1 spoon per cup) and tamp firmly (5). Clean the edges, fit the filter holder (j) under the percolation head (h) (3), place cups, and adjust grid height (4). Once temperature light (f) illuminates, turn function selector (d) to "U". When cups are full, turn to "O". Remove filter holder and eject grounds (j2) (6).
- ESE Pods: Align selection ring (j1) to 1 cup, place the ESE pod in the filter holder (fold flaps inwards if present) (7). Fit the filter holder (j) under the percolation head (h) (3), place a cup, and adjust grid height (4). Once temperature light (f) illuminates, turn function selector (d) to "U". When the desired quantity is reached, turn to "O". Remove filter holder and eject pod (j2) (6).
Steam Function (for frothed/steamed milk or heating liquids):
- Fill water tank (b), turn on (e to "I").
- Turn steam/hot water button (g) to "M".
- Turn function selector (d) to "M".
- Frothing Milk: Pour cold low-fat milk into milk container (k4), place it on support (k5), insert flexible tube (k3) into the lid, ensuring it's submerged (8). Turn adjustable steam tap (k1) to "!!!" for smooth froth (9a) or to the top of the user scale for less froth (9b). Place a cup under nozzle (k2) (8), adjust grid height (4). Once temperature light (f) illuminates, turn function selector (d) to "M" until desired froth is obtained. Turn to "M" and remove cup.
- Heating Thick Liquids: Turn tap (k1) to "!!!". Immerse nozzle (k2) into the liquid (10), ensuring it doesn't touch the bottom. Once temperature light (f) illuminates, turn function selector (d) to "M" until liquid is hot. Turn to "O" and remove container.
- Cooling Down after Steam: If making espresso immediately after steaming, cool the machine by placing a container under the filter holder, turning function selector (d) to "U" until temperature light (f) goes out, then turning to "O".
Maintenance Features:
- General Cleaning: Unplug and allow to cool. Clean the body with a damp cloth. Empty the water tank after use.
- Drip Tray (n): Empty when water level indicator (n1) shows water. Remove grid (l) and support (m) (11), empty drip tray (n). Clean with water and non-abrasive soap, rinse, and dry. Replace the plastic block at the back (12).
- Percolation Head (h) and Filter Holder (j): Clean after every use with a damp cloth and non-abrasive soap. If heavily encrusted, unscrew the grid with a coin, clean, and replace (13, 14).
- Percolation Head Seal: Do not leave the filter holder in the appliance when not in use to prevent wear. Clean regularly with a damp cloth.
- Auto-Cappuccino Accessory (k): Rinse after each use. Turn function selector (d) to "M", turn steam tap (k1) to "!!!", immerse flexible tube (k3) in 1/3 water-filled container, place container under nozzle (k2) (adjust grid height (4)). Once temperature light (f) illuminates, turn function selector (d) to "M". When water runs through, turn to "O". Clean nozzle (k2) with a damp cloth. Periodically dismantle and clean with water, non-abrasive soap, and a small brush, rinse, and dry before reassembling (15).
- Descaling: Essential for continued operation. Remove filter cartridge (p) with key (p1). Unscrew and clean percolation head grid (h) (13). Dissolve 2 tablespoons of descaler (or one sachet of KRUPS accessory 054) in half a liter of lukewarm water and pour into the empty water tank. Turn on (e to "I"). Once temperature light (f) illuminates, place a container under nozzle (k2), switch steam/hot water button (g) to "M", turn tap (k1) to "!!!". Run 1/3 of the mixture by setting function selector (d) to "M", then reset to "O". Move container under percolation head (h) and run the second third of the mixture by setting function selector (d) to "U". Turn off (e to "O") and wait 10-15 minutes. Turn on (e to "I"). With function selector (d) in "U", allow the remainder of the mixture to run into the container. Reset to "O". Rinse with two tanks of fresh water through the percolation head and the nozzle. Replace percolation head grid (h) and filter cartridge (p).
Safety Precautions:
- Read all instructions.
- Do not touch hot surfaces.
- Do not immerse cord, plugs, or appliance in water.
- Supervise children near the appliance.
- Unplug when not in use and before cleaning.
- Do not operate with damaged cord or plug; return to KRUPS Service Center.
- Use only KRUPS evaluated accessories.
- Do not use outdoors.
- Keep cord away from hot surfaces or sharp edges.
- Do not place on hot surfaces or near open flames.
- To disconnect, turn switch to "OFF" then remove plug.
- Use extreme caution when dispensing hot steam.
- Do not remove the base of the machine; no user-serviceable parts inside.
- Do not use without drip tray and grid plate.
- Ensure filter holder is correctly positioned before making coffee and reset function selector (d) to "O" before removing.
- Do not remove filter holder while water is running through.
Warranty:
KRUPS #F922 is covered by a one-year warranty from the date of purchase for defects in materials or workmanship. The warranty is void if malfunction is caused by accident, misuse, abuse, tampering, damage in transit, or commercial use. Contact KRUPS Consumer Service Department for repairs or questions. In the USA, call (800) 526-5377; in Canada, call (905) 669-0114.