7
ENGLISH
PROGRAMMING THE CLOCK
Place the coffee maker on a hard, at surface.
Plug the power cable into a 220V-240V wall outlet.
–When you plug in the coffee maker for the rst time, 12:00 AM appears and blinks on the
screen. Fig. 1. Set the hour by pressing the CLOCK button (O), then the HR button (L)
for the hours and MIN (M) button for the minutes. The time appears. It is automatically
conrmed after 5 seconds have elapsed or by pressing the CLOCK button (O).
Note: Your clock is now set and will continue to display the current time even when your
appliance is in standby mode. If you want to set the time again, press the CLOCK (O) button
and repeat the steps above.
If the unit is unplugged or if there is a power failure, the clock will return to 12:00 AM. The
above instructions must be repeated to program the clock again.
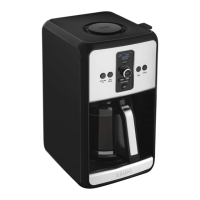
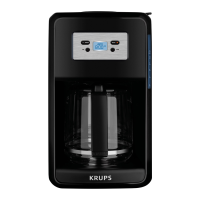
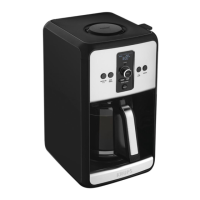
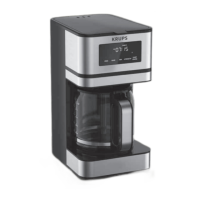
DESCRIPTION
A Appliance body
B Lid
C Water container
D Water level gauge
E Carafe lid
F Carafe handle
G Carafe
H Heating plate
I Filter holder
J ON/OFF button
K PROG button
L HR button
M MIN button
N AROMA button
O CLOCK button
P Spoon
BEFORE USING FOR THE FIRST TIME
COFFEE PREPARATION
Remove the stickers from the machine.
Prior to rst use, run your coffee maker without any coffee to rinse the circuit. Fill the
water reservoir up to the maximum level and start a cycle by pressing on the ON/OFF
button (J).
IMPORTANT: Your appliance has been designed to operate using only cold or warm water.
Lift the coffee maker’s lid (B). Fig. 3.
Fill the carafe (G) with cold or warm water. Pour water in the water tank (C) Fig. 4.
The number of cups is indicated by marks on the carafe and by the water level indicator.
Do not exceed 10-15 cups. Fig. 5.
Place the carafe (G) with its lid (E)closed on the heated base (H) by ensuring that it is
properly in place in order to activate the mechanism that allows the coffee to ow. Fig. 8.
Make sure that the lter holder (I) is inserted. Fig. 6. Place the lter paper into the lter
holder (I). Make sure that the lter paper is fully open and properly in place in the lter
holder. Fig. 7.
Should some ground coffee be inadvertently poured into the reservoir, refrain from starting
the cycle and rst clean the reservoir.

 Loading...