ASSEMBLY
10 mm bolt
(one bolt is pre-installed
in the rack)
10 mm lock nut
1/4” bolt
x4
x4
x4
Trail Doc Bike Stand
HOW TO USE
PROPER STICKER PLACEMENT
WARRANTY
free of defects in material and/or craftsmanship. The following conditions apply:
1. Warranty applies only to original owner.
2. Warranty does not cover wear and tear, accidental damage, or misuse.
3. Repair and/or replacement of any part is at the discretion of Kuat Innovations.
4. All repairs must be made by or under the direction of a Kuat technician.
5. All claims must be shipped to Kuat prepaid.
If you have questions or problems with your rack, please contact Kuat Innovations
directly by calling toll free 1(877)822-KUAT, or by email: info@kuatinnovations.com.
WARNINGS
1. Check tightness of all bolts and screws periodically.
2.
3. DO NOT USE OFF-ROAD.
4. Follow instructions for proper assembly, mounting and loading procedures.
5. Make sure the rack and your vehicle receiver are in good working condition
before each use.
6. Do not use hitch extenders with this product.
7. Do not use this product on a recreational vehicle or trailer.
8. Do not use rain covers, wind covers, or tarps with this product.
9. Place the front tire clamp next to the front fork.
10. Do not haul 20”-24” wheeled bikes without the hook adapter.
This rack is designed to carry 2 bikes weighing no more than 60 pounds each.
12. Do not take through automatic carwash.
13. Do not haul bike on Trail Doc.
11. Maximum wheelbase of bike- 48”.
VISIT WWW.KUATRACKS.COM FOR VIDEO INSTRUCTION. CLICK ON INSTRUCTIONS TAB.
Open quick release and pull up Trail Doc to desired height or use the spring pin for
enhanced stability (g1). Once at desired height, tighten quick release. Trail Doc will
clamp to seat post or top tube. Pivot lever on the back of the Trail Doc to rotate into
desired position.
Fig 1
Spring pin
Abra el liberador rápido y levante el stand la bicicleta a la altura deseada o use el pivote de
resorte para una estabilidad mejorada (g1). Una vez a la altura deseada, tense el liberador
rápido. El Trail Doc se sujetara al poste del asiento o el tubo superior. Pivote la palanca detrás
del Trail Doc para rotar a la posición deseada.
Ouvrir la partie coulissante « quick release » du support et régler celui-ci à la hauteur désirée ou
utiliser la tige à ressort pour plus de stabilité(gure 1). Une fois la hauteur désirée atteinte, serrer la
partie coulissante. Le « Trail Doc » va s’arrimer au tube de la selle ou au tube supérieur du cadre.
Utiliser le pivot à l’arrière du « Trail Doc » pour ajuster dans la position désirée
2
1
2
1
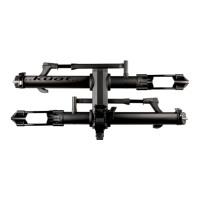
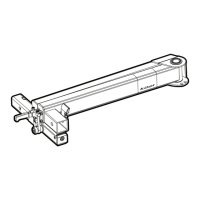
Turn rack upside down for assembly.
Voltee la rejilla de cabeza para ensamblar.
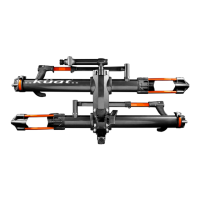
Insert 10mm bolts on rack arms. Make sure lock nut is placed on appropriate side.
Slide bolts and cable lock through rack center beam.
Tighten bolts with large Allen wrench. Alternate tightening between bolts until tight.
Insérer les boulons 10mm sur les bras du rack. S’assurer que l’écrou de sécurité soit placé sur
le bon côté Glisser les boulons et le cable à travers le centre du rack.
Serrer les boulons avec la grosse clef Allen. Altérner le serrage entre les boulons jusqu’à ce
qu’ils soient xes.
Introduzca un tornillo de 10mm en cada soporte. Asegúrese que las contratuercas estén
colocadas en el lado correcto. Pase los tornillos y el cable antirrobo por el cuerpo del
portabicicletas.
Aprete los tornillos usando la llave hexagonal grande. Aprete los tornillos uniformemente
hasta que estén bien rmes.
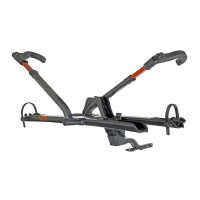
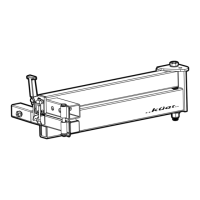
TRAIL DOC END CAP
TRAIL DOC
RACK ARMS
CENTER BEAM
RACK ARM WITH PRE-INSTALLED BOLT HERE
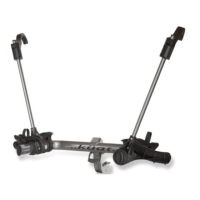
Place Trail Doc end cap on the end of center beam and thread in the four 1/4” bolts.
Trail Doc end cap should align with the center beam after tightening.
Insert the Trail Doc and tighten quick release prior to using rack.
Tourner le support à l’envers pour compléter son assemblage.
Ponga el tope del Trail Doc al nal de la barra central e inserte los 4 tornillos de 6mm y
las rondanas. Asegúrese de que el tope del Trail Doc esté alineado con la barra central
después de apretar.
Placer la base du « Trail Doc » à l’extrémité de la poutre centrale et visser-la en utilisant
les quatre boulons de 6 mm ainsi que leurs rondelles respectives. Une fois serré,
assurez-vous que la base du « Trail Doc » est bien enligné avec la poutre centrale.
Insérer le « Trail Doc » et serrer la partie coulissante « quick release » avant d’utiliser le support.
Inserte el Trail Doc y tense el liberador rápido antes de usar la rejilla.
If you are also assembling the NV 2 Bike Add-On, be sure
to review those instructions to eliminate duplicate steps.