Screw
●Operating Temperature and humidity range :
0 to 40°C 85%RH or less (no condensation)
●Storage Temperature and humidity range :
-20 to 60°C 85%RH or less (no condensation)
●Power source : DC3V R03 / LR03 (AAA) ×2
●Current consumption : < 4mA
●Battery life (ACA, continuous, no load, with R03) :
approx. 170 hours
●Dimension, Weight : 204(L)×81(W)×36(D)mm,
approx. 220g (including batteries)
●Accessories :
Test leads Model 7066A 1set
Battery R03(AAA) 2pcs
Instruction manual 1pce
Carrying case Model 9079 1pce
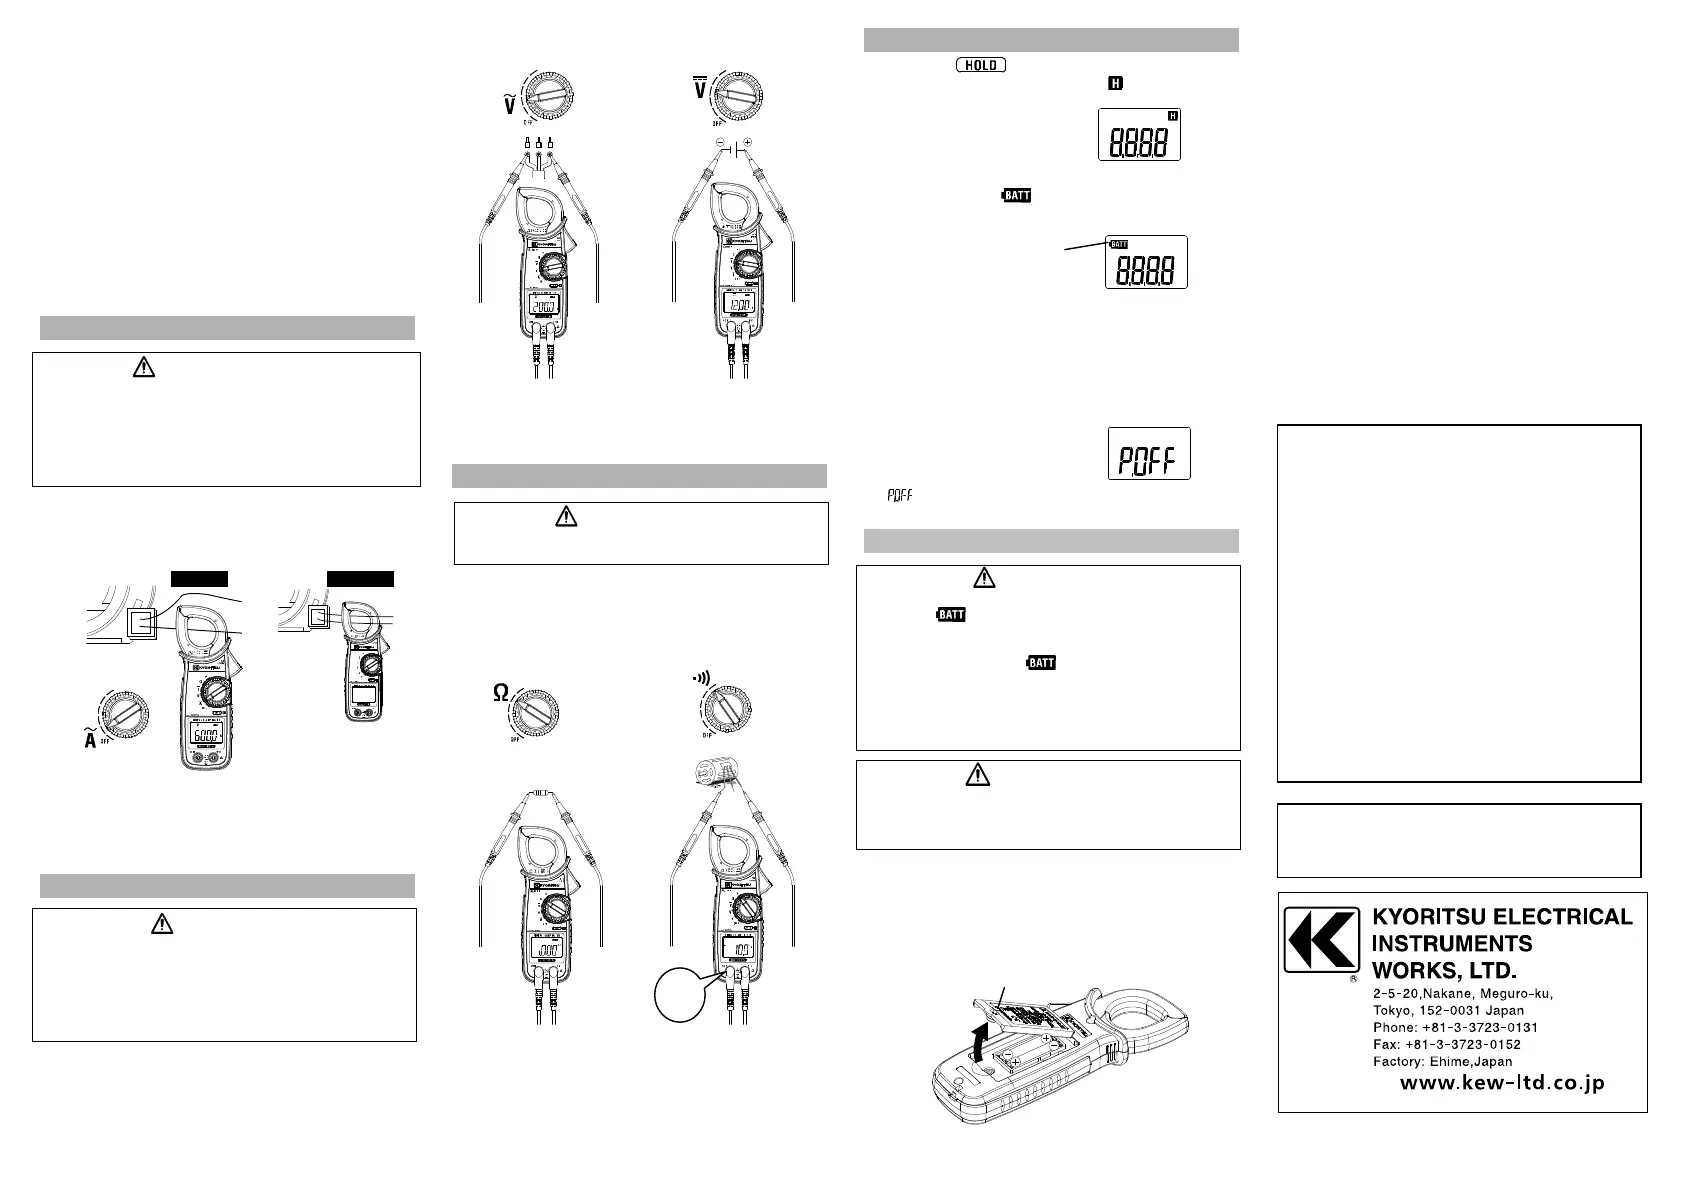
3. ACA Measurement
●Disconnect the test leads from the instrument when
performing a test.
●Do not exceed the rated voltage (600V) and the
category ratings of the instrument.
●Keep your fingers and hands behind the barrier
during measurement.
(1) Set the Function switch to ACA position.
(2) Press the trigger to open the Current Sensor and clamp
the one conductor (Dia. 33mm max.) under test.
NOTE
Measurement accuracy is guaranteed when the measured
object is placed at the center of the Current Sensor.
4. ACV/DCV Measurement
●Before starting a measurement, ensure that the
Function switch is set to the appropriate position.
●Do not exceed the rated voltage (600V) and the
category ratings of the instrument.
●Keep your fingers and hands behind the barrier
during measurement.
(1) Set the Function switch to ACV or DCV position.
(2) Firmly connect the test leads to V/Ω and COM terminals.
NOTE
If the connection is reversed, the LCD indicates the
“ - “ mark (DCV measurement).
5.Resistance(Continuity)Measurement
Power off the circuit under test before making
measurements with this instrument.
(1) Set the Function switch to resistance or continuity
position.
(2) Firmly connect the test leads to V/Ω and COM terminals.
Beeps less than 90Ω.
NOTE
LCD indicates ”OL” when the test leads are open.
6. Other Functions
●Data Hold
Press the Hold key. The LCD shows “ ” mark and the
reading will be held.
Press the Data Hold Key again
to release the display.
●Low battery indication
The LCD shows “ ” mark when the batteries fall
below the normal operating voltage.
●Sleep Function
Automatically powers off the instrument in about 10 min
after the last switch or key operation. Buzzer beeps five
times one minute before entering into the Sleep mode,
and also one time just before entering into the mode. To
exit from the Sleep mode, rotate the Function switch or
press Hold key.
To disable the Sleep function,
press the HOLD key and
power on the instrument.
Confirm that the LCD shows
“ ” about 1 sec.
7. Battery Replacement
● Replace the batteries when a Low Battery Voltage
warning " " mark is indicated on the LCD. Otherwise,
precise measurement cannot be made.
If batteries are completely exhausted, the LCD goes
blank without showing " " mark.
● Do not try to replace the batteries if the surface of the
instrument is wet.
● Disconnect the test leads from the object under test and
power off the instrument before opening the Battery
Compartment Cover for battery replacement.
● Do not mix old and new batteries. Brand and type of the
batteries to be used should be harmonized.
● Install batteries in correct polarity as indicated in
the Battery Compartment.
(1) Set the Function Switch to "OFF" position.
(2) Unscrew and remove the Battery Compartment Cover
on the instrument.
(3) Replace the batteries observing correct polarity.
Use new two AAA 1.5V batteries.
(4) Install the Battery Compartment Cover and tighten the
screw.
MEMO
11-15 92-2261
DISTRIBUTOR
Kyoritsu reserves the rights to change specifications
or designs described in this manual without notice
and without obligations.
ACV
DCV
Black(-) Red(+)
Correct Incorrect
with new ones when
this mark appears.
 Loading...