Do you have a question about the L.L.Bean Rangeley Bed and is the answer not in the manual?
Read through instructions, prepare workspace, and gather materials before starting assembly.
Remove all parts and hardware from packaging and place wooden pieces on a non-abrasive surface.
Identify all included components by comparing them to the parts list.
Identify and count all hardware pieces using the provided diagram and list.
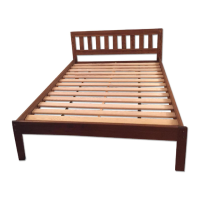
Locate the two side rails (A), the headboard (B), and the footboard (C).
Stand the headboard upright to prepare for attachment.
Insert barrel nuts into side rails and orient grooves correctly.
Align rail with headboard, insert bolts, and tighten using screwdrivers.
Align rail with footboard and attach using bolts, leaving loose for specific sizes.
Attach the long support bar with screws to frame brackets for full size beds.
Attach support bar and wooden leg with dowels to the support bar for queen size beds.
Insert dowels, unroll slat system, and secure middle slat with screws.
Tap wood buttons into place on the headboard and footboard to cover bolt holes.
| Headboard Style | Panel |
|---|---|
| Assembly Required | Yes |
| Finish | Natural |
| Footboard Style | Panel |
| Warranty | 1 year limited |