EasyManua.ls Logo

L.R. Baggs Element Active System User Manual

Default Icon
3 pages
To Next Page IconTo Next Page
Page #1 background imageLoading...
Page #1 background image
Element Active System
Installation Manual
Jack tip recessed inside of strap-ring
Jack tip ush with strap-ring
PACKAGE CONTENTS
One Element Active System with undersaddle pickup, endpin preamp w/volume control
attached.
One battery bag
Three self-stick wire clips
OVERVIEW AND CAUTIONS
The Element Active System combines the Element undersaddle pickup with a pre-contoured,
all-discrete Class A endpin preamp. A soundhole mounted volume pot gives you additional
control and versatility without requiring any other modications to your instrument. The
Element Active is designed to interface with just about anything you plug into, but best
results will be realized through a high-quality, full-range PA. Plugging in and unplugging
the cord from your guitar will turn the preamp on and o.
We recommend that this pickup system be installed by a professional dealer/installer. We
do not provide installation advice or support for home or hobbyist installations.
Installers: Please read the instructions carefully before proceeding. We will not be
responsible for any damage to the guitar or personal injury from installation, improper
installation, use or misuse of the product.
STRAPJACK/PREAMP INSTALLATION
If your guitar already has a half inch hole in the tail block, proceed to the installation.
Drilling the strapjack hole: This jack requires a clean, half inch hole in the tail block of
the instrument. The easiest way to drill this hole accurately and eectively is to use a half
inch “step” drill-bit, available at any hardware store. Other options are to use a “Forstner
Bit, or a “Brad-point bit.
CAUTION: DO NOT USE A SPADE BIT OR STANDARD DRILL BIT FOR THIS!
Begin by placing a piece of masking tape over the area to be drilled (generally, in the center
of the tail block). This is to protect the guitar’s nish. Drill a pilot hole approximately 3/16
dia. Now you can nish up using the step-drill. Place the tip of the step-drill in the pilot
hole, line up the drill as straight as you can, and proceed to drill until you’ve gone all the
way through the tail block.
Installing the strapjack: Remove the strap ring, retaining nut, and one washer from the
end of the jack. There will still be one at washer, one star-locking washer, and one nut
remaining on the threaded barrel of the jack.
Adjust this nut and washers to a depth on the barrel that will allow approximately 90% of
the smaller threaded portion of the jack to extend beyond the tail block outside the guitar.
Bring the jack down through the soundhole into the guitar and insert it into the pre-drilled
hole in the tail-block to check the adjustment. There should be a couple of threads
remaining within the hole.
With the jack in place, lay the remaining washer over the threads and attach the external
retaining nut until it’s tight. Finish by attaching the strap ring.
Upon completion, the small threaded section of the jack should be ush or near ush with
the end of the strap ring. If the threaded section is recessed too far, the plug will not make
electrical contact with the jack! Therefore, be sure to adjust this until it is right.
Question and Answer IconNeed help?

Do you have a question about the L.R. Baggs Element Active System and is the answer not in the manual?

L.R. Baggs Element Active System Specifications

General IconGeneral
BrandL.R. Baggs
ModelElement Active System
CategoryAccessories For Music Instruments
LanguageEnglish

Summary

Overview and Cautions

System Overview and Recommendations

Describes the Element Active System, its features, and recommends professional installation, advising against DIY support.

Strapjack/Preamp Installation

Drilling the Strapjack Hole

Instructions for drilling a clean half-inch hole in the tail block using specific drill bits and protective tape.

Installing the Strapjack

Guidance on fitting the strapjack, adjusting depth for proper connection, and securing it with nuts and rings.

Pickup Installation

Saddle and Slot Preparation

Ensuring a flat bridge slot and saddle surface for even contact, and preparing the saddle for the pickup.

Compensating for Pickup Thickness

Adjusting the saddle height by removing material to match the pickup's thickness for proper seating and performance.

Finishing the Installation

Volume Wheel and Battery Placement

Instructions for mounting the volume wheel inside the soundhole and positioning the battery bag for accessibility.

Other Applications

Adding Auxiliary Pickups or Mic

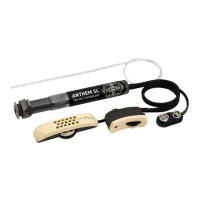
Details on connecting a second passive pickup or a mini-microphone via the stereo input, including wiring.

Related product manuals