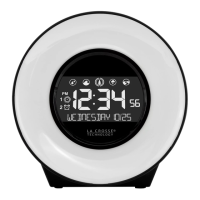
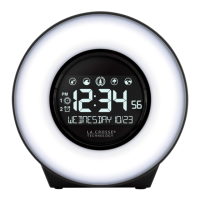
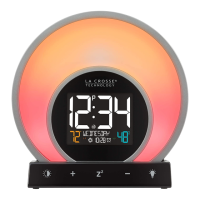
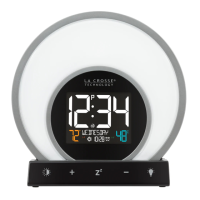
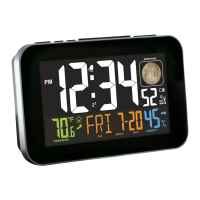
Multi-Color
Atomic Alarm Clock
with USB Charging + Snooze
Model: C85183 | Quick Setup Guide
The Atomic Alarm Clock features radio-controlled time, indoor temperature,
humidity and moon phase on a colorful, and easy to read display. Includes
backlight with dimmer, calendar with month, date, weekday display and alarm
with snooze. Use the integrated USB charging port to charge your
smartphone, camera or other devices while you sleep.
MULTI-COLOR ATOMIC ALARM CLOCK + SNOOZE
SETUP INSTRUCTIONS STEP BY STEP
STEP 1:
• Insert the power adapter plug into a wall
outlet
• Insert the 5 volt AC power adapter into the
back of the Atomic Alarm Clock for a
continuous backlight.
• The Atomic Alarm Clock will light up and
display, indoor temperature and time (12:00).
IMPORTANT: When operating on A/C power, the backlight and USB
charging port will turn off while the Atomic Alarm Clock searches for the
WWVB to avoid interference. The backlight will return after 4~8 minute
search (which occurs during the late night or early morning hours). Then the
USB charging port will resume working.
STEP 2: (Optional battery operation.)
• Remove the battery cover from Atomic Alarm Clock. Slide tab up and pull
out to remove the battery cover.
• Insert 2 NEW AAA batteries (included) into the back of the Atomic Alarm
Clock. Observe the correct polarity (see markings inside the battery
compartment).
Note: When operating on battery power only, the backlight will come on
for 10 seconds when the LIGHT button is pressed.
• Do Not Mix Old and New Batteries
• Do Not Mix Alkaline, Standard, Lithium or Rechargeable Batteries
TROUBLESHOOTING
• If the Atomic Alarm Clock does not display the indoor temperature after 30
seconds remove the a/c power adapter (batteries) and start the setup
process again.
WWVB RADIO CONTROLLED TIME
The NIST radio station, WWVB, is located in Ft. Collins, Colorado and
transmits the exact time signal continuously throughout the United States at
60 kHz. The signal can be received up to 2,000 miles away through the
internal antenna in the Atomic Alarm Clock. However, due to the nature of the
Earth’s Ionosphere, reception is very limited during daylight hours.
The WWVB reception icon with full signal strength will appear on
screen if the reception of atomic time is successful.
• When powered up, the Atomic Alarm Clock will automatically try to receive
the WWVB signal every three hours, for example: 0:00, 3:00,
6:00......18:00, 21:00, but if at any of the above times it receives the
signal, it won’t search again until next day at UTC 7:00, 8:00, 9:00. 10:00,
11:00. When it successfully receives a time update at UTC 7:00, 8:00,
9:00. 10:00, or 11:00, it will not look for an update again until the next day.
• In normal mode, push the - button for three seconds to enter manual
searching for the signal.
• In reception mode, push the
- button for three seconds to exit searching
for the atomic signal.
Note: During WWVB reception, all buttons work. When in time set or alarm
set mode, the WWVB search will stop. When alarm rings, it will also stop the
WWVB search.
IMPORTANT: To limit interference, the LCD backlight & USB charging
functions are suspended during WWVB atomic signal synchronization which
occurs after midnight. They will resume after a 4 to 8 minute signal search.
Note: In case the Atomic Alarm Clock is not able to detect the WWVB-signal
(disturbances, transmitting distance, etc.); the time can be manually set in the
program menu.
PROGRAM MENU
The °F/°C SET button will move through the program menu. The + or -
buttons will change a value.
• WWVB ON/OFF: Hold the °F/°C SET button 5 seconds. WWVB and the
word ON will flash. Press and release the + or - buttons to turn this to
OFF if you do not wish WWVB reception. Confirm with the °F/°C SET
button and move to the next item.
• TIME ZONE: EST will flash. Press and release the + or - buttons to select
a different Time Zone: AST=Atlantic, EST= Eastern, CST= Central, MST=
Mountain, PST= Pacific, AKT= Alaska, HAT=Hawaiian time zone. Confirm
with the °F/°C SET button and move to the next item.
• DAYLIGHT SAVING TIME: DST will flash and the word ON. Press and
release the + or - buttons to turn this to OFF if you do not observe DST.
Confirm with the °F/°C SET button and move to the next item.
• 12/24 HOUR TIME: 12Hr will flash. Press and release the + or - buttons to
select 24Hr. Confirm with the °F/°C SET button and move to the next item.
• HOUR: The hour will flash. Press and release the + or - buttons to select
the correct hour. Confirm with the °F/°C SET button and move to the next
item.
• MINUTES: The minutes will flash. Press and release the + or - buttons to
select the correct minutes. Confirm with the °F/°C SET button and move to
the next item.
• YEAR: The year will flash. Press and release + or - buttons to select the
correct year. Confirm with the °F/°C SET button and move to the next
item.
• MONTH: The month will flash. Press and release the + or - buttons to
select the correct month. Confirm with the °F/°C SET button and move to
the next item.
• DATE: The date will flash. Press and release the + or - buttons to select
the correct date. Confirm with the °F/°C SET button and exit the program
menu.
Note: The Day of the Week will set automatically after the year, month
and date are set.
Note: The set mode will time out after 20 seconds with no button pressed.
FAHRENHEIT/CELSIUS: Press and release the °F/°C SET button to select
temperature readings in Fahrenheit or Celsius.
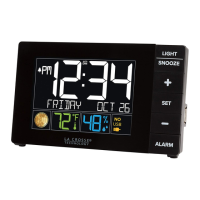
BUTTONS
Button Press and Release
Functions
Hold 3 seconds
°F/°C SET
Move through program menu
(setup)
Select temperature in °F/°