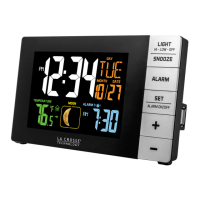
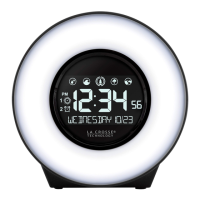
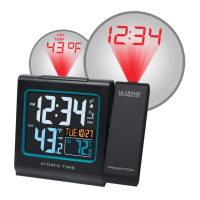
Atomic Projection Alarm
with Indoor and Outdoor Temperature
Model: K84285 | Quick Setup Guide
The Atomic Projection Alarm features accurate atomic time, and indoor and
outdoor temperature on a stylish, colorful and easy-to-read display. Time
and/or outdoor temperature can be projected on a wall or ceiling. Use the
integrated USB charging port to charge your smartphone, camera or other
device when the projection alarm operates on A/C power. Wireless
transmission range of over 200 feet (60 meters) in open air, from the
transmitter to the projection alarm.
SETUP INSTRUCTIONS STEP BY STEP
STEP 1:
• Insert the 5 volt A/C power adapter into the designated area (2) on the back
of the Projection Alarm.
• Insert the power adapter plug into a wall outlet for a continuous backlight.
• IMPORTANT: When operating on A/C power,
to avoid interference, the backlight, projection
and USB charge port, will turn off while the
Projection Alarm searches for the WWVB
signal. The backlight, projection and USB
charge port will function again after the 2-10
minute search.
STEP 2:
• Remove battery cover from Projection
Alarm, slide tab up and pull out to remove the cover (1).
• Insert 2 new AAA batteries (not included) into the back of the Projection
Alarm. Observe the correct polarity (see marking inside the battery
compartment).
• Do NOT mix old and new batteries.
• The Projection Alarm will light up and display indoor temperature and time
(12:00).
STEP 3:
• Ensure that the transmitter is within 10 feet of the projection
alarm.
• Remove battery cover from transmitter: Slide the battery cover
down and lift off the front.
• Insert 2 new AA batteries (not included) into the TX141
transmitter. Observe the correct polarity.
• Within 3 minutes, the projection alarm will show readings in
the Outdoor temperature area on the LCD.
Note: Use Alkaline batteries (or Lithium for temperatures below
-20°F /-28.8°C).
TROUBLESHOOTING
• If the Projection Alarm does not display the outdoor temperature after 3
minutes, remove the A/C power adapter and all batteries from both units
and start the setup process again.
• If the outdoor temperature does not show up after a second attempt, please
slide open the battery cover of the outdoor transmitter to reveal the TX
button push down on the TX button for 3 seconds to send a wireless signal
to the Projection Alarm.
• Hold the +/TEMP button and the Projection Alarm will search for the
transmitter.
• For optimal 433 MHz reception, the outdoor transmitter should be placed
within 200 feet (60 meters) from the Projection Alarm (see positioning
outdoor transmitter).
• Note: Use Alkaline batteries (or Lithium for temperatures below -20°F/-
28.8°C).
PROGRAM MENU
The SET/°C/°F button will move through the program menu. The +/TEMP or -
/TIME buttons will change a value.
• WWVB ON/OFF: Hold the SET/°C/°F button 5 seconds and WWVB and the
word ON will flash. Press and release the +/TEMP or -/TIME button to turn
this to OFF if you do not wish to receive WWVB reception. Confirm with the
SET/°C/°F button and move to the next item.
• TIME ZONE: EST will flash. Press and release the +/TEMP or -/TIME
button to select a different Time Zone: AST=Atlantic, EST= Eastern, CST=
Central, MST= Mountain, PST= Pacific, AKT= Alaska, HAT=Hawaiian time
zone. Confirm with the SET/°C/°F button and move to the next item.
• DAYLIGHT SAVING TIME: DST will flash and the word ON. Press and
release the +/TEMP or -/TIME button to turn this to OFF if you do not
observe DST. Confirm with the SET/°C/°F button and move to the next
item.
• 12/24 HOUR TIME: 12H will flash. Press and release the +/TEMP or -/TIME
button to select 24H. Confirm with the SET/°C/°F button and move to the
next item.
• HOUR: The hour will flash. Press and release the +/TEMP or -/TIME button
to select the correct hour. Confirm with the SET/°C/°F button and move to
the next item.
• MINUTES: The minutes will flash. Press and release the +/TEMP or -/TIME
button to select the correct minutes. Confirm with the SET/°C/°F button and
move to the next item.
• YEAR: The year will flash. Press and release the +/TEMP or -/TIME button
to select the correct year. Confirm with the SET/°C/°F button and move to
the next item.
• MONTH: The month will flash. Press and release the +/TEMP or -/TIME
button to select the correct month. Confirm with the SET/°C/°F button and
move to the next item.
• DATE: The date will flash. Press and release the +/TEMP or -/TIME button
to select the correct date. Confirm with the SET/°C/°F button and exit the
program menu.
• Note: The Day of the Week will SET automatically after the year, month
and date are set.
FAHRENHEIT/CELSIUS: Press and release the SET/°C/°F button to select
temperature readings in Fahrenheit or Celsius.
ALARM SET
• ALARM HOUR: Hold the ALARM button to enter alarm time setting mode.
The Alarm Hour will flash. Use the +/TEMP or -/TIME button to set the
Hour. Press and release the ALARM button.
• ALARM MINUTES: The Alarm Minutes will flash. Use the +/TEMP or -
/TIME button to Set the Minutes. Press and release ALARM to confirm the
alarm settings, then press and release SET button to exit.
ALARM ACTIVATION: ALARM ICON
• Press and release the ALARM button once to show Alarm Time.
• With the Alarm time showing, press and release the ALARM button to
activate the alarm. The alarm icon
appears when alarm is activated.
• With the Alarm time showing, press and release the ALARM button to
deactivate the alarm. The alarm icon will disappear when alarm is activated.
SNOOZE:
• When the alarm sounds, press the SNOOZE button to trigger snooze alarm
for 9 minutes. The snooze icon Zz will flash when the snooze feature is
active.
• To stop alarm for one day, press AL button, while in snooze mode. The
alarm icon
will remain solid.
BACKLIGHT AND PROJECTION INTENSITY
Press and release the SNOOZE/LIGHT button to adjust the brightness of the
backlight and projection (together):
• ON High intensity: The backlight and projection are defaulted to HI when
the Adapter is in use.
• ON Low intensity: Press and release SNOOZE/LIGHT button once
• OFF: Press and release SNOOZE/LIGHT button
• ON High intensity (default): Press and release SNOOZE/LIGHT button
• Note: When the Adapter is NOT in use, the HI/LOW/OFF features are not
available.
PROJECTION
Battery Power: Press and release the SNOOZE/LIGHT button to show the
projection for 10 seconds.
Note: Projection will not display constantly when operating on battery power.
A/C Power: Projection is displayed constantly unless turned off.
Note: can be turned off see “Backlight and Projection Intensity”
• Rotate Projection: Press and release the PROJECTION button to rotate
the projection image 90 degrees. Press and release the PROJECTION
button again to rotate another 90 degrees.
• Change Projection Mode: Hold, then release the PROJECTION button to
switch projection modes. Watch the projection image to view the changes.
o Time and Outdoor Temperature: alternate every 5 seconds (default)
o Time: Hold and release PROJECTION button
o Outdoor Temperature: Hold and release PROJECT button again
USB CHARGE PORT
The integrated USB charging port (on back) will charge your smart phone,
camera or other devices when the projection alarm is plugged into a power
outlet with the included 5V A/C adapter.
Note: This is a power-output charging port. The
charging port does not supply power to the
projection alarm.
Begin charging your external device by
connecting the device’s USB charging cable (not
included) to the USB charging port on the back of
the projection alarm. Charging times will vary.
Note: Some USB cables are for data transfer only
and cannot be used for charging. Make sure that the USB cable you use will
charge your device. Most USB cables included with mobile devices will work
for charging.
• USB Power Output: 0.5A maximum current
IMPORTANT: When operating on A/C power, the backlight, projection and
USB charging port will turn off while the Projection Alarm searches for the