| 5
1
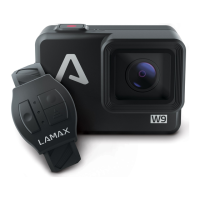
LAMAX W9 ACTION CAMERA
A
On/Off button to turn the camera on and off.
B
Shutter/Button to start/stop the video.
C
Access to USB-C and micro HDMI connectors.
D
Access to battery compartment and microSD card slot.
2
TURNING THE CAMERA ON AND OFF
> To turn on the camera for the first time or after removing the battery, press and hold
the “mode” button for 3–5 seconds.
> When switching on again, turn on the camera by pressing the “mode” button once.
> Turn the camera off by pressing and holding the “mode” button for 3–5 seconds.
3
BATTERY INSTALLATION
A
Press the lock button at the bottom of the camera and slide the door out. The door
can then be opened.
B
Insert the battery into the slot with the battery and camera connectors on the same
side.
C
Close the door again.
4
CHARGING
> You can charge the camera by connecting it to a computer via a USB cable or using
the AC adapter.
NOTE: AC adapter not included.
> Charging current when charging via USB and AC adapter is 580 mA. When the com-
puter‘s output current is 400 mA, charging through the computer’s USB port will also
be 400 mA.
5
INSERTING THE MICRO SD CARD
> Insert and remove a microSDHC or SDXC card from the microSD card slot when the
camera is turned off and not connected to the computer. Memory cards with a higher
write speed (UHS Speed Class – U3 and higher) are recommended.
NOTE: Use only microSDHC or SDXC cards from reputable manufacturers. Generic
cards don’t guarantee proper behaviour of the data storage.
6
CHANGING THE CAMERA MODE
> To change the camera mode, touch the or swipe your finger up to select the
desired mode.
 Loading...