16
Section 1: Assembly & Set-up
FSP300, FSP500, FSP700 & FSP1000 Broadcast Spreaders 309-065M
Table of Contents
11/19/24
Check Driveline Minimum Length
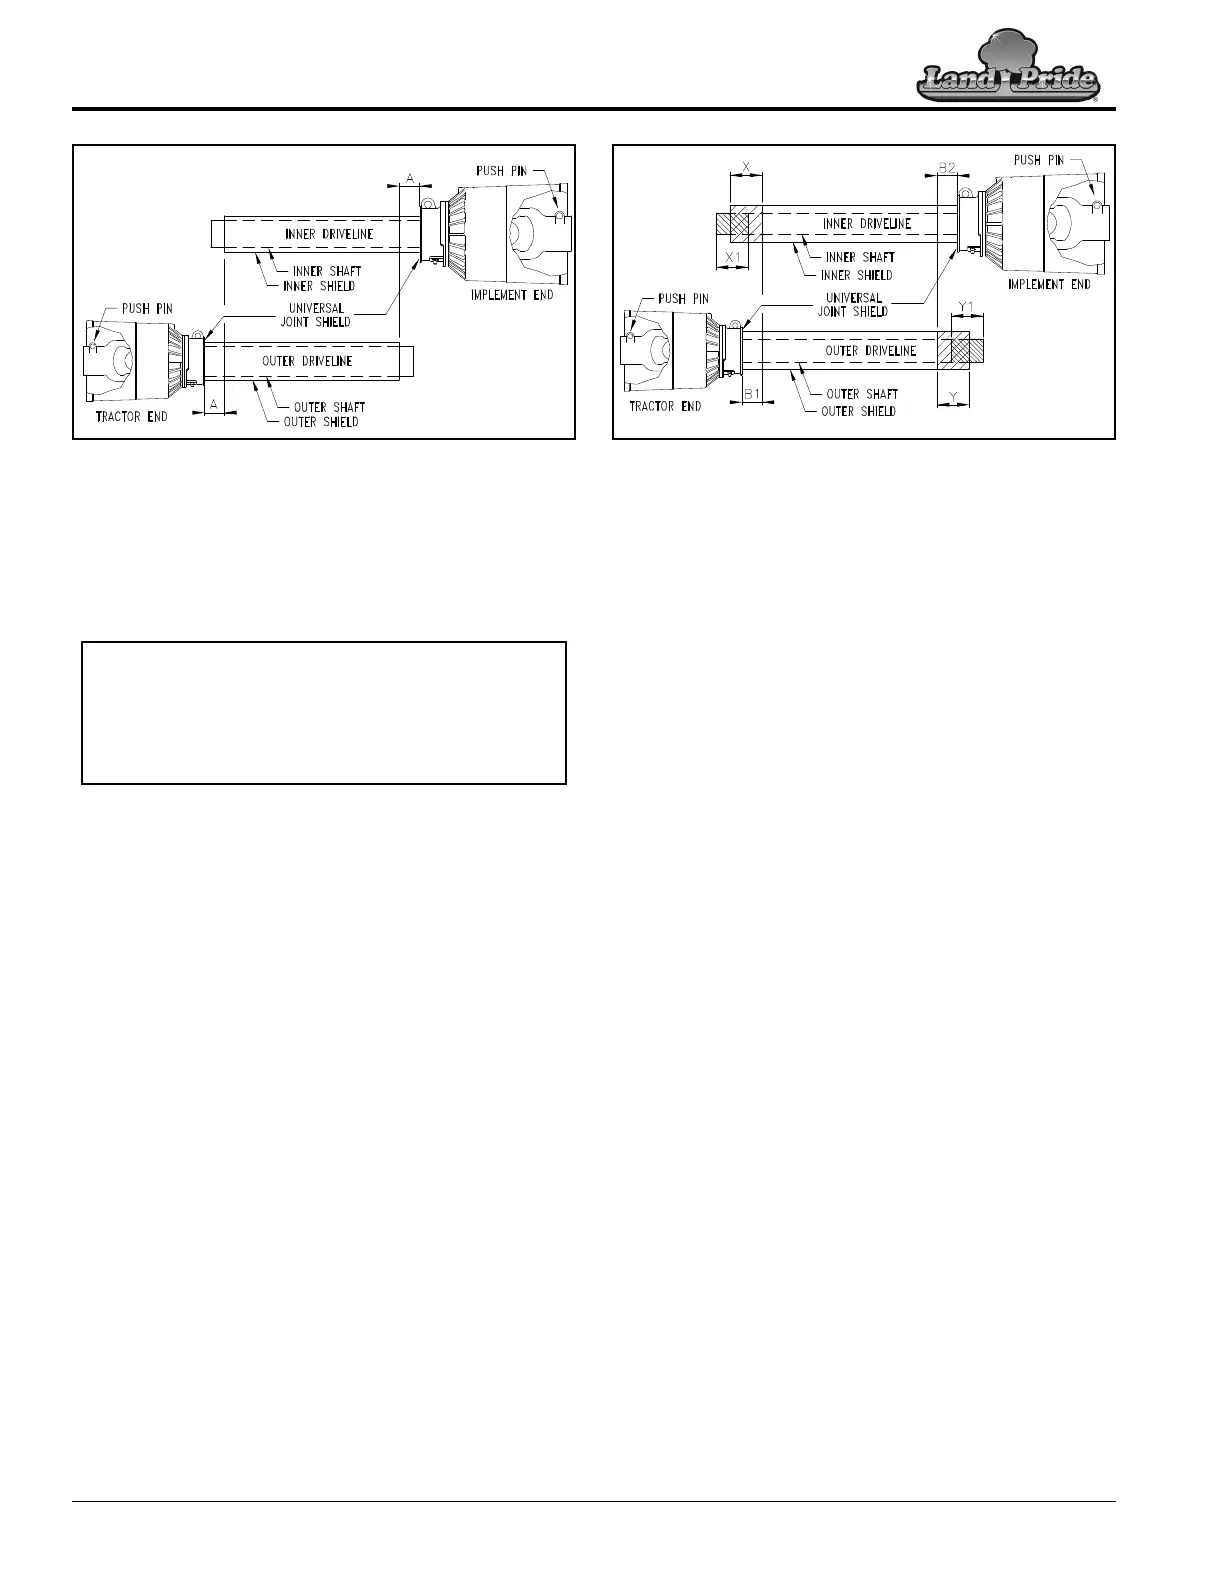
Figure 1-9
Check Subcompact Tractor fit-up
Use instructions below when hooking-up a subcompact
tractor or Kubota BX tractor. If the tractor is a standard
size tractor, go to “Check Standard Tractor Fit-up” on
page 15.
Refer to Figure 1-9:
1. With driveline attached only to the spreader, remove
outer driveline (tractor end) from inner driveline to
separate the two profiles.
2. Park tractor and spreader on a level surface.
3. Raise spreader until gearbox input shaft is level with
tractor power take-off shaft. Securely block spreader
at this height to keep the unit from lowering.
4. With spreader resting on the support blocks,
shutdown tractor using “Tractor Shutdown
Procedure” on page 21.
5. Attach outer driveline half to the tractor’s power take-
off shaft. Refer to “Driveline Hook-up” on page 14.
6. Hold inner and outer drivelines parallel to each other
as shown in Figure 1-5. Measure dimension “A”.
• If “A” is less than 2" (5 cm), continue with step 7.
• If “A” is greater than or equal to 2" (5 cm), skip to
“Assemble Inner & Outer Driveline Halves” on
this page.
IMPORTANT: A driveline that is too long can bottom
out causing structural damage to the tractor and
implement. Always check driveline minimum length
during initial setup, and when connecting to a
different tractor. More than one driveline may be
required to fit all applications.
Shorten Driveline Length
Figure 1-10
Refer to Figure 1-10:
7. Shorten driveline as follows:
a. Measure 2" (5 cm) “B1” dimension) back from
outer driveline shield and make a mark at this
location on the inner driveline shield.
b. Measure 2" (5 cm) (“B2” dimension) back from
the inner driveline shield and make a mark at this
location on the outer driveline shield.
8. Remove outer driveline from the tractor’s power
take-off shaft and inner driveline from the spreader’s
gearbox shaft.
9. Cut off non-yoke end of inner driveline as follows:
a. Measure from end of inner shield to scribed mark
(“X” dimension) and record.
b. Cut off inner shield at the mark. Cut same amount
off the inner shaft (“X1” dimension).
10. Cut off non-yoke end of outer driveline as follows:
a. Measure from end of outer shield to scribed mark
(“Y” dimension) and record.
b. Cut off outer shield at the mark. Cut same amount
off the outer shaft (“Y1” dimension).
11. Remove all burrs and cuttings.
Assemble Inner & Outer Driveline Halves
Refer to Figure 1-10:
1. Apply multi-purpose grease to the inside of the outer
shaft and reassemble the driveline halves.
2. If removed, reattach the driveline to the implement.
Refer to “Driveline Installation” on page 13.
3. Without removing the support blocks, continue with
“Driveline Hook-up” on page 14.


 To Next Page