EasyManua.ls Logo

Lane 59909-049-1X - User Manual

Lane 59909-049-1X
4 pages
Print Icon
To Next Page IconTo Next Page
Loading...
MADE IN VIET NAM
DESCRIPTION
QTY
A
PART
Page 1 of 4
B
1
DRAWING
1
ASSEMBLY INSTRUCTIONS
Customer Service Contact Information:
Toll Free Phone Number: 1-844-771-2727
Email: consumercare@lanefurniture.com
Website: www.lanefurniture.com
NOTES:
1.CHECK CAREFULLY FOR SMALL PARTS WHICH MAY COME LOOSE DURING SHIPMENT.
2.REMOVE ALL COMPONENTS FROM THE PACK AND PLACE ON A CLEAN, SOFT SURFACE TO ASSEMBLE.
3.UNITS SHOULD BE ASSEMBLED BY TWO OR MORE PEOPLE.
4.DO NOT OVER -TIGHTEN SCREW/ BOLTS UNTIL ASSEMBLY IS COMPLETED.
5.WITH USE, SCREW MAY BE COME LOOSE & MUST BE TIGHTENED PERIODICALLY.
SEAT
LEFT BACKREST
PART LIST
DESCRIPTION
QTY
F
PART
G
1
DRAWING
RIGHT WING
C
1
CONSOLE BACKREST
(put under the metal frame inside the
Console box. Take it out by opening the
zipper)
H
1
COMPLETED LOVESEAT DUAL POWER - RECLINING
WITH CONSOLE & POWER STRIP ASSEMBLY
ITEM # 59909-049-1X/2X/1MX
LOVESEAT DUAL POWER - RECLINING
WITH CONSOLE & POWER STRIP
PLUG
D
1
RIGHT BACKREST
E
1
1
TRANSFORMER
LEFT WING
Question and Answer IconNeed help?

Do you have a question about the Lane 59909-049-1X and is the answer not in the manual?

Summary

Part Identification and List

Component Identification

Lists all parts included in the loveseat assembly, such as seat, backrests, and wings.

Part Storage Locations

Illustrates where specific components like wings, console backrest, transformer, and plug are stored within the packaging.

Assembly Steps

Step 1: Attach Backrest and Wings

Connect the backrests and wings to the main seat unit for initial structural assembly.

Step 2: Connect Power Wires to Transformer

Link the power cables from the seat and backrests to the central transformer unit.

Step 3: Connect Power and Test Functionality

Connect the transformer to a power source and test the chair's reclining and headrest functions.

Product Features and Operation

Powered Recliner and Headrest Functions

Details on how to adjust the powered recliner and headrest positions for comfort and strain reduction.

USB Charging Port Usage

Information on the integrated USB port for charging devices and its ambient blue glow indicator.

Overview

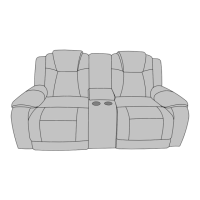
This document provides assembly instructions and feature descriptions for the Lane Home Furnishings Loveseat Dual Power - Reclining with Console & Power Strip, Item # 59909-049-1X/2X/1MX.

Function Description:

The device is a dual power reclining loveseat equipped with a central console and an integrated power strip. It offers powered reclining functionality for both seats and powered adjustable headrests, allowing users to customize their seating positions for optimal comfort. The console provides storage and includes a power strip with USB charging ports and electrical sockets, enhancing convenience for charging devices or powering small electronics. The "RESET / HOME" button returns the chair to its default, upright position.

Important Technical Specifications (Derived from images and text):

  • Item Number: 59909-049-1X/2X/1MX
  • Type: Loveseat Dual Power - Reclining with Console & Power Strip
  • Power Source: Requires connection to a power source via a transformer and plug.
  • Charging Ports: Includes USB charging ports within the console's power strip.
  • Electrical Sockets: Includes electrical sockets within the console's power strip.
  • Components:
    • A: Seat (Qty: 1)
    • B: Left Backrest (Qty: 1)
    • C: Console Backrest (Qty: 1) - Stored under the metal frame inside the console box, accessible by opening the zipper.
    • D: Right Backrest (Qty: 1)
    • E: Left Wing (Qty: 1) - Stored under the metal frame.
    • F: Right Wing (Qty: 1) - Stored under the metal frame.
    • G: Plug (Qty: 1) - Stored in a paper box.
    • H: Transformer (Qty: 1) - Stored in a paper box.
  • Control Panel: Integrated into the armrest, featuring buttons for powered recline, powered headrest adjustment, a "RESET / HOME" function, and a USB charging port. The buttons produce an ambient blue glow when pressed.

Usage Features:

  • Powered Recliner: Allows users to adjust their seat to "every dresser position" (likely meaning various reclining angles) with the push of a button.
  • Powered Headrest: These headrests can be adjusted to a number of different positions with ease, designed to reduce neck and shoulder strain.
  • Console with Power Strip: The central console provides convenient storage and houses a power strip. This power strip includes USB charging ports and electrical sockets, allowing users to charge mobile devices or power other small electronics directly from the loveseat. The power strip is accessed by opening the console lid.
  • "RESET / HOME" Function: A dedicated button returns the chair to its default, upright position, simplifying the process of bringing the loveseat back to a standard configuration.
  • Easy Assembly: The instructions suggest a straightforward assembly process, recommending two or more people for unit assembly. Key components like wings and the console backrest are cleverly stored under the metal frame, while the transformer and plug are in a separate paper box.
  • Intuitive Controls: The control panel, integrated into the armrest, features clearly labeled buttons with an ambient blue glow for easy operation, even in low light.

Maintenance Features:

  • Periodic Tightening: The instructions explicitly state: "WITH USE, SCREW MAY BE COME LOOSE & MUST BE TIGHTENED PERIODICALLY." This highlights a crucial maintenance step to ensure the long-term stability and safety of the loveseat.
  • Careful Handling of Small Parts: Users are advised to "CHECK CAREFULLY FOR SMALL PARTS WHICH MAY COME LOOSE DURING SHIPMENT" and to "REMOVE ALL COMPONENTS FROM THE PACK AND PLACE ON A CLEAN, SOFT SURFACE TO ASSEMBLE," which aids in preventing loss of parts and ensures a smooth assembly process.
  • Avoid Over-tightening: The instructions caution: "DO NOT OVER-TIGHTEN SCREW/ BOLTS UNTIL ASSEMBLY IS COMPLETED." This is a standard practice to prevent damage to threads or components during initial assembly, allowing for proper alignment before final tightening.

Assembly Process Overview:

  1. Unpacking: Remove all components from the packaging and place them on a clean, soft surface. Identify parts using the provided Part List. Note that wings (E/F) and the console backrest (C) are stored under the metal frame, and the plug (G) and transformer (H) are in a paper box.
  2. Step 1 - Attaching Backrests and Wings:
    • Attach the backrests (B, C, D) to the seat (A).
    • Attach the left and right wings (E, F) to the corresponding sides of the backrests (B, D).
  3. Step 2 - Connecting Power Wires (Internal):
    • Connect the internal power wires from the seat (A) and backrests (B, D) to the transformer (I). The power strip is located inside the console's storage compartment.
  4. Step 3 - Connecting to Power Source and Operation:
    • Connect the power wire under the armrest frame to the power source using the transformer (I) and the plug (H).
    • Connect the wire at the back of the console to the power source (likely part of the internal wiring to the power strip).
    • Once powered, the footrest and headrest can be operated by pressing the power buttons on/off.
    • Open the console lid to access and use the USB and socket features of the power strip.

The design emphasizes user comfort and convenience with its powered features and integrated charging capabilities, while also providing clear instructions for assembly and ongoing maintenance. The "TEAM LIFT" icon underscores the weight and size of the product, advising users to seek assistance during handling and assembly for safety.

Lane 59909-049-1X Specifications

General IconGeneral
BrandLane
Model59909-049-1X
CategoryIndoor Furnishing
LanguageEnglish

Related product manuals