Do you have a question about the Lane KONA and is the answer not in the manual?
Details all necessary parts and hardware, including their identifiers, quantities, and dimensions for assembly.
Provides step-by-step instructions with diagrams for assembling the dining chair.
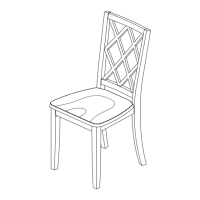
This document provides assembly instructions for the Lane KONA DINING CHAIR, identified by item number 60581-69, with various color options including White (01), Grystone (03), Graphite (05), and Mint (06). The manual is designed to guide users through the process of putting together this piece of home furniture, emphasizing ease of assembly and proper handling to ensure the chair's stability and longevity.
The KONA DINING CHAIR is a functional and aesthetically pleasing piece of furniture intended for use in dining areas. Its primary function is to provide comfortable seating at a dining table, supporting daily meals, gatherings, and other household activities. The chair's design, as depicted in the illustrations, suggests a blend of classic and contemporary styles, making it suitable for a variety of interior decors. The chair features a distinctive backrest with a geometric, lattice-like pattern, which not only adds to its visual appeal but also provides structural support for the user's back. The seat appears to be contoured for comfort, and the legs are designed for stability.
One of the key usage features highlighted in the manual is the importance of proper assembly for the chair's overall performance and safety. The instructions explicitly state that units should be assembled by two or more people, indicating that the process might be easier and safer with assistance, especially when handling larger components like the chair back and seat. This recommendation aims to prevent potential damage to the parts or injury to the assembler. The manual also advises against over-tightening screws and bolts until the assembly is completed, which is a crucial step to ensure all parts align correctly before final securing. This allows for minor adjustments during the assembly process, preventing misalignment or stress on the wood components.
The chair's construction involves several distinct parts: the chair back (A), the seat (B), and the front legs (C). These components are designed to fit together seamlessly, forming a sturdy and reliable structure. The hardware list details the specific fasteners required for assembly, including short bolts (H1), medium bolts (H2), long bolts (H3), spring washers (H4), flat washers (H5), and an Allen key (H6). The inclusion of different bolt lengths and washer types suggests that each fastener is specifically chosen for its role in securing different parts of the chair, contributing to its overall integrity. The Allen key is provided as the necessary tool for tightening the bolts, ensuring that users have everything they need to complete the assembly without requiring additional specialized tools.
The assembly process is broken down into two main steps, as illustrated on page 4 of the manual. Step 1 focuses on attaching the chair back to the seat. This step involves using a combination of short bolts, spring washers, flat washers, and the Allen key to secure these primary components. The diagram clearly shows where each type of bolt and washer should be placed, with specific attention to the orientation of the chair back and seat. The instruction "Do not over-tighten the bolts. Make sure you use the lock washers to ensure the bolts stay fastened" is a critical piece of advice. Lock washers (spring washers in this case) are designed to create friction and prevent bolts from loosening over time due to vibrations or movement, thus enhancing the chair's stability and safety during use.
Step 2 involves attaching the front legs to the assembled chair back and seat. This step utilizes medium bolts, spring washers, and flat washers, again emphasizing the importance of using the correct hardware in the designated locations. The final illustration in Step 2 shows the fully assembled chair, demonstrating the successful completion of the process. The phrase "CHAIR ASSEMBLY COMPLETED" signifies that the chair is now ready for use, provided all instructions have been followed correctly.
Maintenance features, while not explicitly detailed as a separate section, are implicitly addressed through the assembly instructions and general notes. The manual includes a crucial maintenance note: "WITH USE, SCREW/ BOLT MAY BE COME LOOSE & MUST BE TIGHTENED PERIODICALLY." This is a vital piece of information for the long-term care of the KONA DINING CHAIR. It acknowledges that furniture, especially items subject to regular use and movement, can experience loosening of fasteners over time. Periodic tightening of the screws and bolts is a simple yet effective maintenance practice that will help maintain the chair's structural integrity, prevent wobbling, and extend its lifespan. This proactive approach to maintenance ensures the chair remains safe and stable for continued use.
The manual also provides important general notes that contribute to a successful assembly and understanding of the product. "CHECK CAREFULLY FOR SMALL PARTS WHICH MAY COME LOOSE DURING SHIPMENT" advises users to inspect the packaging thoroughly to ensure all components are accounted for, preventing frustration during assembly. "REMOVE ALL COMPONENTS FROM THE PACK AND PLACE ON A CLEAN, SOFT SURFACE TO ASSEMBLE" is a practical tip that helps protect the furniture parts from scratches or damage during assembly and ensures an organized workspace. The instruction "Do not use an impact drill" is a specific warning related to tool usage. Impact drills can apply excessive torque, potentially stripping screw threads, damaging wood, or over-tightening fasteners, which could compromise the chair's structural integrity. The use of the provided Allen key or a hand tool is recommended to allow for better control over the tightening process.
The packaging of the hardware is also noted: "HARDWARE BLISTER PACK IS STORED ON THE TOP OF THE CHAIR BACK." This detail helps users quickly locate all necessary fasteners, preventing delays in starting the assembly. The "TEAM LIFT" icon with the message "For Your Safety!" is a clear visual cue, reinforcing the recommendation for multiple people to handle the components, particularly the larger and potentially heavier parts, to prevent strain or injury.
In summary, the Lane KONA DINING CHAIR is designed as a durable and stylish seating option for dining areas. Its usage features are centered around providing comfortable and stable seating, with an emphasis on proper assembly techniques to ensure safety and longevity. The maintenance aspect, though brief, highlights the importance of periodic fastener checks and tightening to preserve the chair's structural integrity over time. The detailed instructions, clear illustrations, and helpful notes collectively aim to provide a straightforward and safe assembly experience for the user, ensuring the chair performs as intended for many years.
| Category | Indoor Furnishing |
|---|---|
| Brand | Lane |
| Model | KONA |
| Material | Wood |
| Style | Modern |