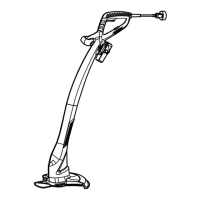
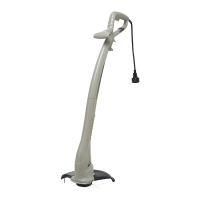
This document is an operator's manual for a LawnMaster 16-inch 10A Electric Fixed Line Trimmer, model number GT1644 1201. It provides detailed information on the product's features, assembly, operation, maintenance, troubleshooting, and warranty.
Function Description
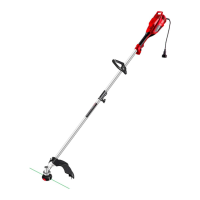
The LawnMaster 16-inch 10A Electric Fixed Line Trimmer is designed for cutting grass and similar soft vegetation, and for trimming grass edges in private and hobby garden areas not accessible with a larger line trimmer. It is not intended for use in public gardens, parks, sports centers, roadsides, agriculture, or forestry. The device is also not suitable for cutting or chopping hedges, shrubs, bushes, flowers, or for composting. It is a corded electric tool, emphasizing safety precautions for electrical operation.
Important Technical Specifications
- Voltage: 120V~60Hz
- Current: 10 AMP
- Revolutions Per Minute: 6650 rpm
- Line Diameter: 0.08 inch (2 mm)
- Feed System: Fixed Line
- Cutting Width: 16 inch
- Weight: 10.5 lbs (4.75 kg)
- Replacement Line: Always use .080" (2mm) round trimmer monofilament line.
- Circuit Protection: Requires a 120V, 15A circuit with a 15A time-delayed fuse or circuit breaker.
- Double Insulation: The tool is double insulated, meaning all exposed metal parts are isolated from internal motor components with protective insulation. However, the extension cord and receptacle must still be grounded.
- Extension Cord Guidelines: The manual provides a table for minimum gauge requirements for extension cords based on length and ampere rating to prevent overheating. For example, for 10-12 Amperes, a 16-gauge cord is recommended for lengths up to 50 ft (15.2 m), and a 14-gauge cord for lengths up to 100 ft (30.4 m).
Usage Features
The trimmer is designed for ease of use and safety.
- Cord Retainer: A convenient cord retainer helps secure the extension cord connection during operation.
- Auxiliary Handle: Equipped with a front handle assembly for ease of operation and to prevent loss of control. This handle can be mounted on either side of the shaft to accommodate personal preference.
- Shoulder Strap: A shoulder strap is included to help the operator carry the product, reducing fatigue.
- Fixed Line Head: This straight shaft trimmer features a fixed line head where the line is easily replaced with a simple push of a button.
- Attachment Compatibility: While it comes with a Fixed Line Trimmer Head, the Power Head can be connected to most other trimmer attachments, although the manual warns against using attachments not recommended by the manufacturer.
- Starting/Stopping: To start, squeeze the safety switch, then press the switch trigger. To stop, release the switch trigger. The manual explicitly warns against attempting to lock the trigger lever in the "on" position.
- Operating Tips:
- Hold the trimmer with a firm grip, both hands, at a comfortable position with the rear handle about hip height.
- Swing the trimmer gently from right to left.
- For optimum cutting, only cut dry grass.
- When cutting thick or long grass, start at the top and gradually work down.
- Reduce the amount of material if the trimmer runs slowly.
- Avoid hot trimmer surfaces by keeping the tool away from the body.
- Keep the trimmer tilted toward the area being cut for best results.
- Swing from right to left to avoid throwing debris at the operator.
- Use only the tip of the line for cutting; do not force the line head into uncut grass.
- Be cautious around wire and picket fences, stone and brick walls, curbs, wood, trees, and shrubs, as they can cause line wear, breakage, or damage.
Maintenance Features
The manual outlines several maintenance procedures to ensure long-term, satisfactory operation.
- Regular Cleaning:
- Regularly clean the ventilation slot, cutting line, and trimmer head using a soft brush or dry cloth.
- Use a blunt scraper to remove grass and dirt from the underside of the safety guard.
- Line Replacement:
- Unplug the trimmer.
- Press and hold the release button on the trimmer head housing.
- Insert new trimming line (0.08" (2mm) round monofilament line) ensuring it sticks out evenly from both sides.
- Trimmer Head Replacement:
- Lay the product on a flat, stable surface with the trimming head facing upward.
- Rotate the backing flange until a notch aligns with the hole in the gear head.
- Insert the spindle lock rod into the hole to lock the spindle.
- Unscrew the trimmer head clockwise to remove.
- Storage:
- Clean all foreign material from the trimmer.
- Store it in a place inaccessible to children.
- Keep away from corrosive agents like garden chemicals and de-icing salts.
- Pre-use and Post-impact Checks: Before using and after any impact, check for signs of wear or damage and repair as necessary.
- Damaged Cord: If the supply cord is damaged, stop using the unit immediately and take it to a qualified service dealer for inspection and repair using identical replacement parts. Do not touch the cord before disconnecting the supply.
- Repair: Electric powered trimmers should only be repaired by a qualified service dealer using identical replacement parts.
The manual also includes a troubleshooting table to address common issues like grass wrapping, motor failure to start, and diminished trimming efficiency, providing possible causes and solutions.