EasyManua.ls Logo

Legacy FLEXZILLA PRO - User Manual

Legacy FLEXZILLA PRO
4 pages
Print Icon
To Next Page IconTo Next Page
Loading...
The color CHARTREUSE as applied to the body of the air hose is a registered trademark of Weems Industries, Inc. Flexzilla is a registered trademark of Weems Industries, Inc.
The color CHARTREUSE as applied to the body of the air hose reel is a trademark of Weems Industries, Inc.
The Flexzilla Stylized X is a trademark of Weems Industries, Inc.
SAFETY INSTRUCTIONS
Do not allow tools to hang on the end of the hose when not
in use.
Do not allow the hose to contact hot, sharp or heated
surfaces that could damage it.
Always recoil hose back into the reel when work is completed.
Do not allow hose to retract uncontrolled.
INSTALLATION AND MOUNTING OPTIONS
Choose fasteners suitable for the mounting surface, the weight
of the reel, and the force of pulling the hose. Use a leveling
device for proper positioning. Use hex head fasteners up to
5/16" (8 mm) in diameter, with a minimum 1/2” (12.5 mm) hex
head. Mounting fasteners not included. See mounting diagram
on last page.
Wall Mounting Option:
Recommended height is 5 ft. (1.5 m) to 8 ft. (2.5 m)
Ceiling Mounting Option:
Recommended ceiling height is 8 ft. (2.5 m) to 10 ft. (3 m)
Installation:
1. Locate 3 holes on mounting bracket
2. Observe both sides of reel housing and remove screws
that hold bracket pivots in reel. Remove pivots and bracket
from reel.
3. Mount bracket to surface.
4. Re-install reel to bracket with the pivots. Re-install screws.
SAVE THESE INSTRUCTIONS! READ ALL INSTRUCTIONS!
CAUTION: Read all instructions and warnings before operating this product.
CAUTION: Inspect hose before each use. Do not exceed 150 psi working pressure. Do not kink, twist, knot or abrade hose. Do not
wrap hose around body. Keep hose away from hot surfaces and/or chemicals. KEEP CHILDREN AWAY FROM WORK AREA!
Part No.: L8251FZP
Retractable Air Hose Reel, 50 ft.
Owner’s Instructions
OPERATION
The reel can lock the air hose at approximately 17-inch intervals.
Each latching interval is announced by a series of five "clicks."
This "ratcheting" sound lets you know that the reel is in the
latching zone as the air hose is pulled out.
1. Latching Hose -
After pulling out the desired length of hose, allow it to
retract slightly until you feel it stop. The reel is now latched.
2. Rewinding Hose -
Pull out approximately one extra foot from latch position and
allow hose to retract. The reel will continue rewinding until
hose is fully retracted. Do not allow the hose to rewind
uncontrolled back into the reel. Personal injury can result.
3. Hose Stopper Adjustment -
To modify the hose stopper position, pull out hose to the
desired length and latch reel. Loosen screws holding the
two halves of the hose stopper together, slide stopper to
opening of reel and tighten screws.
NOTE: ENSURE THE REEL IS COMPLETELY LATCHED
BEFORE LOOSENING THE HOSE STOPPER.
4. Do not extend hose beyond the indicator shown in the image below.
Legacy Manufacturing Company
Marion, IA, 52302 USA
Ph: 319.373.7305 service@legacymfg.com
legacymfg.com
INS8251FZP
(Published 10/21/2021)
Bracket
mounting holes
Red label indicator located at end of hose
Question and Answer IconNeed help?

Do you have a question about the Legacy FLEXZILLA PRO and is the answer not in the manual?

Legacy FLEXZILLA PRO Specifications

General IconGeneral
BrandLegacy
ModelFLEXZILLA PRO
CategoryTools
LanguageEnglish

Summary

Safety Instructions

Installation and Mounting Options

Operation

Latching Hose

Process to secure the air hose at desired length using the reel's ratcheting mechanism.

Rewinding Hose

Procedure to retract the air hose fully, emphasizing controlled retraction.

Hose Stopper Adjustment

How to modify the hose stopper position for optimal hose extension.

Repair Instructions

Replacing Extension Hose Part 1

First steps for replacing the extension hose, involving initial hose extension and retraction.

Replacing Extension Hose Part 2

Removing the swivel cover and screws during hose replacement.

Replacing Extension Hose Part 3

Detaching the swivel body, hose clamp, and bend restrictor.

Replacing Extension Hose Part 4

Separating the hose from the swivel and reel assembly.

Replacing Extension Hose Part 5

Installing the new replacement reel hose into the drum.

Replacing Extension Hose Part 6

Attaching the bend restrictor and clamp to the new hose.

Replacing Extension Hose Part 7

Installing the swivel body, washer, and c-clip onto the axle shaft.

Replacing Extension Hose Part 8

Installing the swivel cover and securing it with screws.

Replacing Extension Hose Part 9

Re-installing hose stopper and small gear correctly before final hose retraction.

Replacing Extension Hose Part 10

Final assembly of belt, covers, and securing screws after hose replacement.

Replacing Lead-in Hose

Steps to remove and replace the lead-in hose assembly.
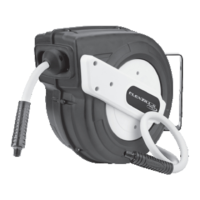
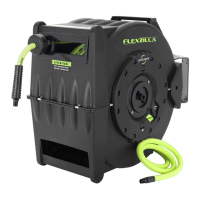
Replacement Parts

Related product manuals