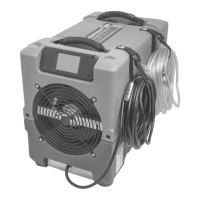
The Dri-Eaz® Revolution LGR Dehumidifier is designed to reduce humidity in enclosed environments by removing water vapor from the air. It is ideal for various applications including water damage restoration, structural drying, and construction, requiring high-performance dehumidification.
Important Technical Specifications:
- Model: Revolution LGR #111995
- Water Removal (AHAM): 80 pints (38 L) per day at 80°F/60% RH (26.7°C/60% relative humidity).
- Water Removal (Saturation): 144 pints (68.1 L) per day at 90°F/90% RH (32.2°C/90% relative humidity).
- Water Removal (Low Grain): 10 pints (4.7 L) per day at 80°F/20% RH (26.7°C/20% relative humidity).
- Dimensions (W × H × D): 12.5 x 17.6 x 21.5 inches (31.8 x 44.7 x 54.6 cm).
- Weight (with cord and hose): 60 lbs (27.2 kg).
- Amps (80°F/60% RH): 5.5A.
- Input Current (104°F/35%RH): 6.7A.
- Power: 115V/60Hz / 633W.
- Refrigerant: R32, 0.312 kg (11.0 oz).
- Max. Use Altitude: 3 km (10,000 feet).
- Air Movement: 121–180 CFM (206–306 CMH).
- Operating Temperature Range: 33–100°F (1–38°C).
- Max. Operating Temperature: 104°F (40°C).
- Safety: Conforms to UL STD 60335-1 & 60335-2-40; Certified to CSA STD. C22.2 NO. 60335-1 & CO335-2-40.
- Contains: FCC ID 2ADHKWINC3400; IC 20266-ATWINC3400; CAN-ICES-003(B)/MB-003(B).
Usage Features:
The unit features a Command Hub, which provides comprehensive dehumidifier controls and detailed real-time data about the drying environment, job hours, self-diagnosis messages, maintenance reminders, and operating status.
Setting up the unit:
- Positioning: Always store, transport, and use the unit in a horizontal position. If placed vertically, return it to horizontal and let it stand for at least 30 minutes before turning it on. For best results, operate in an enclosed area with all doors and windows closed to maximize efficiency. Place the dehumidifier away from obstructions that could block airflow.
- Drain Hose Setup: The unit automatically pumps out water. It includes a quick-connect fitting for a 40 ft. (12 m) drain hose. Uncoil the entire hose and place the open end in a sink, drain, bucket, or outdoors for safe water drainage. If using a bucket, check it regularly to prevent overflows. Ensure the hose is uncoiled, straightened, and its end is not placed higher than 20 ft. (6 m) above the unit's bottom. Check for kinks or obstructions.
- Electrical Connection: Plug into a GFCI-protected 115V outlet rated for at least 15 amps.
Command Hub Operation:
- Unit OFF Screen: Displays job hours and current time.
- Press MENU to access settings and configuration controls.
- Press PURGE to pump out the condensate tank.
- Press ON/OFF to turn the unit on.
- Unit ON Screen: Displays job hours, current time, inlet/outlet temperature, %RH, GPP, and current GPP removal.
- Bottom menu bar shows Quick-Reference Inlet GPP categories: 1: < 60 GPP; 2: 60–90 GPP; 3: > 90 GPP.
- Press MENU to access settings and configuration controls.
- Press PURGE to pump out the condensate tank.
- Press ON/OFF to turn the unit off.
Errors and Warnings:
- An "Alert" symbol appears in the upper right corner of the screen if a problem is detected. Press ON/OFF to view and clear the message. The unit will not operate until the problem is resolved.
- Common error messages and solutions include:
- ER4 (Defrost Thermistor Connect/Outlet Thermistor Connect): Temp sensor open, missing, or shorted. Check sensor installation.
- ER5 (Inlet RH1 Temp/RH Sensor): Inlet Temp/RH sensor open, missing, or shorted. Check sensor installation on control panel and inlet shroud.
- ER6 (Current Sensor Failure): Current sensor failure.
- ER9 (Pump Blocked): Check for drain hose obstructions or pump blockages.
- W1 (Low BATTERY): Replace coin cell battery (3V, CR2032) on the control panel.
- W2 (BLE Error), W3 (Flash Reset), W4 (WDT Reset): Cycle power to the dehumidifier.
End of Job Procedures:
To reduce drips when moving the unit:
- If in defrost cycle, wait for normal operation to resume.
- Gently rock the machine to ensure any remaining water falls into the collector area.
- Press the PURGE button. Once the purge cycle is complete, turn off the unit.
- Remove, drain, coil, and secure the external drain hose.
- Unplug, coil, and secure the power cord.
Transport and Storage:
- Always unplug the power cord before moving, transporting, or storing.
- Handle carefully; do not drop or throw.
- Do not use or store near ignition sources, combustible gases, electric heaters, or open flames.
- Protect the control panel from moisture, snow, or rain.
- Protect from freezing.
- Store and transport securely to prevent damage to internal parts and injury to vehicle occupants.
Maintenance Features:
Before Each Use:
- Electrical Cord Inspection: Check for fraying or cuts. Do not use if damaged; contact an authorized distributor.
- Filter Inspection: Replace if dust and debris are visible. Use only new Dri-Eaz 4-PRO filters (part no. #102312 (F583), 24-pack). Remove wrapper before installation.
Monthly:
- Coil Inspection: Clean when dust accumulation is visible. Use a vacuum cleaner with a brush tool and a soft cloth. Avoid damaging internal components.
- Appearance Maintenance: Wipe interior and exterior surfaces with a damp cloth. For deep cleaning and shine, use an automotive interior cleaner.
As Needed:
- Clean Pump Check Valve and Basin: Remove grills and cover (refer to Fig. B for disassembly). Remove screws from pump base and lift out the pump. Wipe the pump basin with a damp cloth. Inspect for debris and clean if needed. Unthread the barbed fitting with check valve, rinse with clean water, and reinstall. Do not overtighten. Reinstall pump, cover, and grills.
- Clean Coils: With the cover removed, inspect both coils. Vacuum thoroughly and/or clean with coil cleaner if excessive dust and debris are present.
Safety Warnings (General):
- Do not alter or modify the unit. Use only authorized replacement parts.
- Explosion/Combustion Hazard (Flammable Refrigerant): Do not drill into or braze the dehumidifier. Do not attempt to service the refrigeration system; only authorized service center personnel should service or decommission it. Refrigerant gases can be odorless.
- Electric Shock Hazard, Rotating Fan, Hot Surface Hazards: Unplug before opening for cleaning or servicing. Unit must be grounded. Inspect power cord before use; do not use if damaged. Always grasp the plug, not the cord, to unplug. Insert the three-prong plug into a matching electrically grounded outlet; do not use adapters or cut off the third prong. Do not use an extension cord. Operate on a 115V/60Hz circuit protected by a GFCI device. Keep motor and wiring dry. Do not attempt to repair; contact Dri-Eaz for authorized service centers.
- Corrosive Chemicals: Do not use in environments with corrosive chemicals like chlorine.
- User Safety: Not for use by persons (including children) with reduced physical, sensory, or mental capabilities, or lack of experience/knowledge, unless supervised or instructed. Children should not play with the unit.
- California Proposition 65 Warning: Product may expose to chemicals (lead, phthalates) known to cause cancer, birth defects, or other reproductive harm. Visit www.P65Warnings.ca.gov for more information.
Service Technicians Only (R32 Refrigerant):
- Safety Procedures: Survey the area for ignition sources, post "no smoking" signs, display component inspection procedures, disconnect power, and follow safety procedures for refrigerant removal and evacuation.
- Decommissioning: Ensure PPE is available, recovery process is supervised, electrical power is isolated, refrigerants can be recovered safely, appropriate equipment and cylinders are used, cylinders are evacuated, recovery equipment is working, and calibrated weighing scales are available.
- Decommissioning Process: Pump down the refrigerant system, operate recovery machine according to instructions (do not overfill cylinders), do not charge recovered refrigerant into another system without cleaning/checking, and label the unit after decommissioning.
Accessories Included:
- Drain hose: 40 ft. (12.2 m)
- Power cord: 25 ft. (7.6 m)
Optional Accessories:
- Duct Attachment Kit #106996 (F530)
- Replacement air filters: Part no. #102312 (F583) (24-pack).
For additional product information and current documentation, visit LegendBrands.com. Register your purchase for updated product information. For proper disposal, take the unit to a recycler licensed to process refrigeration equipment.