Do you have a question about the Leica Lino L2P5 and is the answer not in the manual?
General introduction to setup procedures and safety warnings.
Explanation of the levelling lock mechanism and its function for transport or use.
Using the device with a laser receiver for extended range or poor lighting.
Instructions for charging and handling the Li-Ion battery for optimal performance.
Step-by-step guide to correctly inserting the Li-Ion battery pack into the instrument.
Explanation of the LED indicators for battery charging status.
Guidelines for using and inserting high-quality alkaline batteries.
Procedures for turning the device on, off, and managing auto power-off.
Explanation of the laser line and dot functions and their practical usage.
Steps for securely attaching the laser device to the smart adapter.
How to precisely align the vertical laser line using the adapter.
How to precisely adjust the horizontal laser line to a desired reference.
Various methods for fixing the device to surfaces using adapters.
Procedure to check the instrument's levelling accuracy before use.
How to check the accuracy of the vertical and horizontal laser lines.
Methods to verify the accuracy of the vertical plumb points.
Checking the perpendicularity of horizontal laser points to each other.
Details about the product's international warranty terms and registration.
Recommendations for calibration, repair, and authorized service.
Defines responsibilities of manufacturer and user for safe operation.
Specifies the authorized applications for the laser instrument.
Lists actions that are not allowed when using the instrument to ensure safety.
Details potential hazards and warnings during operation and handling.
Specifies the environmental and operational limits for the instrument.
Guidelines for the proper disposal of batteries and the instrument.
Instructions for safely transporting the instrument and its battery.
Information on EMC compliance and FCC/ISED statements.
Details on the laser class and related safety information.
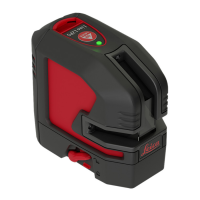
The Leica Lino L2P5/L2P5G is a versatile, self-levelling multifunctional laser designed for precision tasks in various job site scenarios. It combines the functionalities of a cross-line laser and a point laser within a single, robust tool, making it suitable for levelling, plumbing, transferring, and setting out right angles. The device projects two crossing vertical and horizontal lines, along with five points—four peripheral points and one intersection point in front of the device—all arranged precisely at 90 degrees to each other. Two versions are available: the L2P5, which uses a red laser, and the L2P5G, which uses a green laser. For all illustrative purposes in the manual, the red laser version (L2P5) is shown.
The core functionality of the Leica Lino L2P5/L2P5G revolves around its self-levelling mechanism. When the levelling lock is in the "unlocked" position, the instrument automatically levels itself within its specified inclination range. This ensures accurate projections for horizontal and vertical lines and points. For transport or when tilting the instrument beyond its self-levelling range, the levelling lock can be engaged. In this "locked" position, the pendulum is fixed, and the self-levelling function is deactivated, causing the laser to blink every 5 seconds as a visual indicator.
The device offers various projection modes, activated by pressing the laser key on the keypad. A single press (1x) activates vertical lines and dots along with horizontal lines and dots. A double press (2x) projects horizontal lines and dots, while a triple press (3x) activates vertical lines and dots. This flexibility allows users to select the appropriate laser projection for specific tasks, whether it's for general levelling, plumbing, or setting out precise angles.
An auto power-off feature is integrated to conserve battery life. When the lock switch is in the unlocked position, users can activate auto power-off after 30 minutes of operation by pressing and holding the On button for 5 seconds at startup. The status LED will blink green three times to confirm activation. To deactivate this feature, the same steps are repeated, and the status LED will blink red three times.
The Leica Lino L2P5/L2P5G is designed for ease of use and adaptability on the job site. It can be powered by either a Li-Ion battery pack or alkaline batteries, offering flexibility depending on availability and desired operating time. The Li-Ion battery pack (5200 mAh / 18.7 Wh) provides extended operation, while three AA alkaline batteries serve as an alternative power source. The battery pack is easily inserted by pressing it down and tilting it towards the housing until it snaps into place. A status LED on the keypad indicates the charging status of the Li-Ion battery: 0 or 1 blinks green for charging, OFF for charging finished/no charging; 3 or more blinks green for charging, and lights green for charging finished/no charging. For alkaline batteries, it is recommended to use high-quality ones for reliable performance.
For enhanced usability, the device supports smart adapters. The Twist 360 adapter allows the device to be snapped on, enabling a full 360-degree rotation around the plumb point for precise adjustment of vertical lines. Another adapter, UAL130, features an adjustment knob for fine-tuning the horizontal line to the desired reference level, offering a vertical adjustment range of 130 mm (5.12 inches). These adapters provide versatile fixing applications, allowing the device to be mounted on tripods (with 1/4" or 5/8" threads) or other surfaces, enhancing its utility in various work environments.
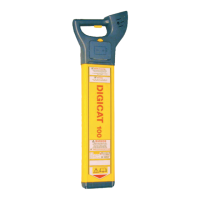
In situations requiring detection of laser lines over long distances or in unfavorable lighting conditions, a laser receiver can be used. The Leica RGR200 laser receiver is recommended, and the Lino device, powered by XRANGE technology, automatically detects it.
Regular maintenance and checks are crucial to ensure the precision and longevity of the Leica Lino L2P5/L2P5G. The manual emphasizes the importance of checking the instrument's accuracy regularly, especially before critical measuring tasks. This includes checks for levelling accuracy, vertical and horizontal line accuracy, and plumb point accuracy. If the instrument falls outside the specified tolerances during these checks, it is recommended to contact a local dealer or an authorized Leica Geosystems distributor for service.
For general care, the device should never be immersed in water. Dirt should be wiped off with a damp soft cloth, avoiding aggressive cleaning agents or solvents. The optics should be cleaned regularly to maintain optimal precision and visibility. This involves blowing off dust from the glasses without touching them directly, and if necessary, using a damp soft cloth with a small amount of pure alcohol. The interfaces between the adapter and the device should also be kept clean to ensure easy rotation. For magnetic surfaces, compressed air or modelling clay can be used for cleaning. If the equipment gets wet, it should be thoroughly dried (at a maximum of 70°C/158°F) before being repacked into its case.
The Li-Ion battery should be charged before first use. When storing the battery for extended periods, it is recommended to have a 50% to 100% charge and store it at temperatures between -20°C and +30°C (-4°F to +86°F). After one year of storage, the batteries must be recharged. Only Leica-approved chargers, batteries, and cables should be used to prevent damage or explosion.
For transport, the device should always be in the "locked" position, and the original case or equivalent packaging should be used. When transporting or disposing of Li-Ion batteries, they should be discharged by running the product until they are flat. Batteries must be protected from mechanical influences and high ambient temperatures and should not be dropped or immersed in fluids. Applicable national and international rules for battery transport and shipping must be observed, and a local passenger or freight transport company should be contacted for guidance.
Leica Geosystems recommends checking the device at least once a year to ensure its function and reliability meet standards and requirements. Users are advised never to attempt to repair the device themselves if it is damaged, but to contact a local dealer instead.
| Laser Color | Red |
|---|---|
| Laser Wavelength | 635 nm |
| Protection Class | IP54 |
| Number of Laser Lines | 2 |
| Power Supply | 4 x AA batteries |
| Operating Time | Up to 15 hours |
| Operating Temperature | -10°C to +50°C |
| Storage Temperature | -20°C to +70°C |