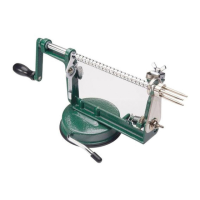
LEM
A
pp
l
e
/
P
o
t
a
t
o
Peeler
Use
&
Care
I
n
s
t
r
u
c
t
i
o
n
s
CAUTION! Please
be careful when handling
t
h
i
s
machine - blades are
e
x
p
o
s
e
d
.
SET
U
P
1.
S
ec
ur
e
machine
onto
a
c
l
e
a
n
,
d
r
y
,
s
moo
t
h
s
ur
f
a
ce
,
such as a
counter
or table
t
o
p
,
by
turning the
lever on
the
s
u
c
t
i
on
b
a
s
e
.
2.
Using a
s
c
r
e
wd
r
i
v
e
r
,
attach crank handle
with the
screw
provided
to the
handle
a
rm
.
3. Check
the alignment
of
the
3 pronged gripper fork and
the
p
o
s
i
t
i
on
of
the
c
or
e
r
/
s
l
i
ce
r
b
l
a
d
e
.
(See
diagram
A
&
B
.
)
PEEL,
C
O
R
E, AND
S
L
I
C
E
1.
To
release
the
groove clamp push down on
the
release
s
w
i
t
c
h
,
and pull
the
crank
handle all
the
way
b
a
c
k
.
2. Push
produce securely
onto the
3 pronged gripper
f
or
k
.
3.
Turn
the
crank handle
until the
produce comes in
contact with the
b
l
a
d
e
.
If
n
ece
ss
a
r
y
,
change
the depth at
which
the
blade peels
the
produce by loosening
the
wing
nut
on
t
h
e
peeler blade and
a
d
j
u
s
t
the
gap
between the
blade and blade shelf
l
i
p
.
(See
diagram
C
.
)
NOTE:
A
little
a
d
j
u
s
t
m
e
n
t
goes a long
w
a
y
.
4.
To remove an apple
c
or
e
,
release
the
groove clamp and firmly pull back on
t
h
e
crank
h
a
n
d
l
e
.
The
apple core will pop off
the
gripper
f
or
k
.
C
O
R
E AND SLICE
ONLY
Carefully pull back on peeler arm and flip
the retaining latch
in place
to
hold
the
p
ee
l
e
r
arm in
p
l
a
ce
.
Leave c
or
e
r
/
s
l
i
ce
r
blade in
p
o
s
i
t
i
on
.
PEEL
ONLY
Loosen
the
c
or
e
r
/
s
l
i
ce
r
blade wing
nut
and slide
the
c
or
e
r
/
s
l
i
ce
r
b
l
a
d
e
out
of
the
way and
retighten the
wing
nu
t
.
C
L
E
A
N
I
N
G
Immediately after
use,
rinse
the
machine
with
warm water and dry at
on
ce
.
THIS MACHINE IS NOT DISHWASHER SAFE.
Handwash
on
l
y
.
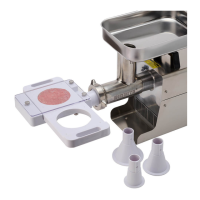
CHANGING THE
B
L
AD
ES
C
O
R
ER
/
S
L
I
C
ER
B
L
AD
E
1.
When
attaching
t
h
i
s
blade
to the
f
r
a
m
e
,
make
sure
the
3 prong gripper fork is
a
ll
the
way forward by releasing
the
groove
c
l
a
m
p
.
2.
C
e
n
t
e
r
c
or
e
r
/
s
l
i
ce
r
blade over
the
3 prong gripper fork and
tighten the
wing
nu
t
.
(See
diagram
A.) NOTE:
It
is very
important to attach the
blade
with the
coring ring
f
a
c
i
ng
ou
t
,
not toward the p
rong
s
.
(See
diagram
B
.
)
PEELER
B
L
AD
E
Loosen
the
wing
nut to
replace or
a
d
j
u
s
t
the
b
l
a
d
e
.
The
blade can be
a
d
j
u
s
t
e
d
for
m
i
n
i
mum
to
maximum peel
t
h
i
c
k
n
e
ss
.
(See
diagram
C
.
)
T
R
OUBLESHOOTING
LEM
A
pp
l
e
/
P
o
t
a
t
o
Peeler Use
&
Care
D
i
a
g
r
a
m
s
If you
have
q
u
e
s
t
i
on
s
or for information on
or
d
e
r
i
n
g
r
e
p
l
a
ce
m
e
n
t
p
a
r
t
s
,
p
l
e
a
s
e
contact
LEM
P
ro
d
u
c
t
s
a
t
1-877-536-7763
.
LEM
P
ro
d
u
c
t
s
West Chester, OH 45011-9767
•
PH: 877-536-7763
•
www
.
l
e
mp
ro
d
u
c
t
s
.
c
o
m