3LNX74-543.3
Carel pGD1 Digital Display/Interface Module
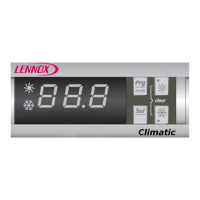
Button Features
The pGD1 has 6 buttons for control. Refer to Figure 3.1 for the
buttons and their functions:
Figure 3.1 – pGD1 Button Features
ALARM: Press once to indicate information
regarding active alarms (red if active alarms).
Press twice to reset any active manual-reset
alarms.
PRG: Press to select the main navigation menu.
ESC: Press to return to the main display screen
showing unit status.
UP: Press to either:
• Scroll through the various display screens,
providing the cursor is in the top left position.
• Increase the value of a set point adjustment.
ENTER: Press to confirm any set point
adjustments and move the cursor to the next
available set point.
DOWN: Press to either:
• Scroll through the various display screens,
providing the cursor is in the top left position.
• Decrease the value of a set point adjustment.
For detailed instructions on the how to use the pGD1, please
refer to the latest revision of the Controls Manual that shipped
with the unit.
Note: In most cases, the unit controller will automatically
recognize the pGD1 when connected. If the pGD1 is not
recognized, refer to the section "Addressing the pGD1 in the
Carel Controller" on the next page.
Addressing the pGD1 in the Carel Controller
Once the pGD1 is connected to the Carel controller, the
controller should automatically detect the pGD1. If it doesn't,
the address must be set as follows:
1. Press and hold down the UP+DOWN+ENTER buttons
simultaneously until “Display Address” screen is shown.
The address settings should be:
• Display: 32
• I/O Board: 1 (for PCO3, 5, or OEM+) or 2 (for PCOxs)
2. If the settings are not as shown, press the ENTER button
to go to the “Terminal Config” screen as follows:
3. Press the ENTER button again. The display will show the
terminal configuration screen, similar to the following:
4. Press the ENTER button until the cursor is underneath the
Trm1 setting. Press the UP or DOWN buttons to change
the value to 32.
5. Press the ENTER button until the cursor is underneath
Pr or Sh. Press the UP or DOWN buttons to change the
value to Pr for units without Energy Recovery (Model Digit
7=A, C, D, F, or R) or Sh for units with a Energy Recovery
(Model Digit 7=B or E).
6. Press the ENTER button until the cursor is underneath
No. Press the UP or DOWN buttons to change the value
to Yes and press the ENTER button to complete the
programming.
 Loading...