The document is an owner's manual for Lennox Comfort Series window-type room air conditioners, covering models LNWR21X, LNWR39X, LNWR53X, and LNWR59X. It provides instructions for installation, operation, and maintenance.
Function Description
The Lennox window-type room air conditioner is designed to regulate room temperature to maintain comfort levels. It can be used in various settings such as residences, shops, hotels, offices, libraries, and laboratories.
Operating Modes:
- Cooling in summer: Cools down room air by transferring heat out.
- Dehumidifying in rainy or humid season: Dehumidifies the room air without significantly reducing the room temperature, making the air dry and comfortable.
- Heating in winter (Only for heat units): Heats up room air.
- Exchange fresh air: Allows fresh air into the room by opening a storm door.
Operating Conditions:
- COOL mode: Operates efficiently when ambient temperature is between 18°C and 43°C. Humidity inside the room should be below 90% to prevent excessive condensation.
- DRY mode: Operates efficiently when ambient temperature is between 18°C and 43°C.
Important Technical Specifications
Power Requirement:
- Rated voltage: 230V~.
- Voltage fluctuations: High voltage can damage electrical components. Low voltage can cause the compressor to vibrate violently, damaging the refrigerant system and electrical components.
- Grounding: The unit must be properly grounded. A special socket conforming to local wiring regulations and a reliable earthing method must be used.
- Fixed circuit: Requires an electricity leakage protection switch of sufficient power capacity and an air switch with adequate space.
- Earth wire: Do not connect the earth wire to water pipes to ensure reliable earthing.
- Wiring: All electrical work must comply with local wiring regulations. An all-pole disconnection switch with a contact separation of at least 3mm in all poles should be connected in fixed wiring. An air switch (thermal-magnetic breaker) should be installed in the circuit. If the supply cord is damaged, it must be replaced by a qualified professional to avoid hazards.
Installation Clearances:
- Upper: 300mm
- Lower: 1500mm
- Left: 500mm
- Right: 500mm
- Front: 1500mm
Installation Slant:
- The unit should be slanted down to the back (6-10mm) to avoid increased noise or vibration and to facilitate drainage.
Usage Features
Remote Controller Description:
- ON/OFF button: Starts or stops operation.
- MODE button: Selects operation mode (AUTO/COOL/DRY/FAN/HEAT).
- Temperature adjustment buttons (+/-): Decreases or increases temperature setting. Holding for 2 seconds allows rapid adjustment. Not adjustable in AUTO mode.
- FAN button: Sets fan speed (AUTO, Speed 1, Speed 2, Speed 3, Speed 4).
- SWING button: Activates or deactivates the swing function.
- SLEEP button: Enters/exits SLEEP operation mode. Available in COOL, HEAT (for heating function models), or DRY mode to maintain comfortable temperature.
- TIMER button: Initiates auto-on/auto-off timer. Pressing twice cancels the program.
- Lock function (combination of "+" and "-" buttons): Locks or unlocks the keypad.
- Temperature unit switch (combination of "MODE" and "-" buttons): Switches between °C and °F when the unit is OFF.
- Lamp control (combination of "+" and "FAN" buttons): Turns the lamp on or off. Default is on after energizing.
Remote Controller Battery Replacement:
- Remove the battery cover plate from the rear.
- Remove old batteries.
- Insert two new AAA1.5V dry batteries, observing polarity.
- Reinstall the battery cover plate.
- Note: Do not mix old and new batteries or different types. Remove batteries if not used for a long time to prevent leakage. Ensure operation within receiving range and avoid interference from other infrared sensing equipment. If the remote controller malfunctions, remove and reinsert batteries after 30 seconds; if it persists, replace batteries.
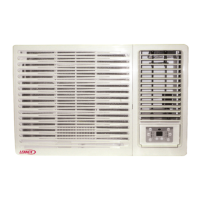
Control Panel (Manual Operation):
- ON/OFF BUTTON: Starts/stops operation.
- SWING BUTTON: Activates automatic air swing.
- FAN SPEED BUTTON: Selects fan speed (HIGH, MID, LOW, AUTO).
- TIME/TEMP BUTTON: Increases/decreases set temperature (16-30°C) or selected time (0-24 hours) in 1-hour increments.
- SIGNAL RECEIVER: Receives signals from the remote controller.
- MODE BUTTON: Selects operation mode (AUTO, COOL, DRY, FAN, HEAT for reverse cycle models or AUTO, COOL, DRY, FAN for cooling-only models).
- FILTER BUTTON: Reminder to clean the air filter after 250 hours of operation. The LED illuminates. Pressing the button for 3 seconds resets the timer and turns off the light.
Ventilation Lever:
- "OPEN" position: Opens the ventilation door to expel air, smoke, or odors from the room.
- "CLOSE" position: Closes the ventilation door, circulating and conditioning the air inside the room.
Operation Tips for Comfort and Economy:
- Avoid overcooling to save electricity and for health.
- Keep blinds or curtains closed to prevent direct sunlight when the AC is on.
- Adjust vertical and horizontal airflow to ensure uniform room temperature.
- Keep doors and windows tightly closed to maintain indoor temperatures.
- Clean the air filter regularly (at least every two weeks) to maintain dehumidifying effects.
- Ventilate the room occasionally by opening windows.
- Close curtains or windows when starting the unit to prevent heat/cool leakage.
Safety Precautions:
- The plug must be accessible after positioning the appliance.
- Do not use the appliance in the laundry.
- If the power cord is damaged, it must be replaced.
- Do not pull the power cord forcefully to avoid electric shocks.
- Use the air conditioner only for room air conditioning; do not use it for drying clothes, preserving food, or cultivating vegetables.
- Do not block air intake and outlet vents to avoid reduced performance and irregular operation.
- Do not insert sticks or other objects into vents to avoid touching electric components and the fan.
- Maintain an appropriate temperature in rooms occupied by infants, the elderly, or the sick.
- Avoid using heating apparatuses nearby, as plastic parts may melt.
- Avoid prolonged direct exposure to a continuous unidirectional airflow for health reasons.
- Always wait at least 3 minutes before restarting the air conditioner after turning it off during cooling or heating.
Maintenance Features
Cleaning Unit:
- Cut power off: Always unplug the unit after it stops completely before cleaning.
- Clean cabinet: Use a soft cloth. For very dirty cabinets, dip the cloth in warm water (below 40°C), wring it dry, and then wipe off the dirt.
- Avoid harsh chemicals: Do not use gas, benzene, solvent, or other chemical solvents for cleaning.
- Avoid splashing water: Do not splash water directly into the indoor unit, especially on micro-computer and circuit plate parts.
Air Filter Cleaning:
- The air filter behind the intake grille should be washed at least once every two weeks or as often as needed.
- Remove filter: Grasp the tab on the filter and pull it out.
- Remove dust: Vacuum the dusty side of the filter to remove light dust.
- Wash filter: Wash the filter, cleaner side up, under gently flowing water to remove accumulated dust and lint. For very dirty filters, use a mild household detergent.
- Dry and reinstall: Let the filter dry thoroughly before reinstalling. If necessary, consult professional personnel for cleaning.
Checks:
- Check the earth wire for damage or looseness.
- Check if the air inlet and outlet of the outdoor unit are blocked, as this can lead to bad efficiency.
Troubleshooting Guide:
- Unit not operating: Check for power failure, unplugged plug, or incorrect voltage.
- Poor cooling/heating efficiency: Check for blocked air inlet/outlet, other heat/cool sources, dirty air filters, or low indoor fan speed. The room might have been too hot/cool when the unit started.
- Foggy air flow: Normal in COOL mode due to rapid cooling of humid room air.
- Odor from indoor outlet: Normal if inlet air mixes with smells from furniture or smoke.
- Noisy operation: Water flowing sound indicates freon flow. Shower-like sound indicates dehumidifying water processing. For other noises, contact a technician.
- Condensation leakage: Normal when airflow cools warm room air.
- Unit not operating for 3 minutes after restart: This is a protective mechanism; wait for operation to begin.
After Service:
- Contact Lennox service center at 13 23 50 if there are quality issues or other problems.
- Immediately stop operations, unplug the unit, and contact the dealer if:
- Operation starts or stops abnormally.
- Power fuse or switch often trips.
- Water or other substances are splashed into the air conditioner.
- Electrical lines are hot or their covers are broken.
- Any other strange situations occur.