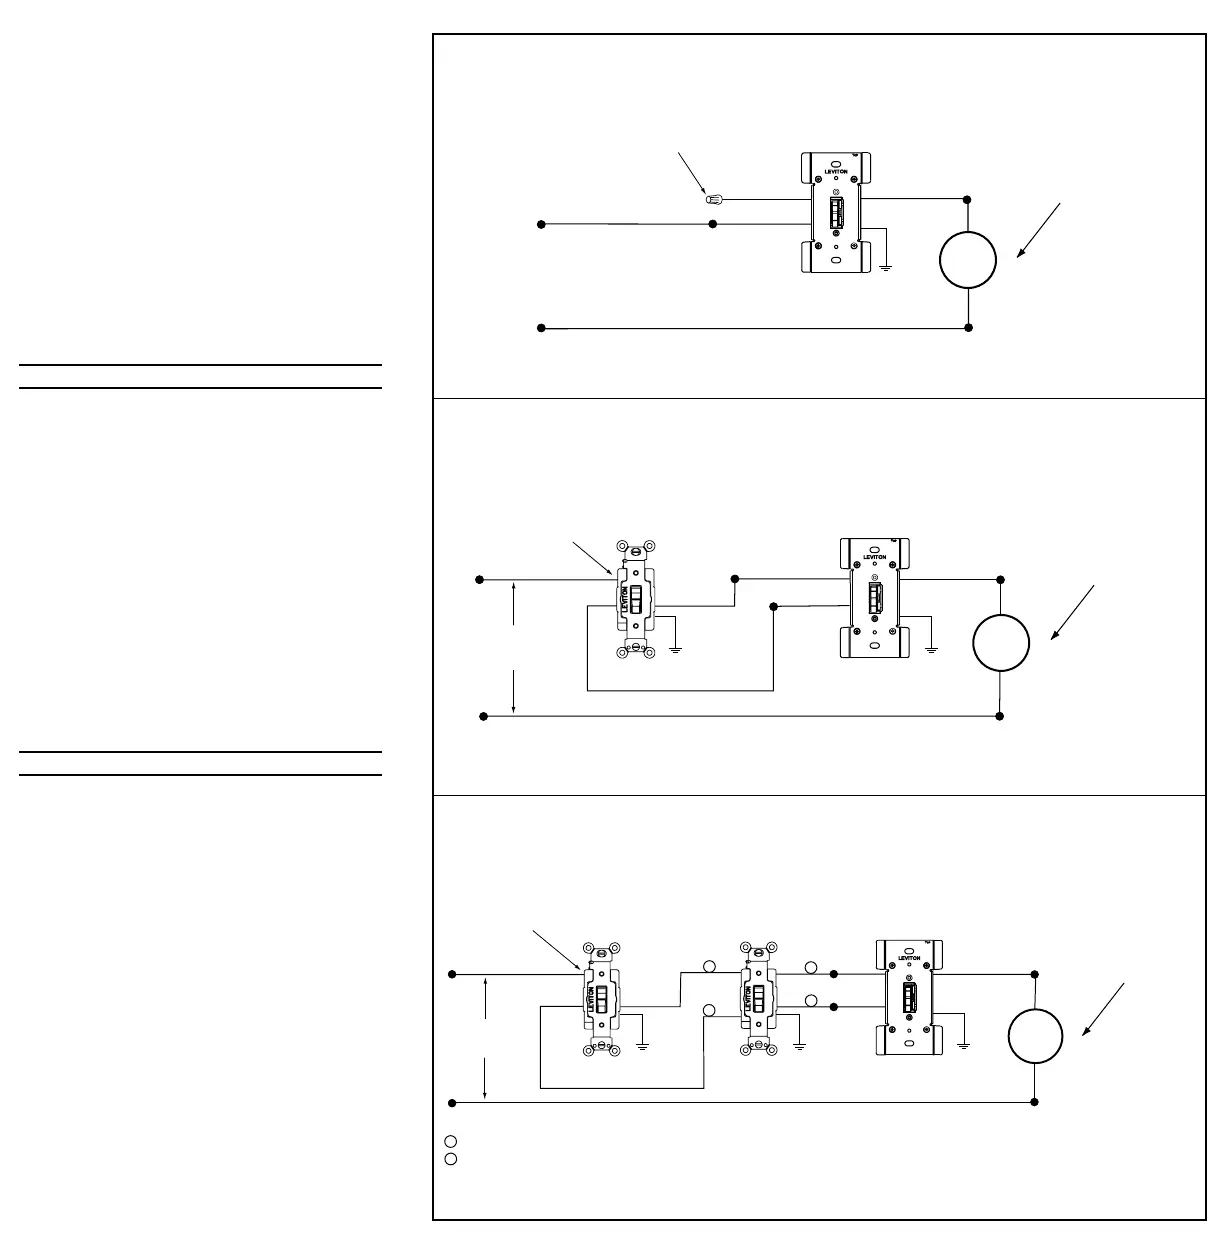
Hot (Black)
Neutral (White)
Load
Dimmer
Blue
Red
Green
Ground
Black
White
Black
Line
120VAC, 60Hz
Cap with
Wire Connector
(OR PRIMARY SIDE OF
MAGNETIC LOW-VOLTAGE
TRANSFORMER)
}
Wiring Diagram 1 - Single Control Application
Hot (Black)
Neutral (White)
Load
Dimmer
3-Way Switch
Red
Black
Green
Ground
Green
Ground
Black
White
Blue
Line
120VAC, 60Hz
Common
Terminal
(Black Screw)
(OR PRIMARY SIDE OF
MAGNETIC LOW-VOLTAGE
TRANSFORMER)
}
Wiring Diagram 2 - Two Location Control Application
Hot (Black)
Neutral (White)
Load
Dimmer
3-Way Switch
Red
Black
Green
Ground
Green
Ground
Black
White
Blue
Line
120VAC, 60Hz
Common
Terminal
(Black Screw)
4-Way Switch
Green
Ground
1
1
Travelers between switches "IN"
Travelers between switches "OUT"
2
1
2
2
(OR PRIMARY SIDE OF
MAGNETIC LOW-VOLTAGE
TRANSFORMER)
}
Wiring Diagram 3 - Three Location Control Application
making sure that no bare conductor shows below the
wire connectors. Secure each connector with electrical
tape.
NOTE: For single pole applications, cap RED lead
with an appropriate size wire connector. Secure
connector with electrical tape.
5. Carefully position all wires to provide room in outlet
box for dimmer. Mount dimmer into box with mounting
screws supplied.
6. Restore power at circuit breaker or fuse. Check for
proper operation by turning ON the toggle switch and
pressing the upper touch plate. Verify that the lights
turn ON. If lights do not turn ON, go to the
Troubleshooting section. If lights turn ON and function
properly (see To Operate section), TURN OFF
POWER and replace wallplate.
7. Restore power at circuit breaker or fuse.
INSTALLATION IS COMPLETE.
TO OPERATE:
ON: Single Pole - Operate toggle UP.
3-Way - Operate toggle UP or DOWN until LED
turns OFF.
OFF: Single Pole - Operate toggle DOWN.
3-Way - Operate toggle UP or DOWN until LED
turns ON.
BRIGHTEN: Touch and hold the UPPER touch plate of
the dimmer until light intensity reaches the
desired BRIGHTNESS level.
DIM: Touch and hold the LOWER touch plate of
the dimmer until light intensity reaches the
desired DIM level.
ON/OFF LED (Lighted Version): When Lights are ON,
LED is OFF.
When Lights are OFF,
LED is ON.
CLEANING: To clean touch plate, wipe it with a
clean damp cloth using clean water
only, dry thoroughly.
TROUBLESHOOTING
• Light does not turn ON and ON/OFF LED does not
turn ON
- Circuit breaker or fuse has tripped.
- Lamp is burned out.
- Lamp is not connected to line Neutral.
• Dimmer does not operate (lights do not dim or
brighten)
- Dimmer BLACK wire miswired to lamp and
Dimmer BLUE wire miswired to LINE Hot.
• Lights Flickering
- Lamp has a bad connection.
- Lamp power is less than 40W or 40VA.
PK-92952-10-00-0A 2/24/2000, 9:59 AM2
 Loading...